Alerts
Use Alerts to hear about licensing problems before users report them: a license server that stops responding, a network license pool that is filling up, a license about to expire, a directory sync that failed. You define rules for the conditions you care about. Alerts records every alert, emails the recipients you chose, and shows you at a glance what fired and which products still have no rules.
To see what fired, review rules, or change how alerts are delivered, open the matching page:
- Overview: See what fired in the selected period, how your OpenLM license is doing, and which products still have no alert rules.
- Alert Rules: Define conditions that prompt an alert, and the email recipients to notify when it fires.
- Alert log: on the Alerts page, review every alert that has fired.
- System Events: Review informational events that OpenLM services report automatically.
- Notifications: configure how alerts are delivered (email or ticket).
Use alerts to move from reactive troubleshooting to proactive monitoring of your licensing environment.
Before you begin
Confirm these prerequisites:
- You have an Alerts viewer or administrator role. Viewers get read-only access. Creating or editing rules, deleting alerts or system events, and changing notification settings all require the administrator role.
To open Alerts, select Navigation (the grid icon in the OpenLM Platform header), then Platform Administration, then Alerts.
For related tasks, see Notifications.
Overview page
To see at a glance what has fired, how your OpenLM license is doing, and where you still have no rules, open Overview. It is the page Alerts opens on. The following screenshot shows the Overview page:
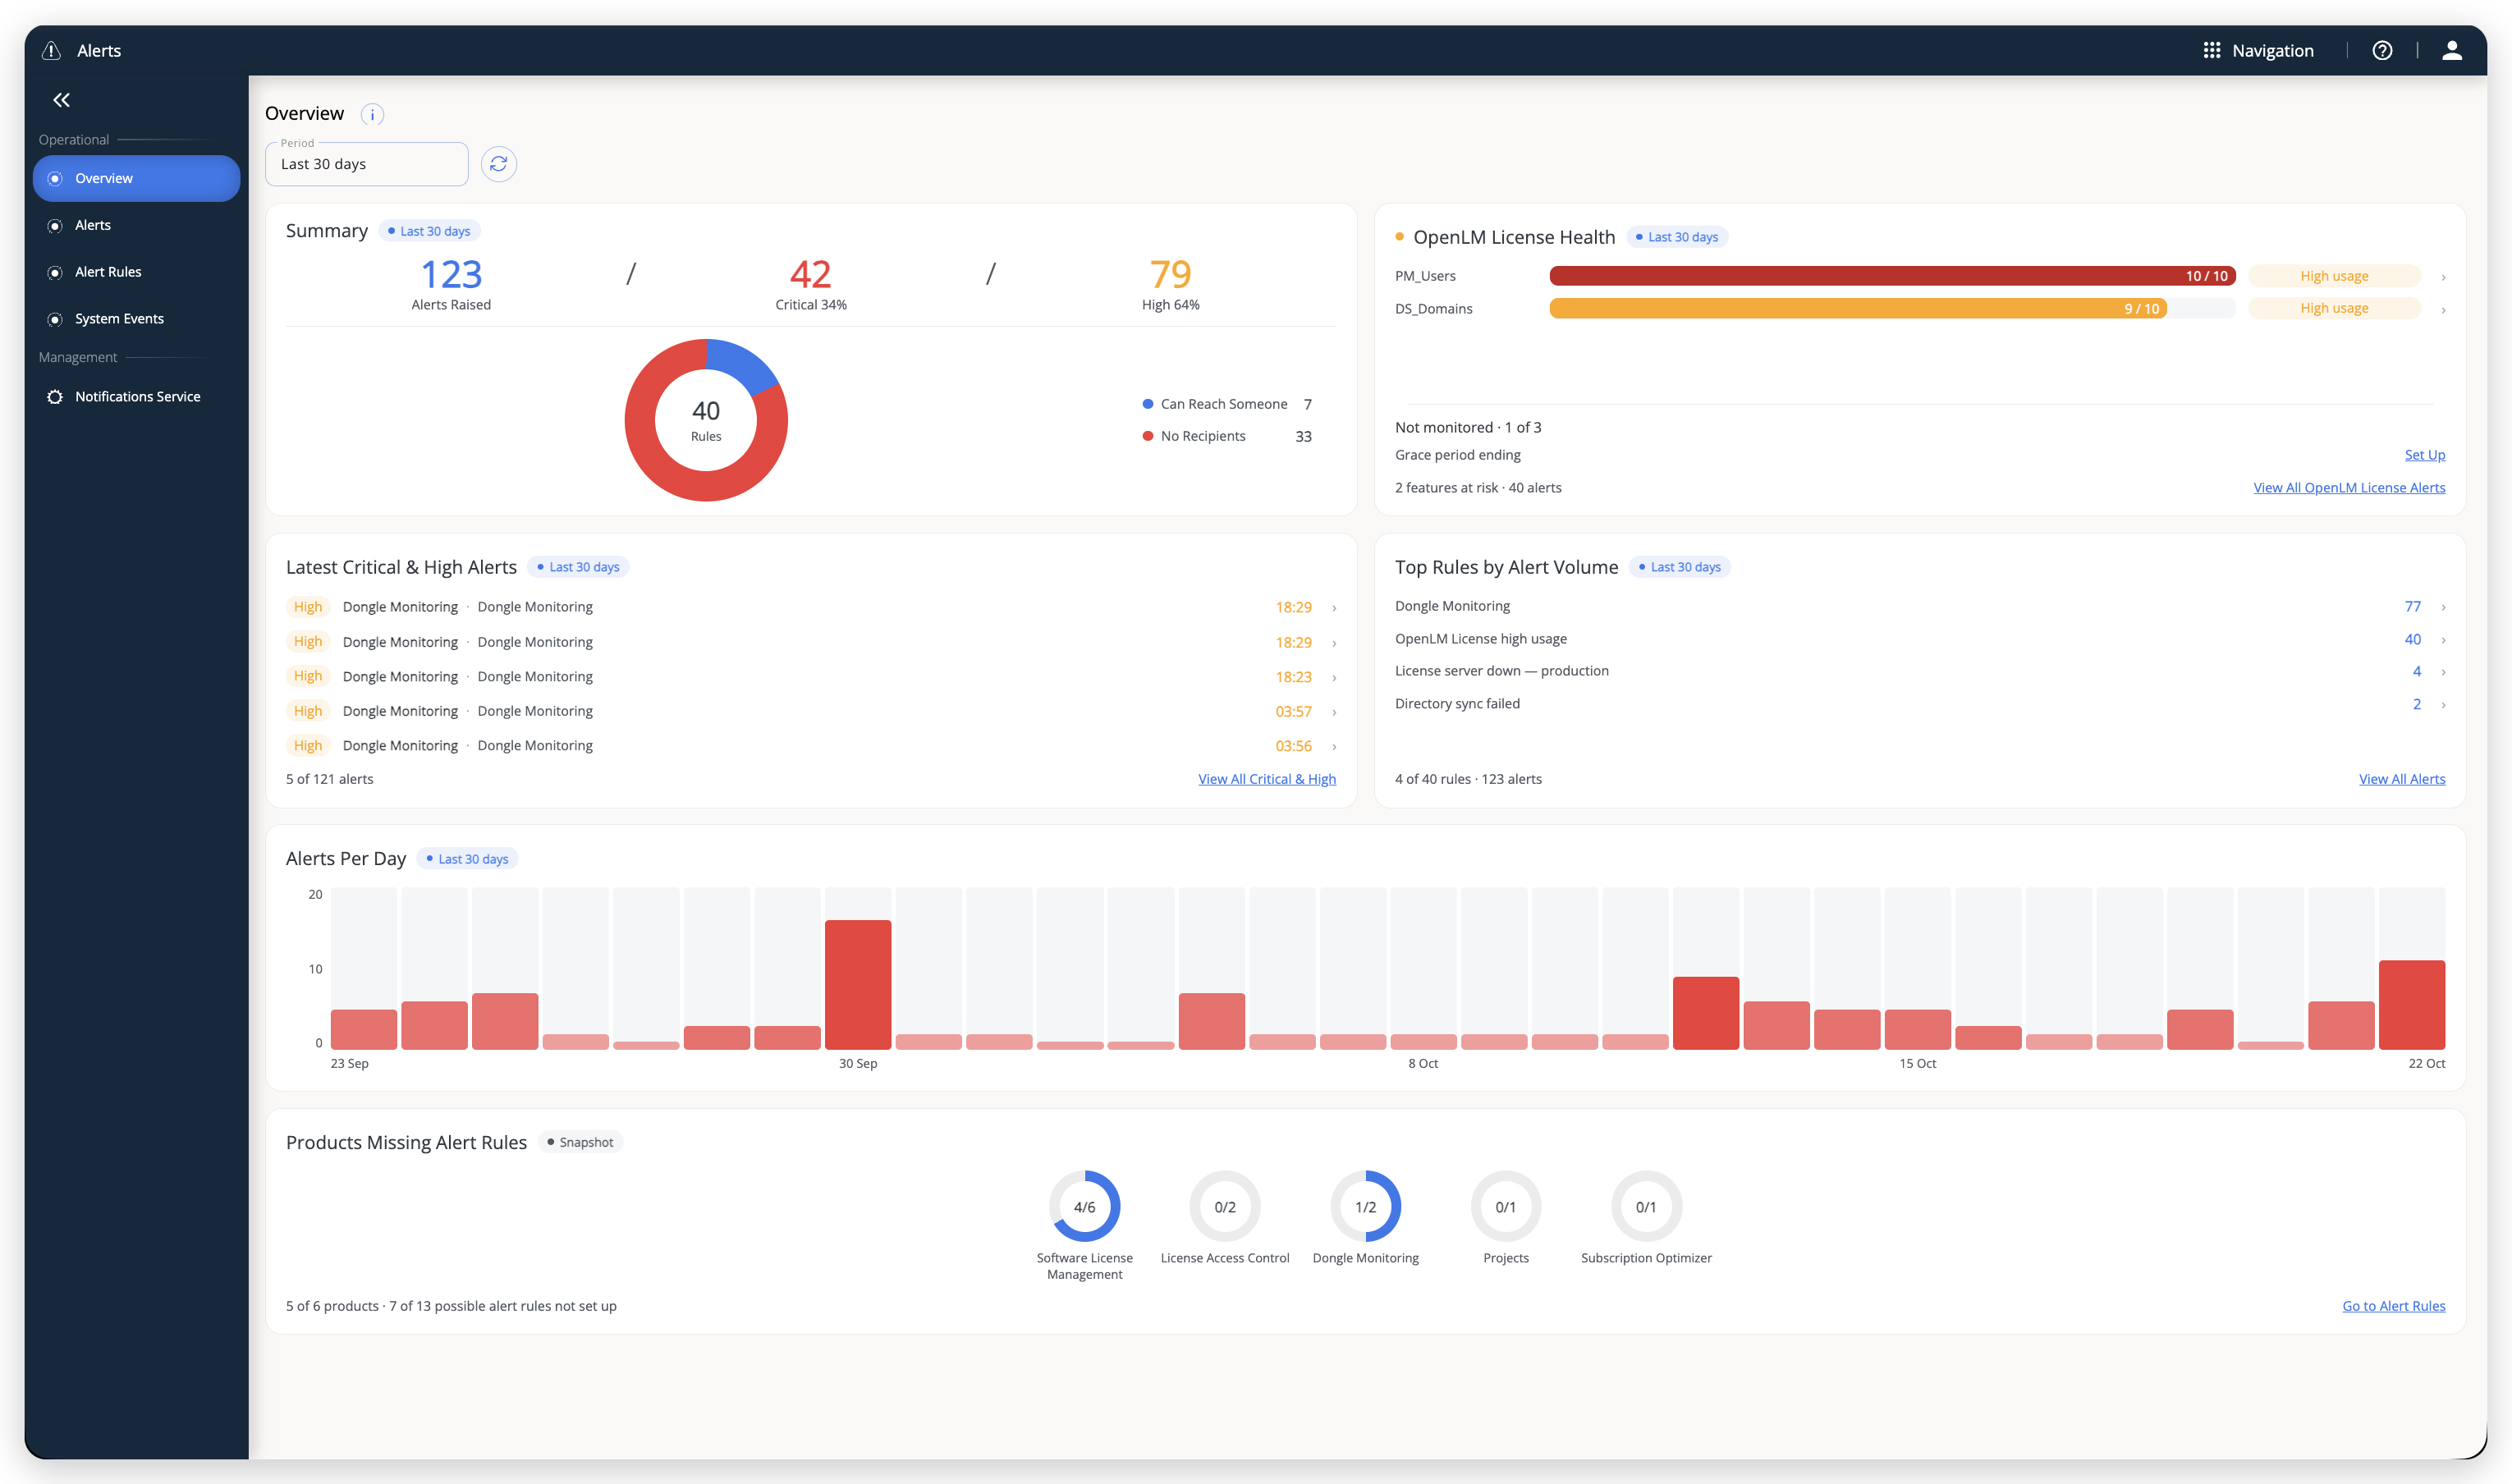 Overview answers three questions at once: what fired, how your OpenLM license is holding up, and which products nobody is watching.
Check what fired
On the Overview page, you can do the following:
- Set the Period (Last 7, 14, 30, or 90 days, with 30 as the default). Every card with a period chip follows it. Products Missing Alert Rules is a Snapshot of your current configuration, so the period doesn't change it.
- To see how many alerts fired, the share of Critical and High ones, and how many of your rules can reach someone, read the Summary. A rule with no recipients fires without telling anyone, so the donut counts those rules as No Recipients. Select Alerts Raised, Critical, or High to open those alerts, or select Can Reach Someone or No Recipients to open those rules.
- Check OpenLM License Health: the usage of each OpenLM license feature, the OpenLM License conditions you don't monitor, and a Set Up link (administrators only) that opens the Add Rule form with that condition preselected.
- Scan Latest Critical & High Alerts and Top Rules by Alert Volume, and read Alerts Per Day for the trend.
- Find the products you activated that still have no rules in Products Missing Alert Rules.
- Select a row in a list, a feature bar, or a bar in the chart to open the Alerts page filtered to it. The card footers (View All OpenLM License Alerts, View All Critical & High, View All Alerts, Go to Alert Rules) open the full lists. When the Alerts page opens from Overview, the period shows as a filter.
Alerts page
To see what has fired and why, open Alerts. It lists every alert that any OpenLM service raised. The following screenshot shows the Alerts page:
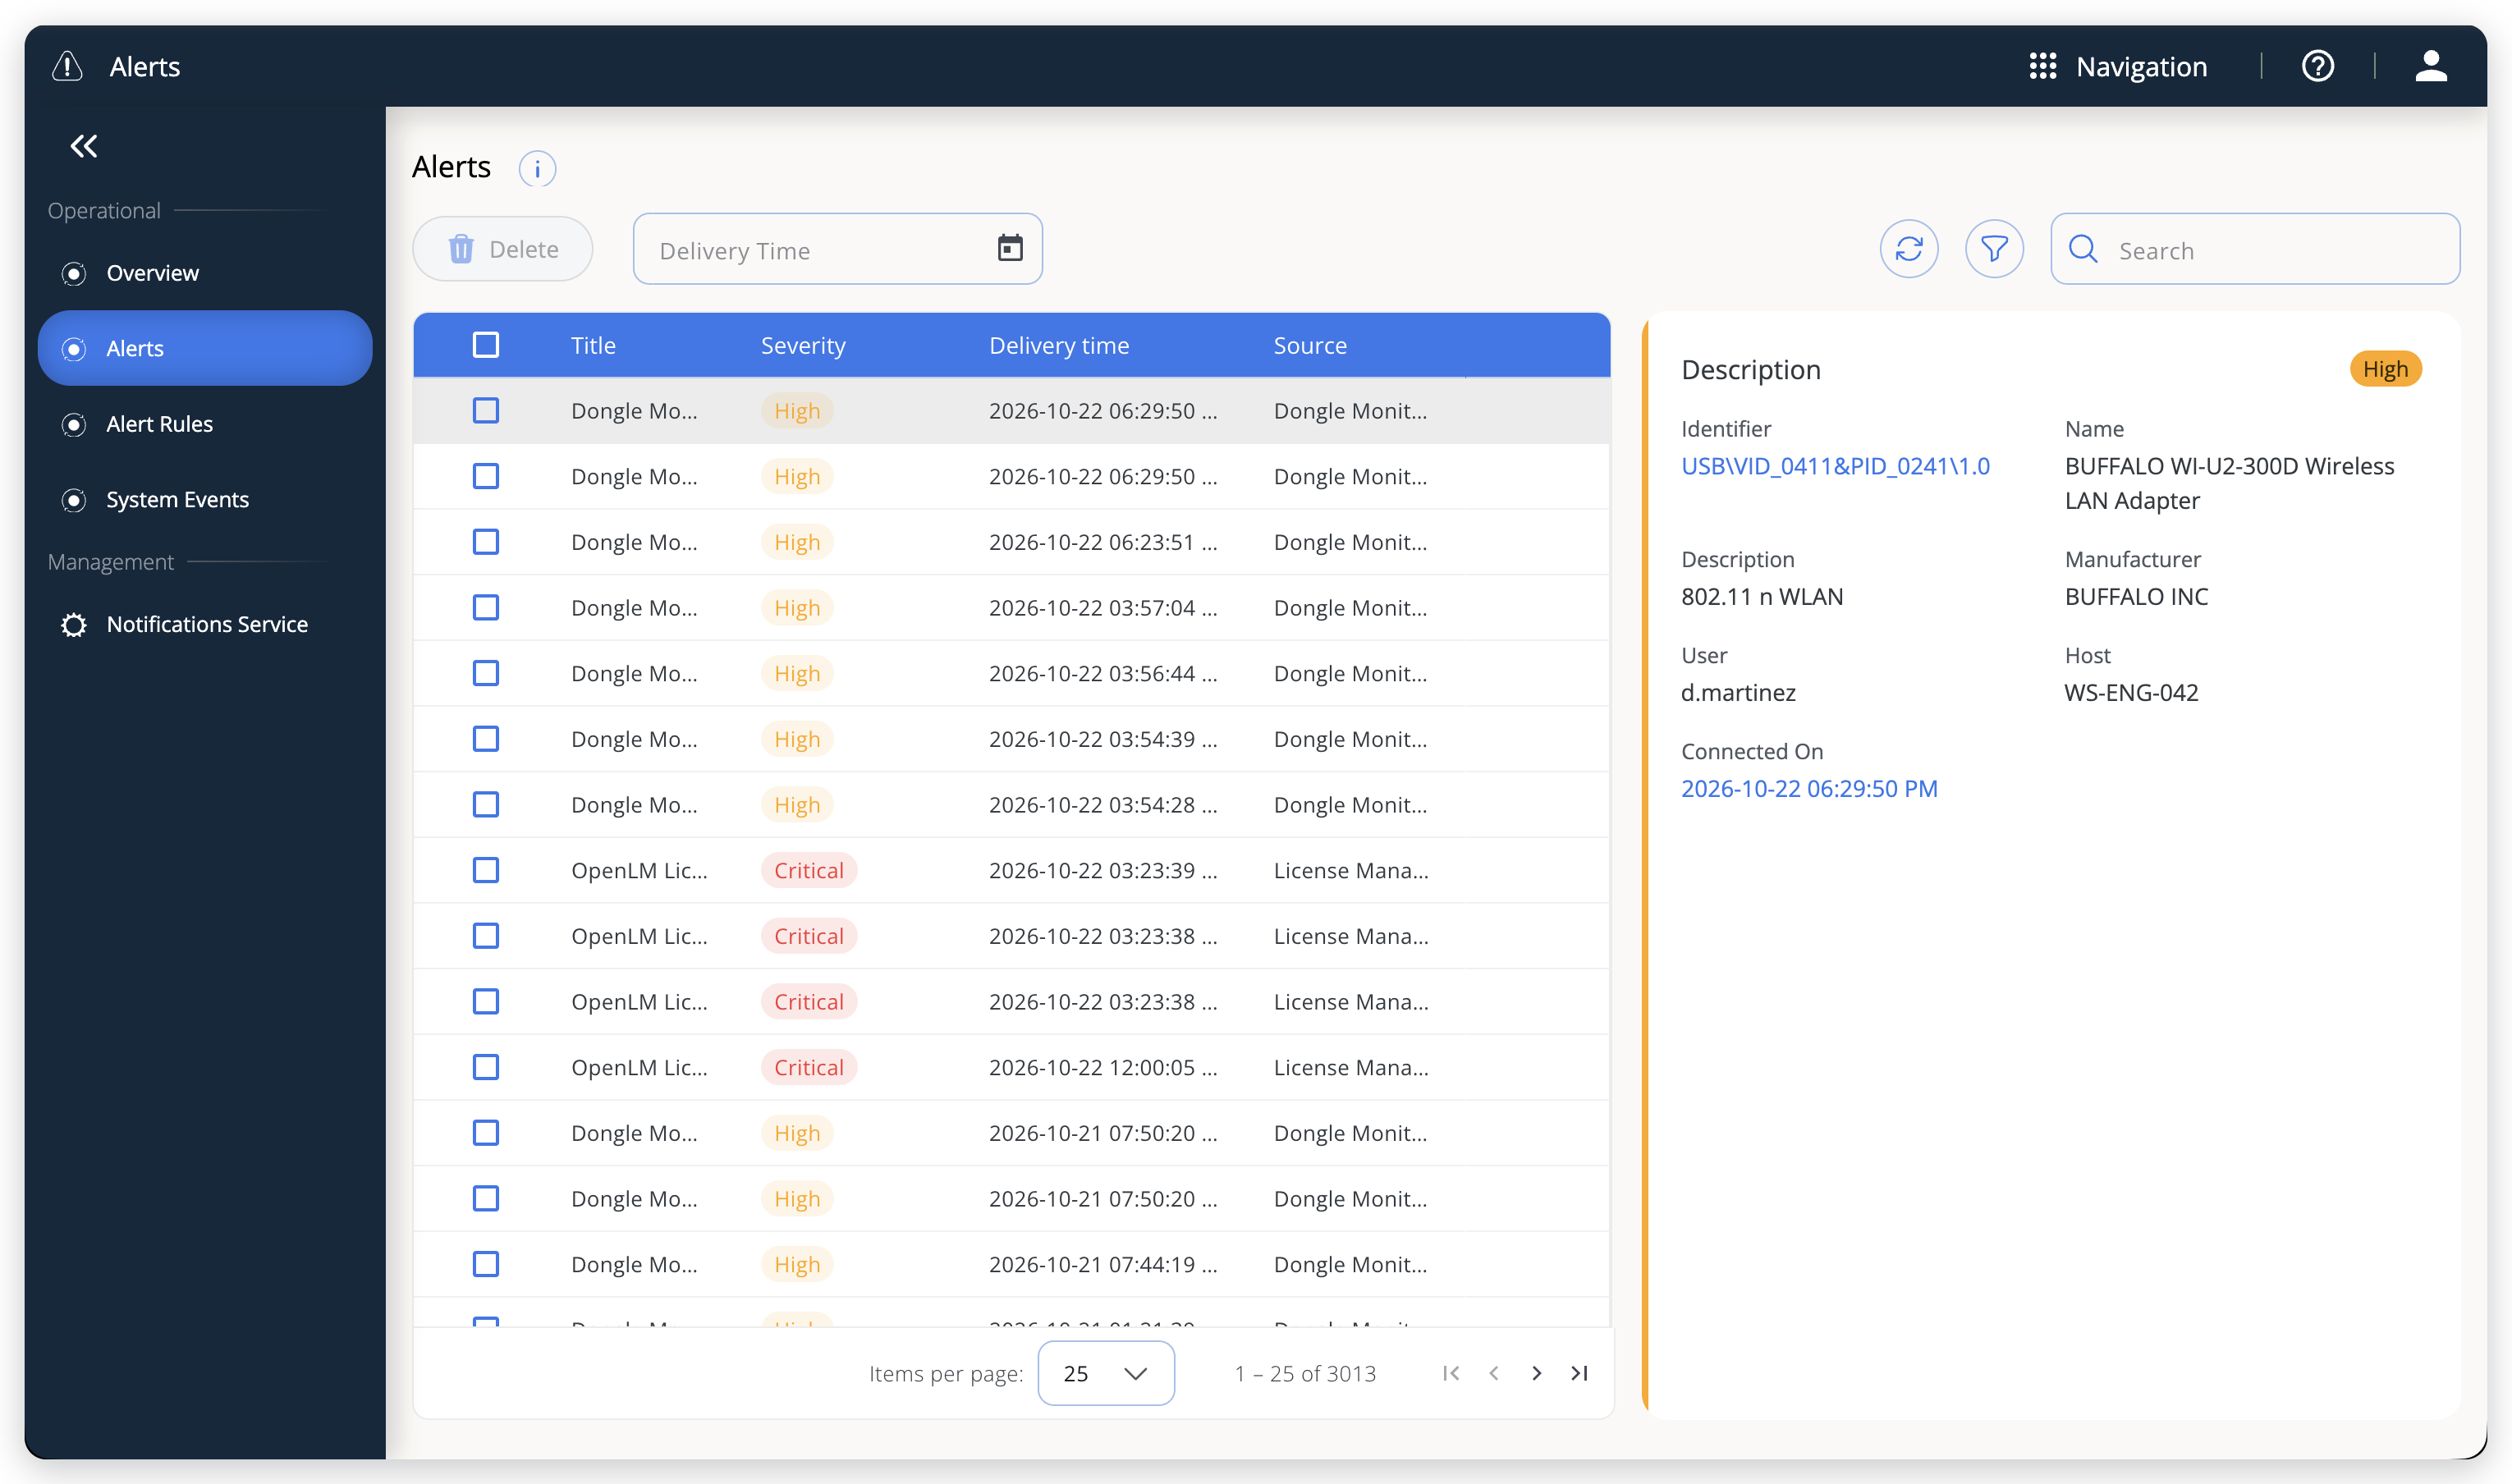 Selecting an alert opens its full description, where values link through to the record that caused it.
Review and manage alerts
On the Alerts page, you can do the following:
- Read the alert messages that OpenLM services generate. Each alert shows a Title (the name of the rule that raised it), its Severity, the Delivery time, and the Source service that reported the condition.
- Filter by time, source, severity (Critical, High, Medium, or Low), or title. Select Toggle Filters (the funnel icon) if the filter bar is hidden, then select Add Filter and select Title, Severity, Source, or Delivery Time. Each filter appears in the bar as a chip.
- Search alerts by title or description text using the search box.
- Select an alert to view its full description, origin, and time. The Description panel shows the alert's structured details. For example, a dongle alert lists the device identifier, name, manufacturer, user, host, and connection times. The first alert in the list is selected automatically.
- Follow the links in the Description panel to the record behind the alert:
- A dongle identifier opens Dongle Monitoring.
- A feature opens Licenses (or License Manager, for OpenLM License alerts).
- A license server opens License Servers.
- A sync definition or agent opens Directory Sync.
- If the alert was emailed, check the Notified drawer at the bottom of the Description panel to see who received it.
- Delete alerts you no longer need: check their rows and select Delete (administrators only). Alerts are also deleted automatically after a retention period (90 days by default).
Use Alerts to review current and past issues in your environment, such as a license server going down, licenses approaching expiration, or a blacklisted dongle connecting to a workstation.
Alert Rules page
To decide what OpenLM watches for and who hears about it, open Alert Rules. The following screenshot shows the Alert Rules page:
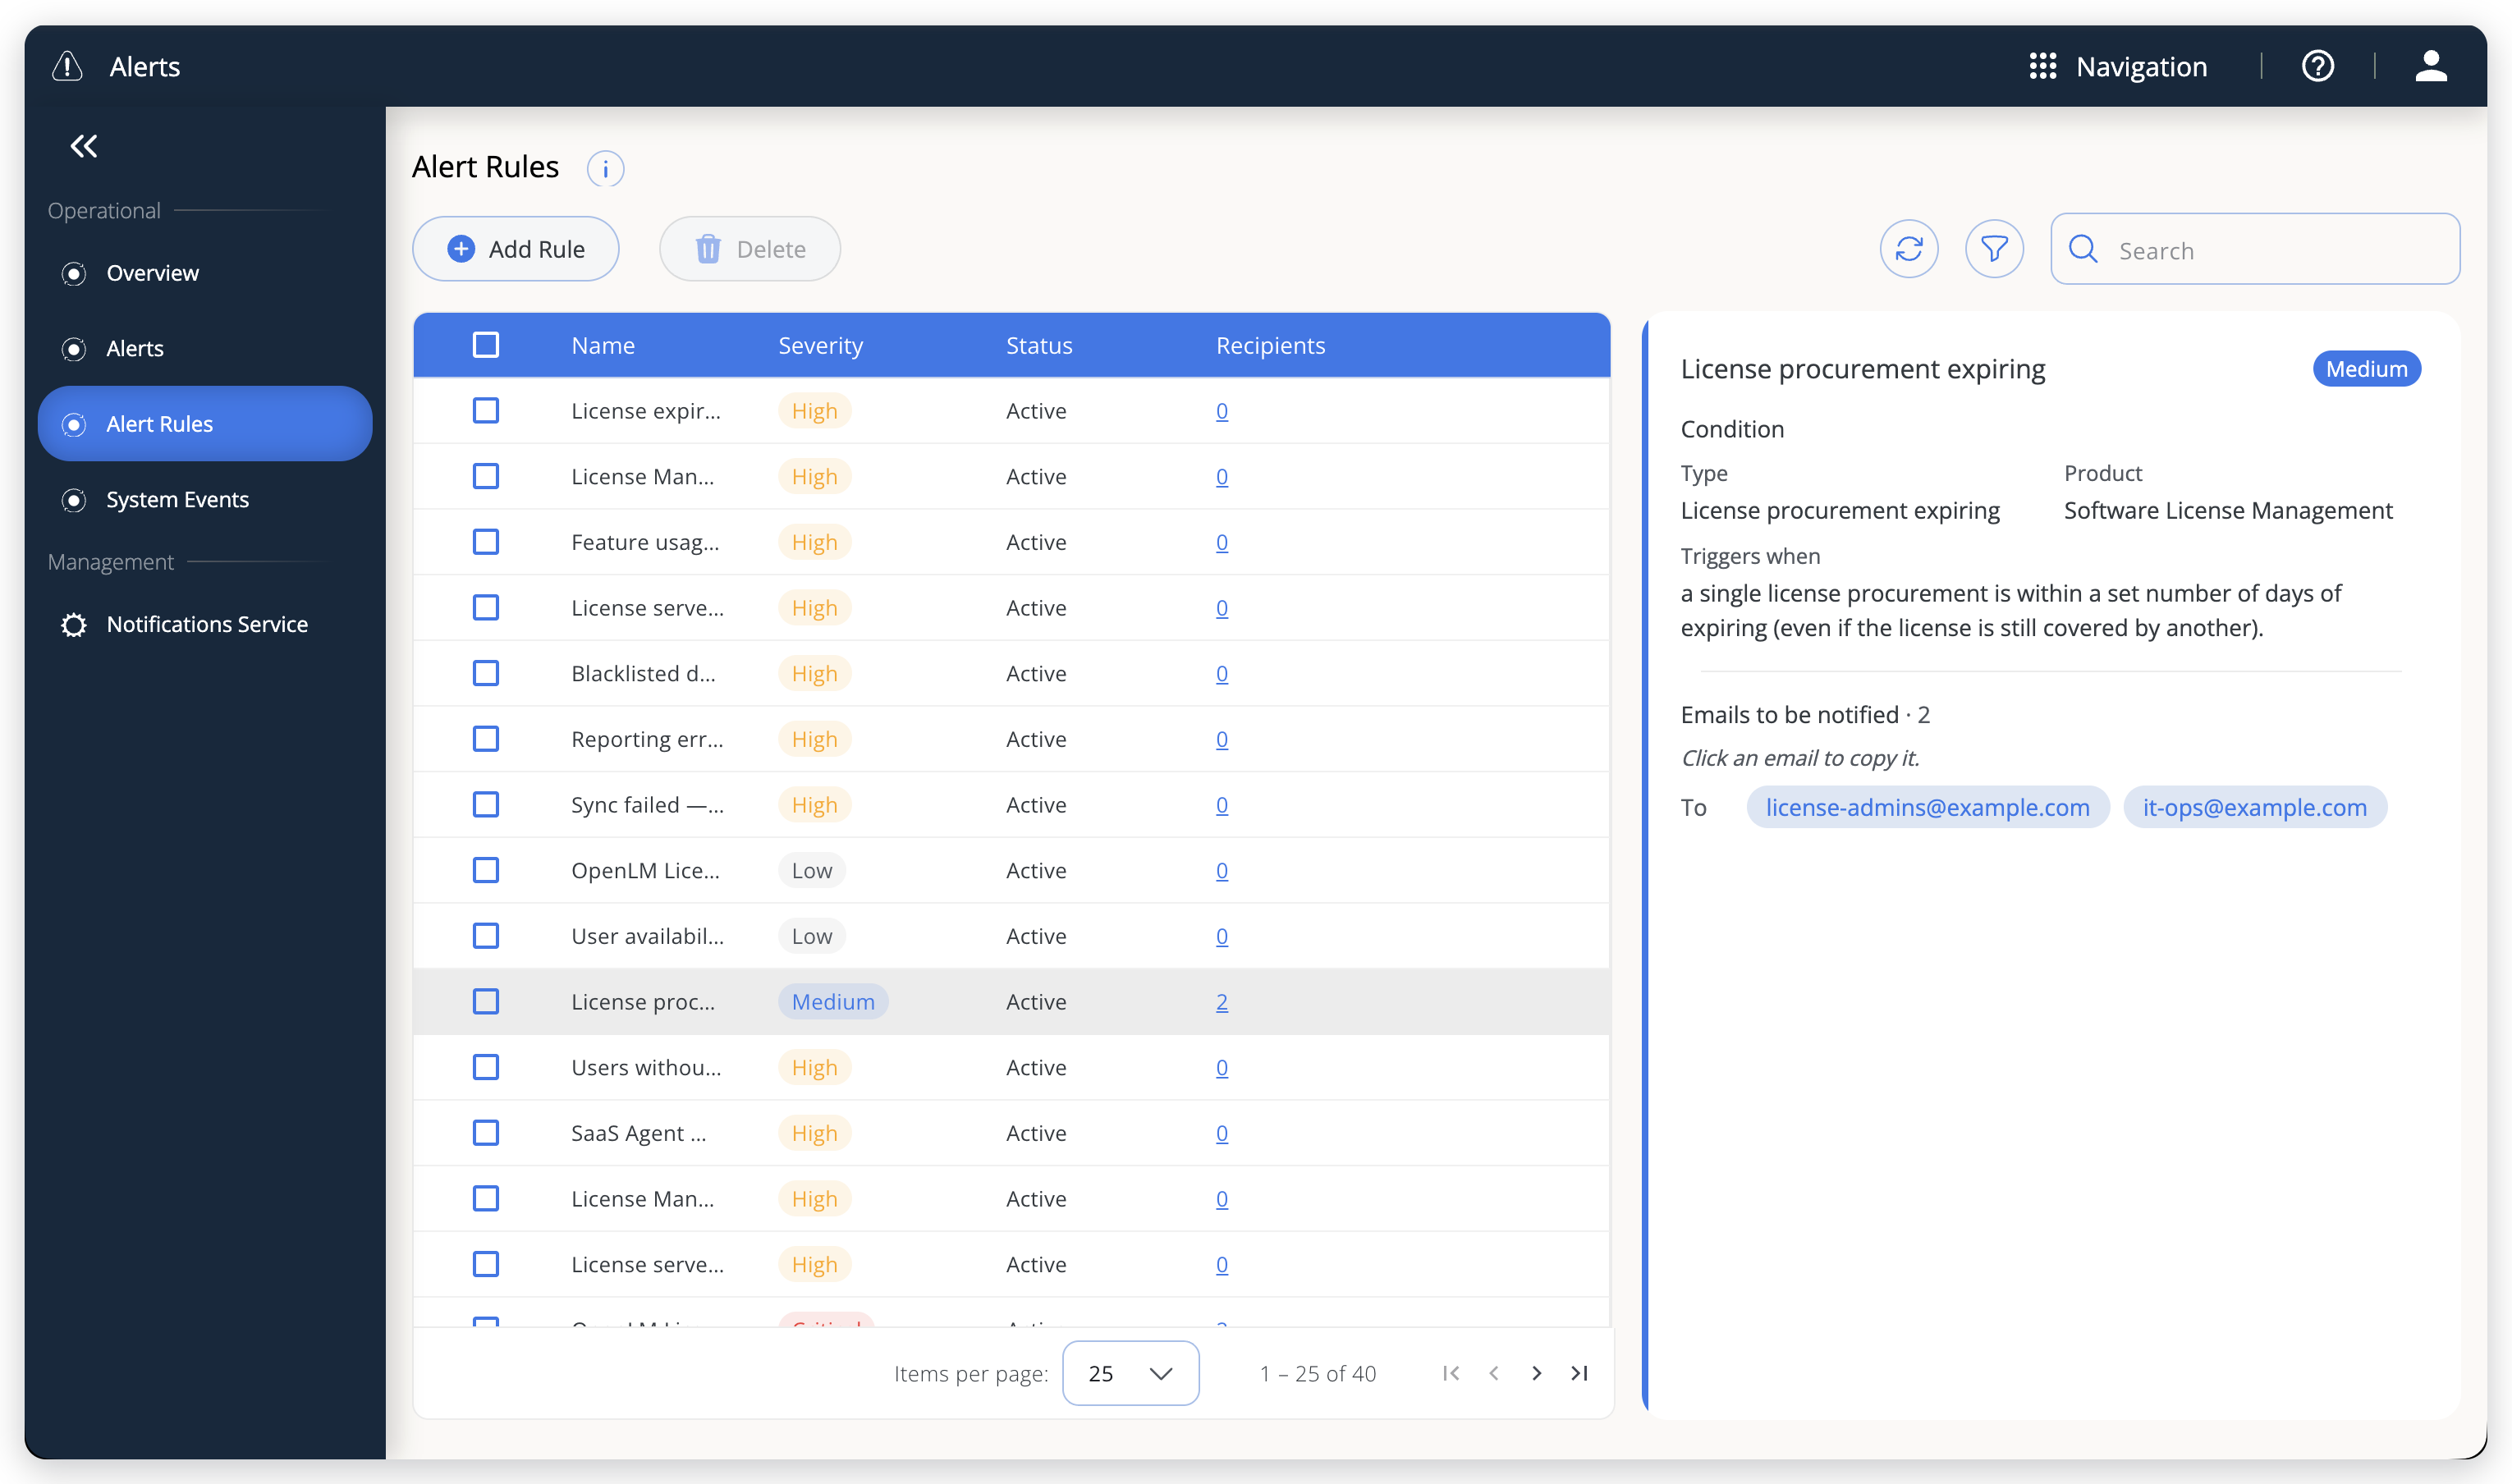 The details panel shows what a rule watches for and who hears about it, without opening the editor.
Manage alert rules
On the Alert Rules page, you can do the following:
- View existing rules by name and severity. The grid also shows each rule's Status (Active or Inactive) and the number of email Recipients attached to it. Select the number to open the rule's recipient list.
- Turn rules on or off with the Enabled toggle in the rule editor. The Status column of the grid reflects the result.
- Filter and search the rule list. In the filter bar, narrow the rules by Severity, Service, Status, or Recipients. Search matches both rule names and condition names.
- Add rules by selecting from the predefined conditions.
- Select a rule to review its condition and recipients in the details panel, or select the pencil icon (Edit Rule) to modify it.
- Delete rules by checking their rows and selecting Delete (administrators only).
Define a rule
To define a rule:
-
Select Add Rule.
-
Enter a rule name.
Alerts raised by the rule carry this name as their title.
-
Set the rule severity to Critical, High, Medium, or Low.
New rules default to High. Alerts inherit the rule's severity.
-
Leave the Enabled toggle on.
The rule starts working when you save it.
-
On the Conditions tab, select the condition that triggers the rule.
Check the product that reports the condition and the "Triggers when" explanation to confirm it.
-
If the condition has parameters, set them under the condition.
-
On the Emails to be notified tab, enter the recipient's email address.
-
Select a Receiver Type (To, Cc, or Bcc).
-
Select Add.
Repeat the last three steps for each recipient.
-
Select Save.
For the parameters of each condition, see Condition parameters.
The following screenshot shows the Conditions tab of the Add Rule form:
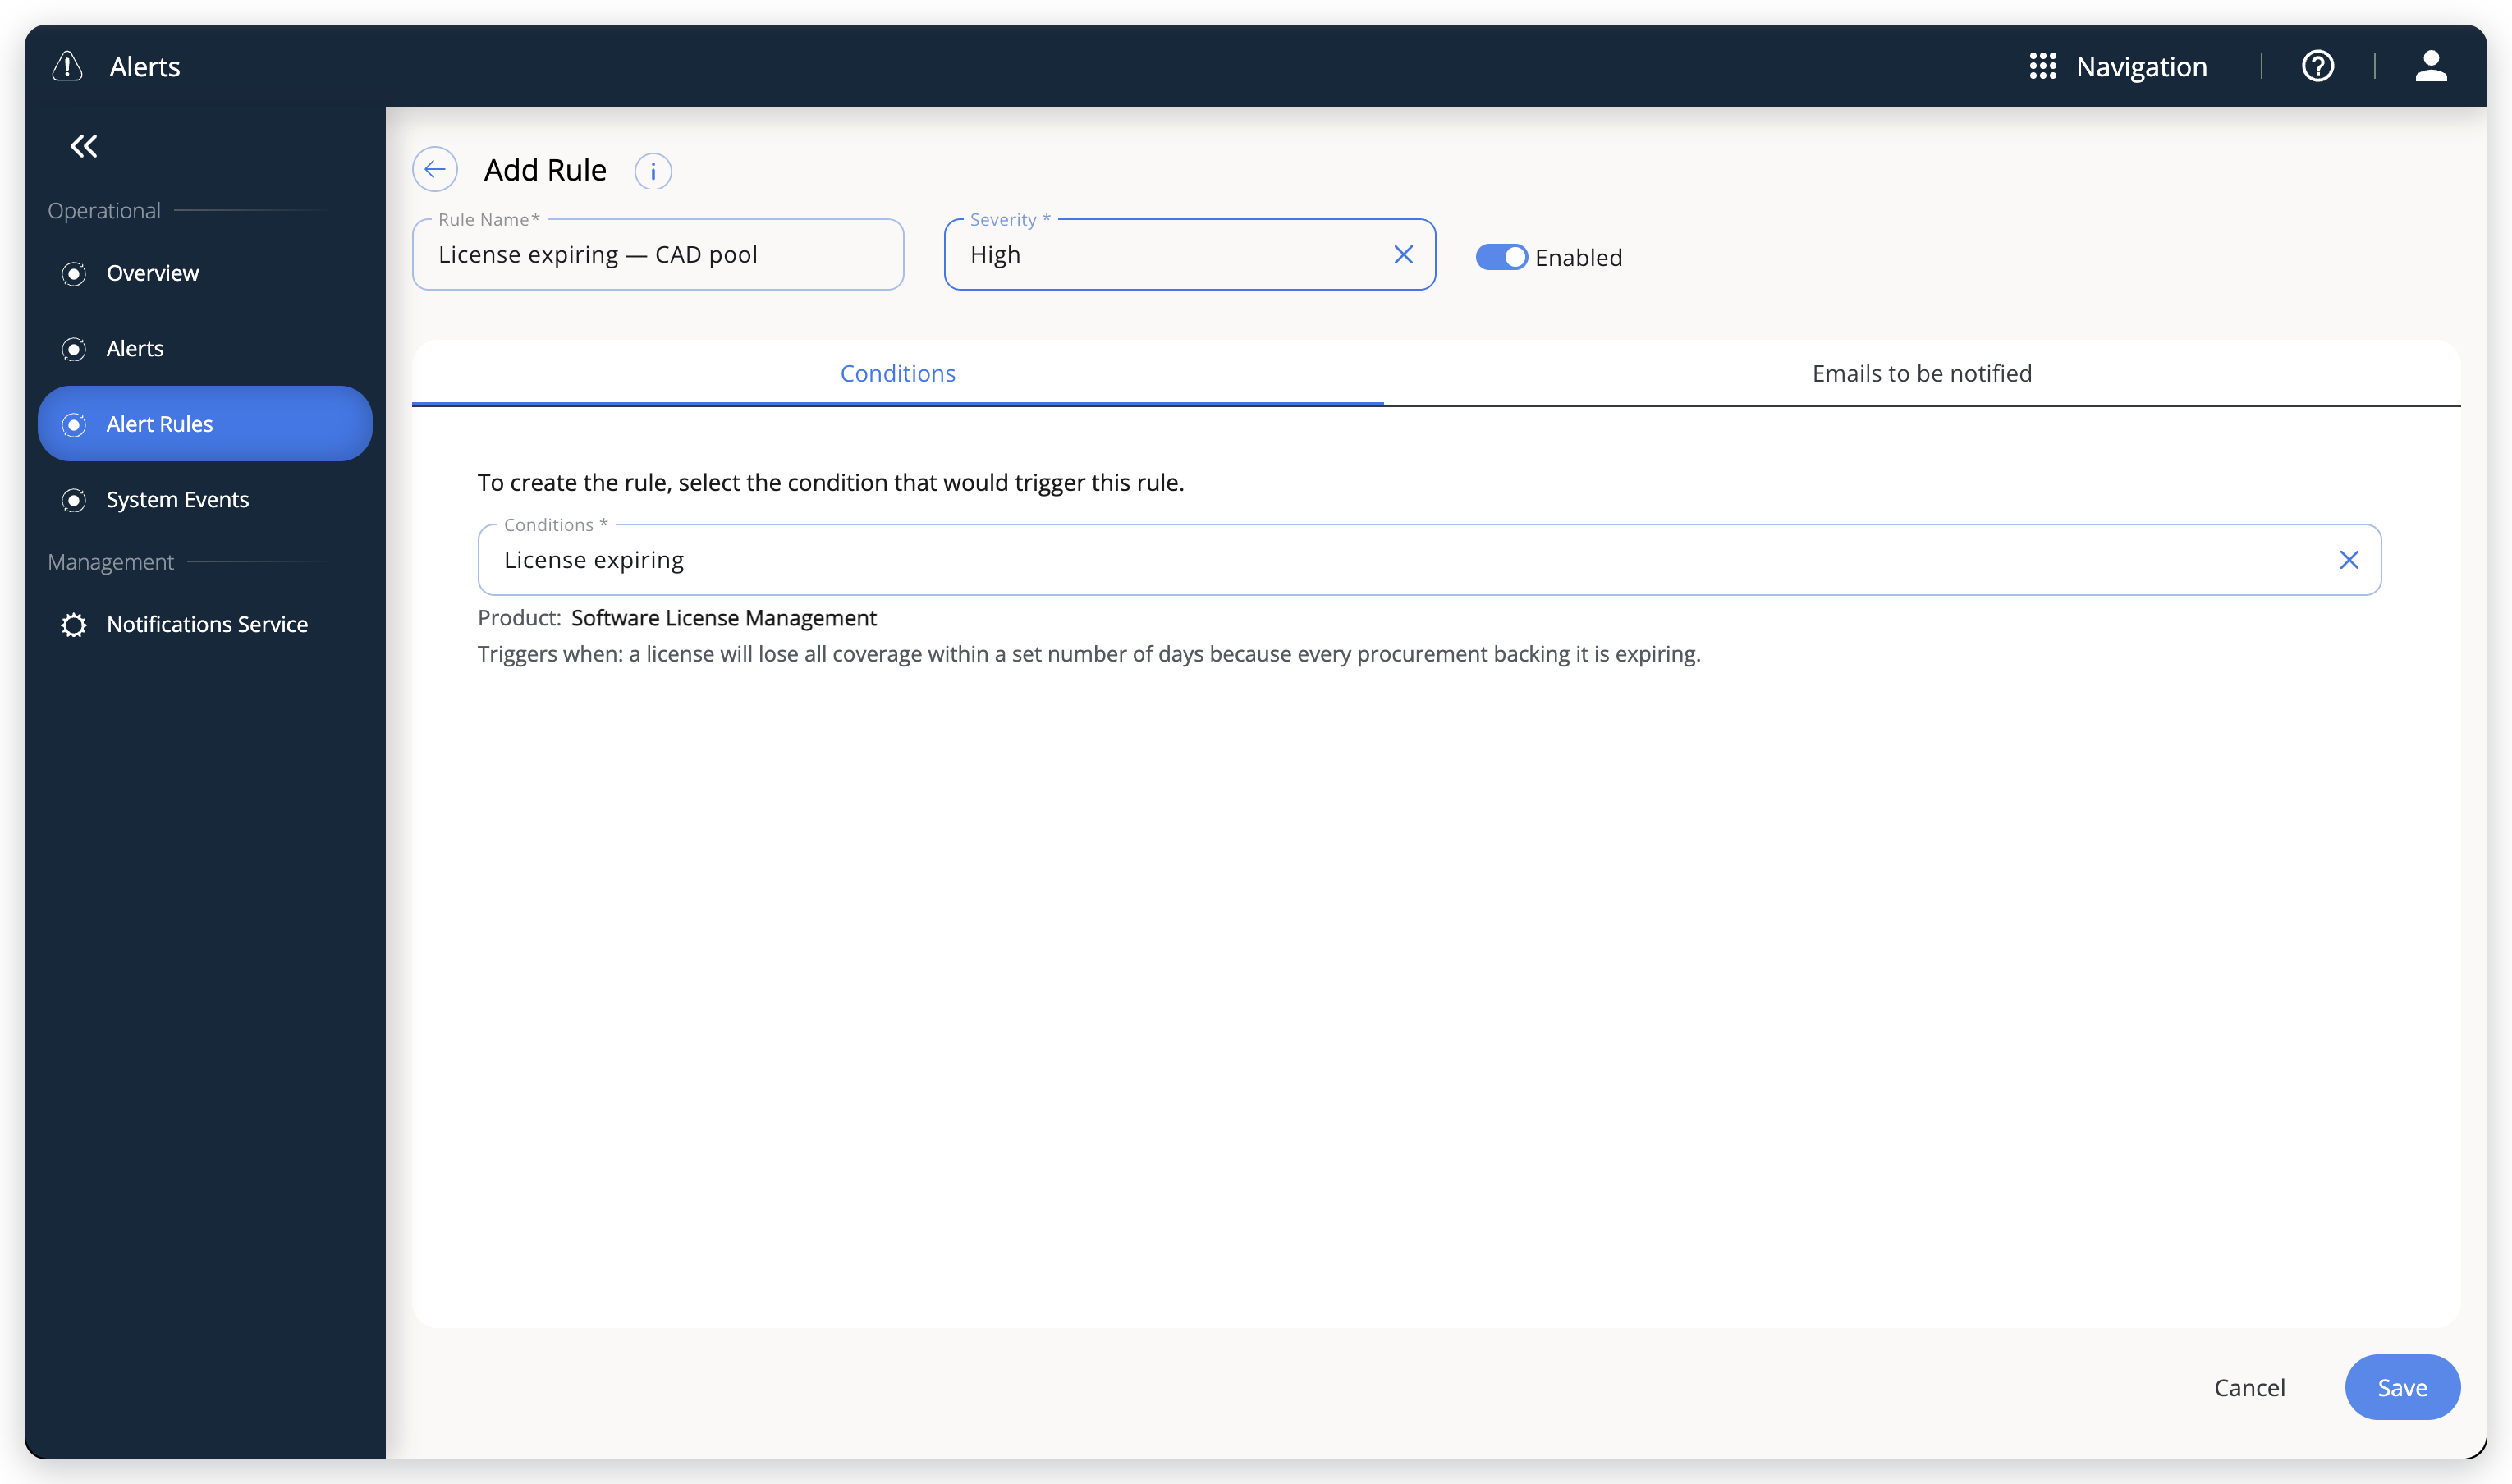 Selecting a condition shows which product reports it and exactly what makes it fire.
The following screenshot shows the Emails to be notified tab with one recipient added:
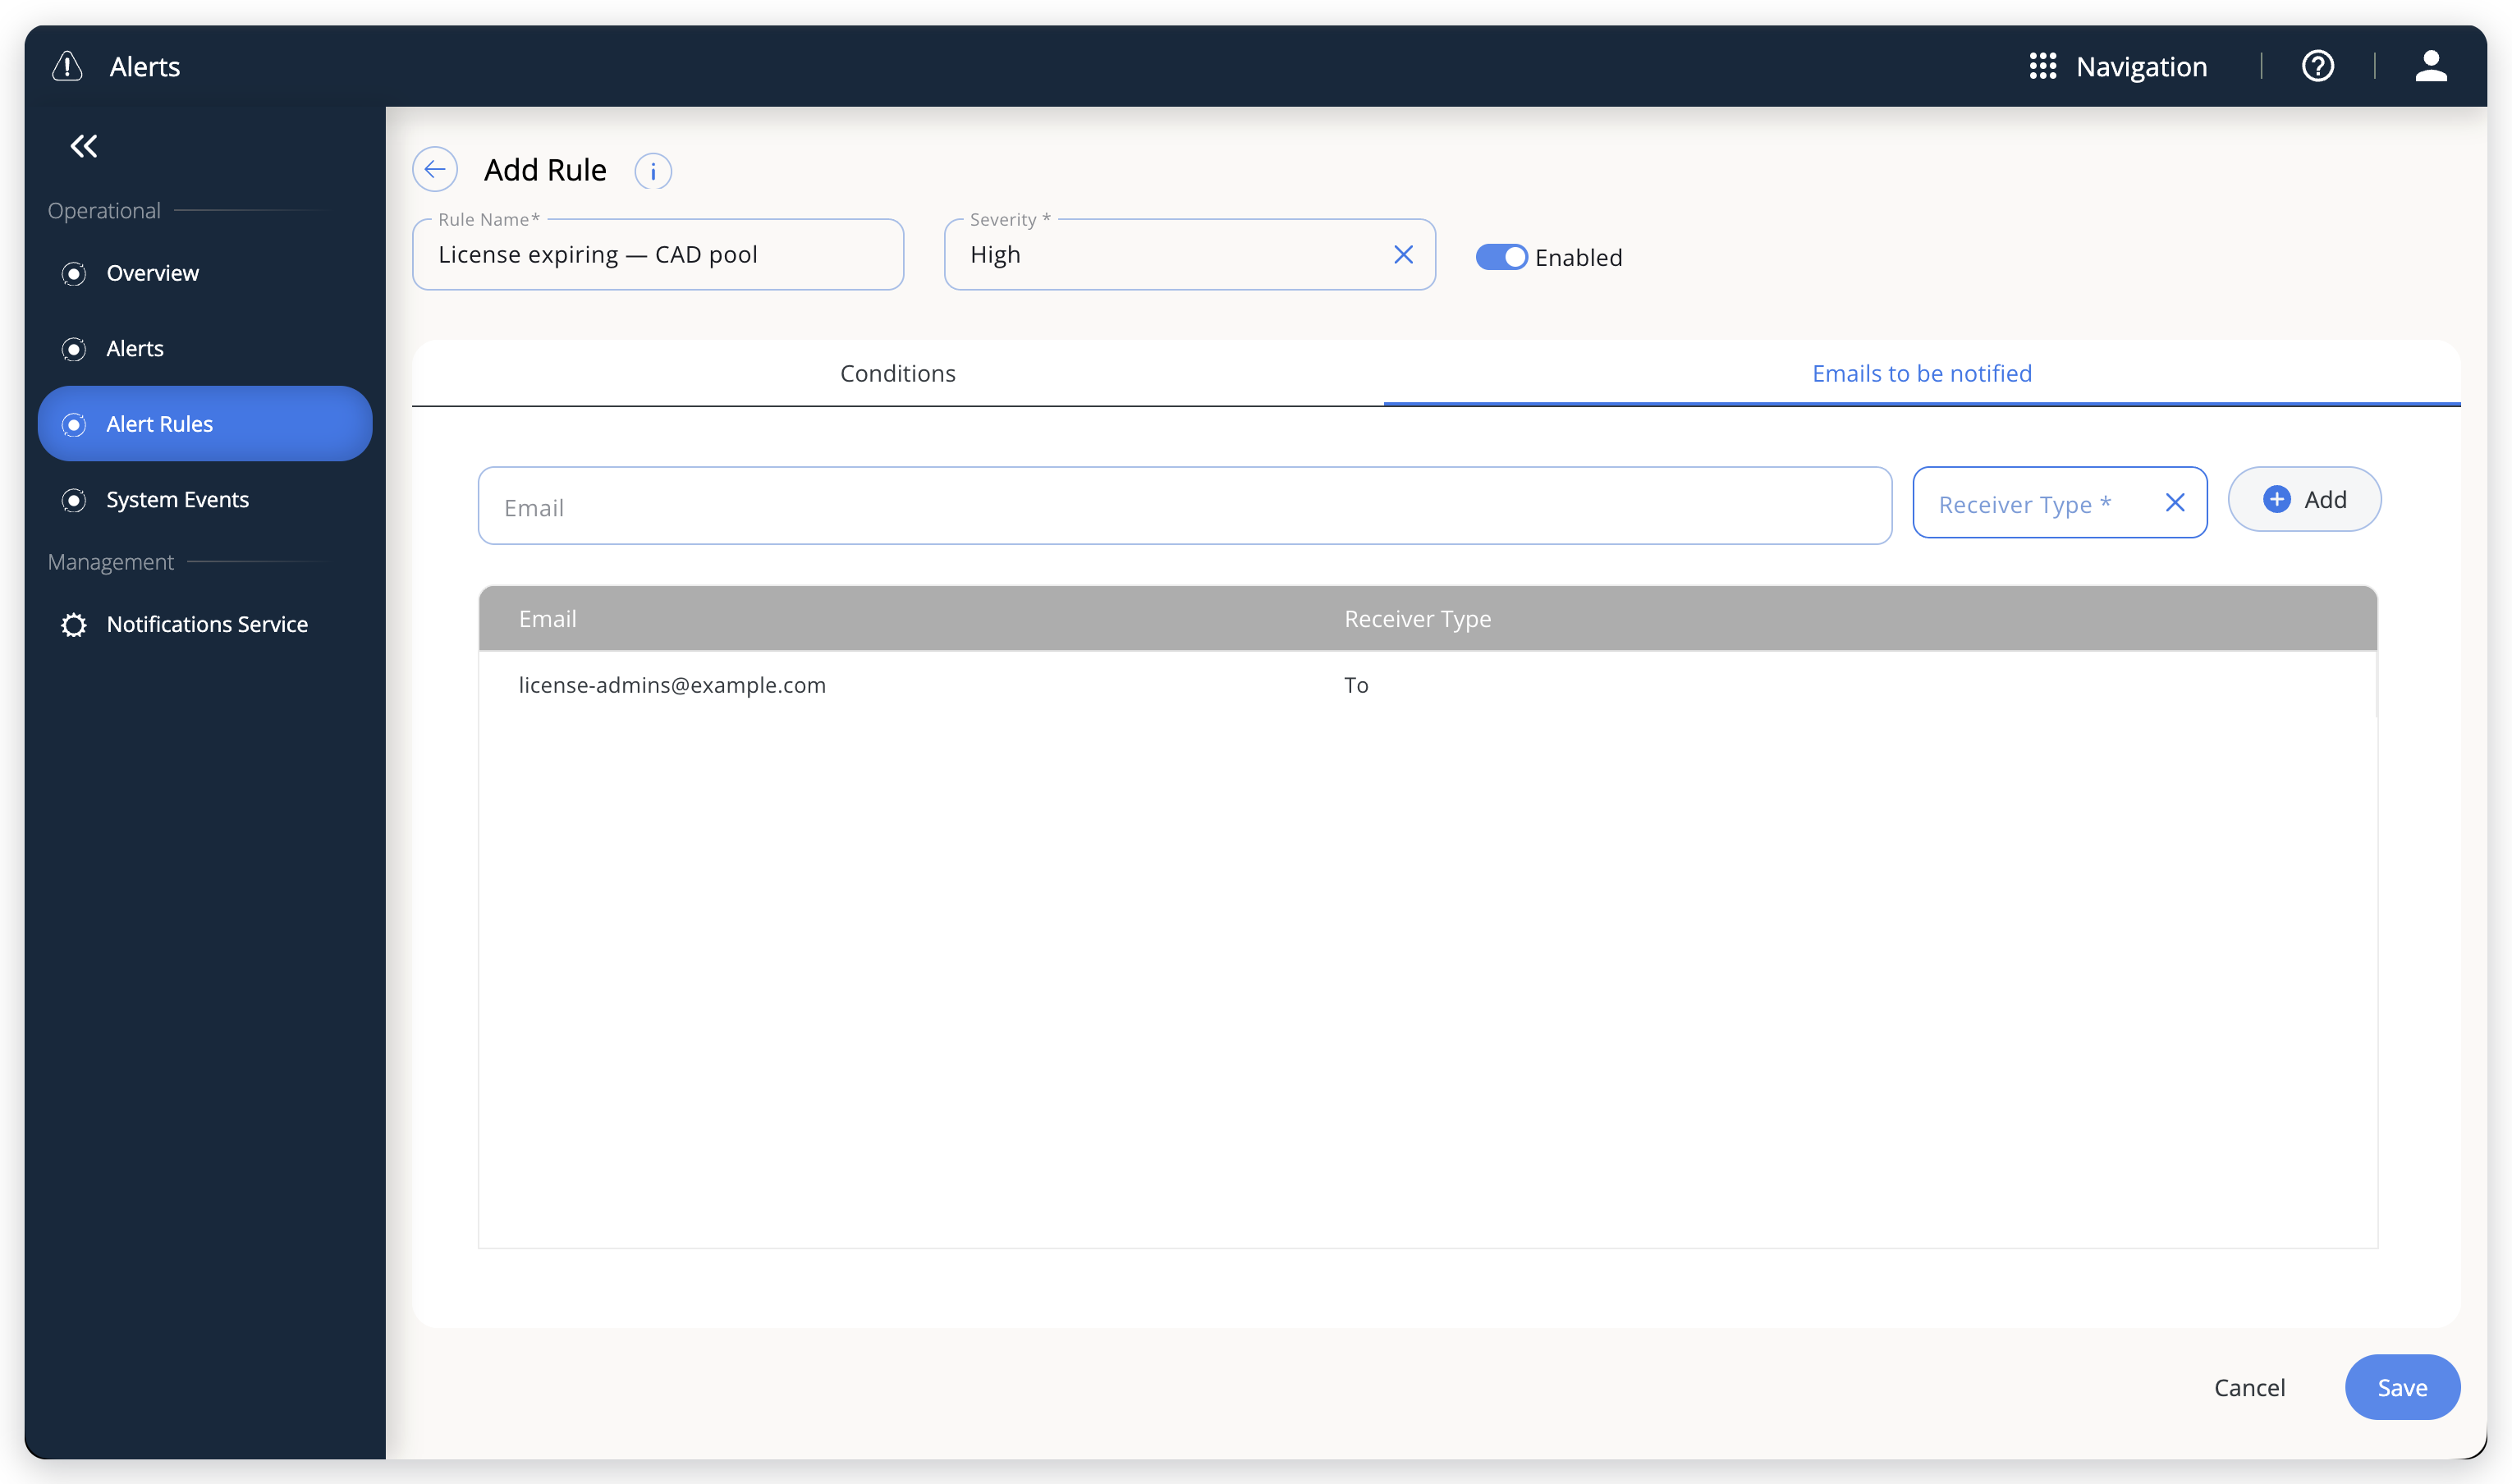 Add every recipient before you save. A rule with no recipients still fires, but it reaches nobody.
Rules determine when an alert fires. Notifications define how it is delivered and who receives it.
Recipients can be edited only while at least one delivery channel (email or ticketing) is turned on at the Notifications Service page. If both are off, the Emails tab shows a notice instead of the editor.
Available conditions
Each rule watches exactly one condition. In OpenLM Platform you can select from the following 20 conditions, grouped by the product that reports them:
| Condition | Reported by | Triggers when |
|---|---|---|
| License expiring | Software License Management | A license will lose all coverage within a set number of days because every procurement backing it is expiring. |
| License procurement expiring | Software License Management | A single license procurement is within a set number of days of expiring (even if the license is still covered by another). |
| Network license usage threshold | Software License Management | Concurrent usage of a network license feature reaches or exceeds the configured percentage of its available seats. |
| License server down | Software License Management | A monitored license server's daemon stops responding, so its licenses can't be tracked. |
| License server data error | Software License Management | A license server is reachable but its response can't be read, so its license data is unreliable. |
| License Manager host down | Software License Management | One host of a redundant license server stops responding, degrading its redundancy. |
| Blacklisted device connected/disconnected | Dongle Monitoring | A blacklisted device (for example, a lost or decommissioned dongle) connects or disconnects. |
| Non-blacklisted device disconnected | Dongle Monitoring | A device that isn't blacklisted disconnects from a monitored workstation. |
| Orphaned process mapping | Dongle Monitoring | A monitoring target mapped to a dongle vendor no longer exists in Process Manager, or its mapped DLL was removed from it. See Process mapping. |
| Synchronization failed | Directory Sync | A directory (LDAP/Active Directory) synchronization job fails. |
| Directory Synchronization Agent not reporting | Directory Sync | A Directory Synchronization Agent hasn't reported within its expected reporting interval. |
| User has no default project | Projects | A user generates usage but has no default project to attribute it to. |
| User not eligible for subscription optimization | Subscription Optimizer | A user doesn't meet the conditions required for subscription optimization. |
| Usage without agent | License Access Control | A user's license access is blocked because their machine has no Workstation Agent installed. |
| Deployment failed | License Access Control | A License Access Control deployment fails to apply its access changes to the license server, however it was started. |
| SaaS Agent monitoring failure | Cloud Broker | A SaaS Agent reports a failure operating against its platform (for example, an Autodesk Cloud error). The alert's Source column shows SaaS Agent. |
| Reporting error | Reporting | OpenLM can't process your reporting data, so your reports might be incomplete or out of date. |
| OpenLM License high usage | OpenLM License | An OpenLM license feature reaches its usage limit (100%). |
| OpenLM License grace period ending | OpenLM License | A license feature's usage passes 100%, warning that the over-used features will be turned off if usage isn't reduced. |
| OpenLM License feature suspended | OpenLM License | An over-used OpenLM license feature is suspended (turned off) after the grace period. |
For more information about the agent in the Usage without agent condition, see Workstation Agent.
Condition parameters
Most conditions, including Deployment failed, need no extra input. Three of them accept parameters:
- Network license usage threshold: set the usage percentage, from 1 to 100, that fires the alert. The default is 80%.
- User has no default project: include all affected users in the alert, or limit the list to a set number of users (default 100).
- Usage without agent: (Optional) turn on Notify affected user to also send each blocked user a direct notification asking them to install the Workstation Agent. Users without a known email address are listed in the administrator alert instead.
How rules fire
The following points describe when rules raise alerts:
- Only rules that are turned on raise alerts. Rules that are turned off are ignored.
- One alert per event: if several rules that are turned on watch the same condition, only the most severe one fires.
- The alert takes its title, severity, and recipients from the rule that raised it.
- Network license usage threshold has a built-in cooldown: after it fires for a license, it doesn't fire again for the same license for 24 hours. If usage drops under the threshold first, the alert is armed again immediately.
System Events page
To find out what an OpenLM service reported on its own, without a rule of yours, open System Events.
Review system events
On the System Events page, you can do the following:
- Review events, including service status changes, warnings, and errors.
- Filter by time, severity, or source in the filter bar: select Add Filter, and then select Severity, Source, or Delivery Time.
- Search the event message text.
- Select an event to read its full message in the details panel.
- Delete events by checking their rows and selecting Delete (administrators only).
- Find the root causes of triggered alerts.
OpenLM services send system events on their own, so they appear automatically and need no rules or setup. Use system events to find the source of issues behind alerts.
Notifications Service page
To manage how alerts are delivered, use the Notifications Service page. The following screenshot shows the page:
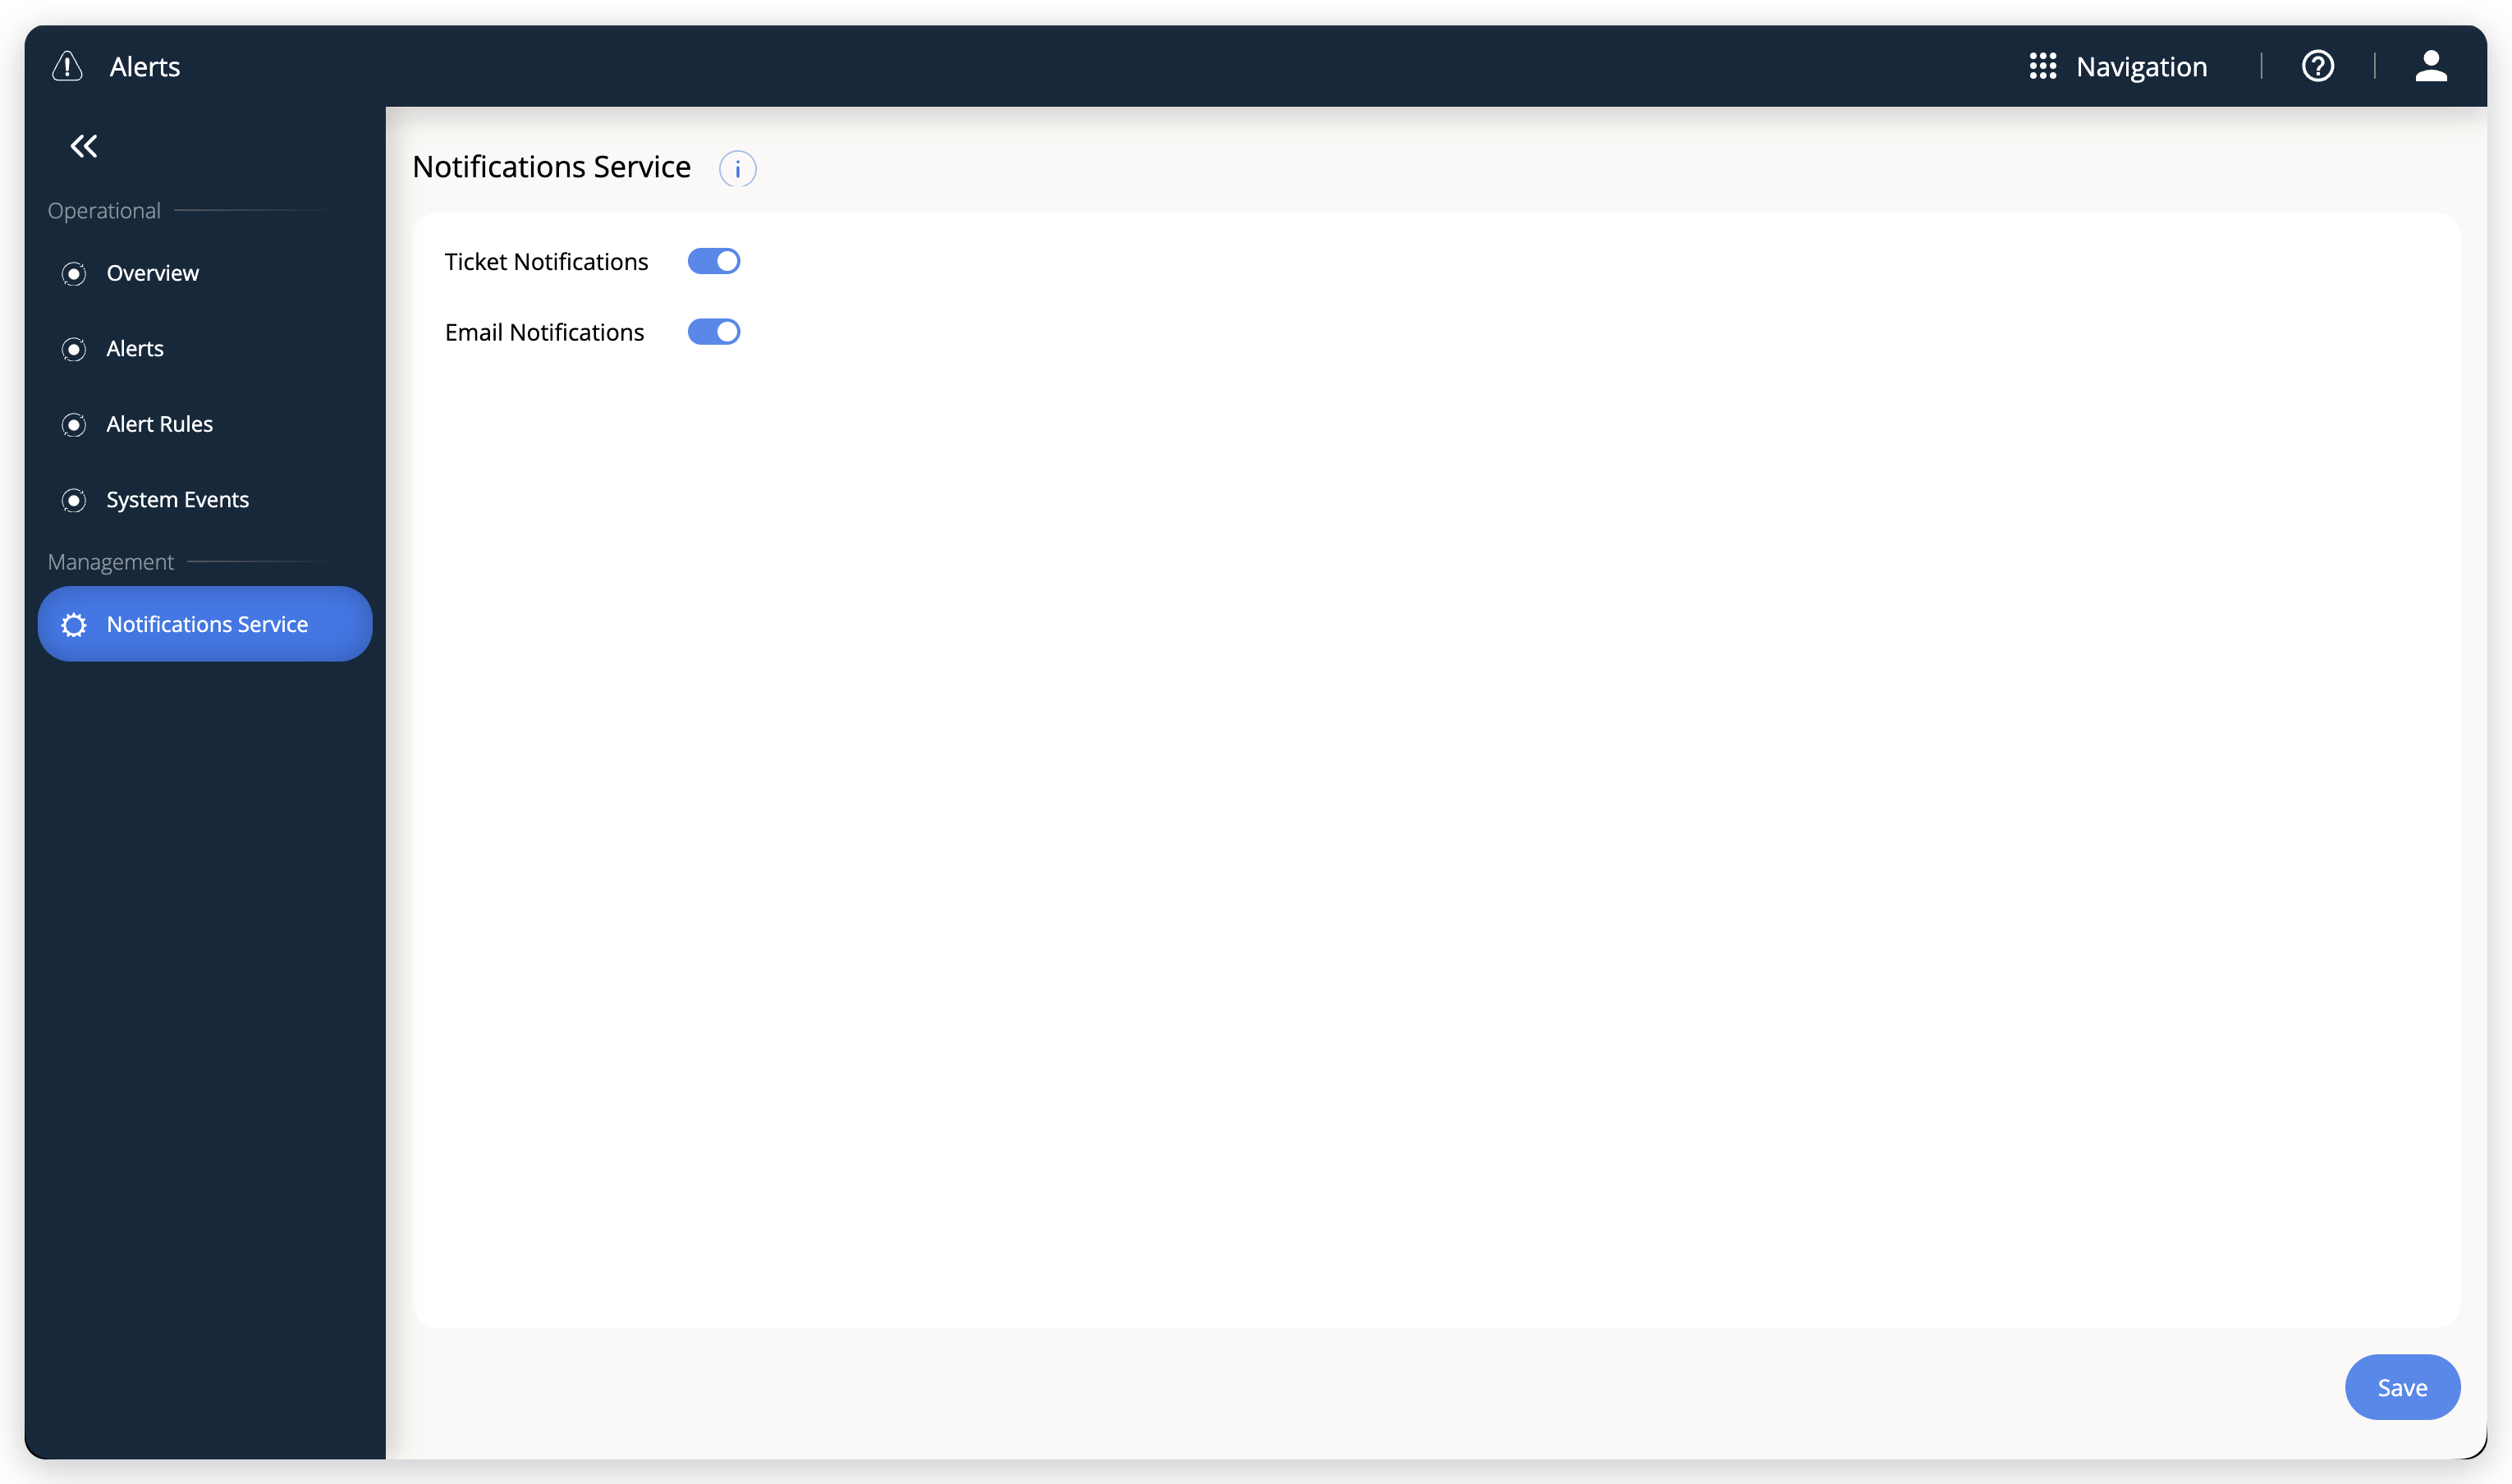 These two switches decide whether any alert leaves the app. Recipients stay per rule.
Supported channels
Alerts supports the following delivery channels:
- Email notifications: Send alert emails to each rule's recipient list.
- Ticketing system integration: Create tickets by emailing your ticketing platform's inbound email-to-ticket address (for example, ServiceNow). Delivery is email only. Alerts has no direct API integration with ticketing systems.
Turn delivery channels on or off
To turn delivery channels on or off:
- In the sidebar, select Notifications Service.
- Turn the Email Notifications and Ticket Notifications toggles on or off.
- Select Save (administrators only).
These toggles are global on/off switches for Alerts. The recipients of each alert are defined per rule, on the rule's Emails to be notified tab. The Notifications service in OpenLM Platform does the sending.
When Alerts is first activated for a tenant, both channels start turned off. Turn on at least one before you create rules. Otherwise, alerts are recorded on the Alerts page but nobody is notified, and the rule editor blocks recipient editing.
Validate your configuration with a test alert.
Tips for alert rules
These tips help you keep your alert configuration effective:
- Review and refine alert rules regularly based on evolving licensing needs.
- Assign severity levels appropriately to prioritize actions.
- Use system events to find the cause of an incident and to spot trends.
- Use Alerts together with Compliance and Notifications.
The documentation team might draft this page using a large language model. A technical writer reviews every page and verifies it against the product before publishing it. A human makes the final decision.