Install the Directory Synchronization Agent (DSA)
To sync users and groups from your directory to OpenLM Platform, install the Directory Synchronization Agent (DSA) on a machine that can reach the directory. The DSA reads local directories (LDAP) or cloud directories (Microsoft Entra ID, Google, Okta), and sends the user and group data to OpenLM Platform through the Directory Synchronization Service (DSS).
You set up the DSA once, in the installer. After that, you approve it and tell it what to sync in Directory Sync.
Before you begin
Confirm these prerequisites:
- Verify that the machine meets the system requirements.
- Choose a 64-bit Windows machine with network access to your directory. For a local directory (LDAP), the machine needs access to the directory server, on port 389 by default, or 636 with SSL. To sync through a Global Catalog, the ports are 3268, or 3269 with SSL, as described in Directory Sync with global catalog. For a cloud directory (Microsoft Entra ID, Google, Okta), it needs internet access.
- Allow outbound HTTPS (port 443) from the machine to your OpenLM Platform. The DSA opens every connection to OpenLM Platform itself, so the machine needs no inbound access from the internet.
- Generate an authorization file of type Dsa for this DSA. Leave Encrypted authorization client clear: the installer accepts only the plain file, named
dsa-authorization.json. - Sign in to Windows with an administrator account.
- If you run OpenLM Platform on your own servers, read Choose the connection option first.
Install the DSA in four steps
To install the DSA, follow these steps:
The following sections give the details. For every component on one page, see OpenLM components installation and configuration.
Install on Windows
Download the DSA installer, OpenLM_Directory_Synchronization_Agent_Setup.<version>.msi, from the Downloads page. Then install the DSA with the installer, or silently from the command line.
Install with the installer
To install the DSA with the installer:
-
Open the installer file,
OpenLM_Directory_Synchronization_Agent_Setup.<version>.msi. -
On the first page, select I agree to the license terms and conditions, and then select Next.
Next becomes available after you select the check box.
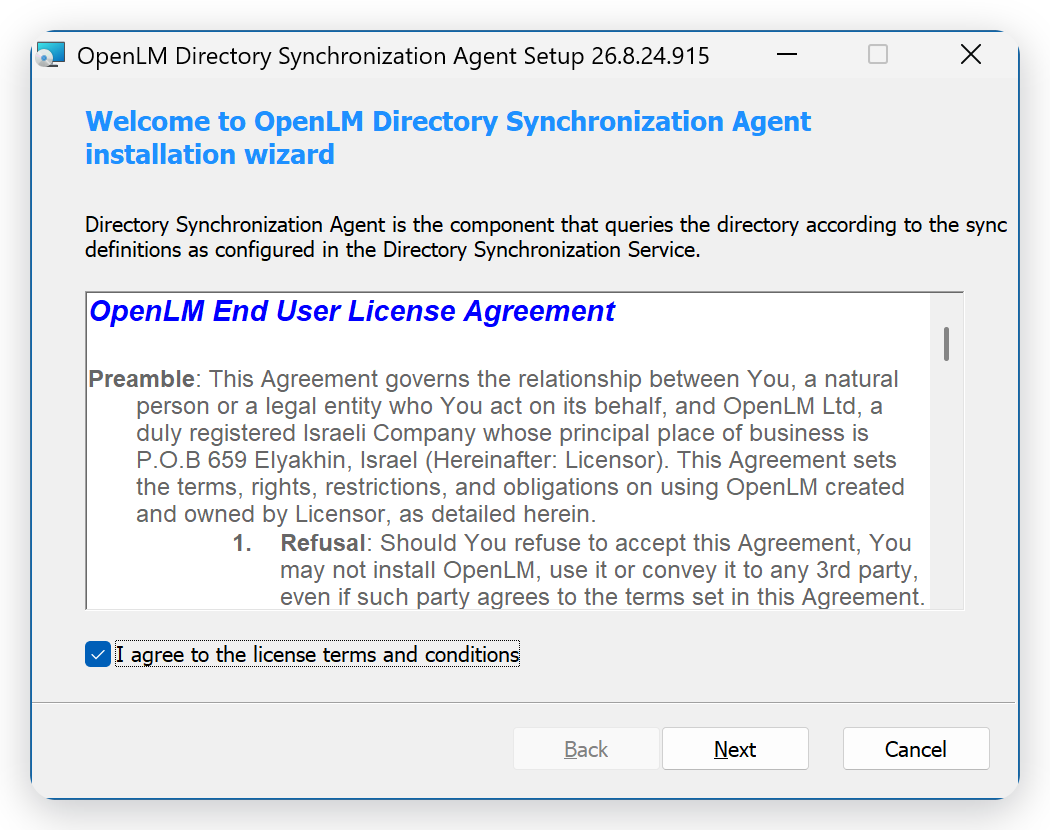 The first page, with the license terms accepted
-
On the Directory Synchronization Agent (DSA) Configuration page, enter an Agent name.
Directory Sync lists the agent under this name, so use a name that tells you which machine runs it. The name can't contain spaces.
-
Keep the Agent service port,
8099, unless another program on the machine uses that port.
-
Under Choose your Open LM version, select OpenLM Cloud, and then select Next.
The installer selects OpenLM On-Premise by default.
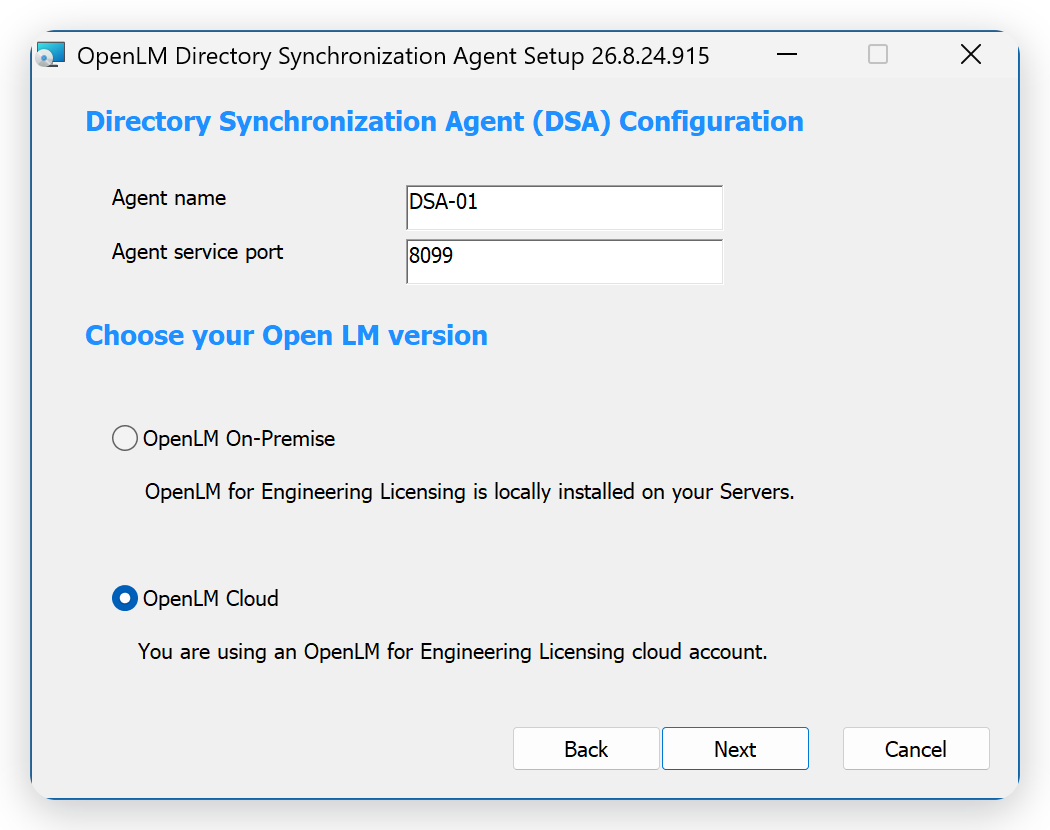 Name the agent, and select OpenLM Cloud
-
On the DSA Authorization page, select Import authorization details from file, and then select Browse.
Ignore the instruction to generate the authorization details in OpenLM EasyAdmin. For OpenLM Platform, generate the file in Identity, as described in Authorize components. The file also carries the address of your OpenLM Platform.
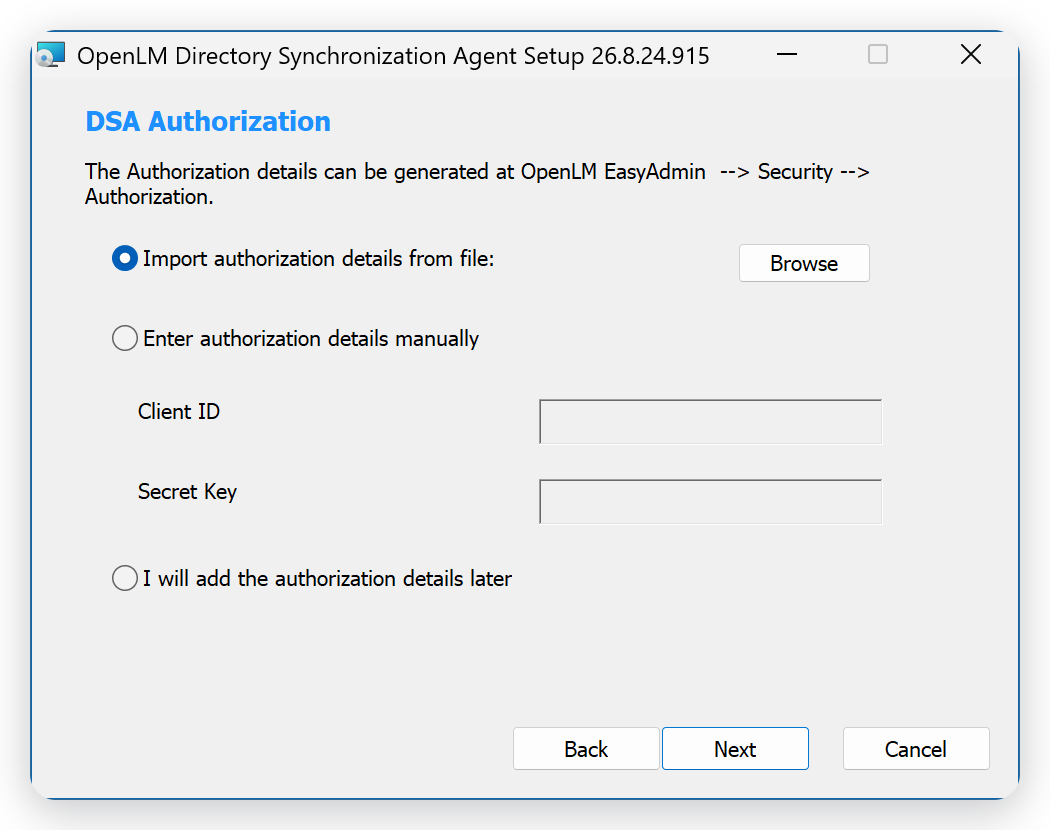 Select Import authorization details from file
-
Select the
dsa-authorization.jsonfile you generated for this DSA, and then select Open.The installer checks the file when you select it.
-
Select Next.
-
On the Select destination folder page, keep the default folder,
C:\Program Files\OpenLM\OpenLM Directory Synchronization Agent\, and then select Next to start the installation.To install in another folder, select Browse first.
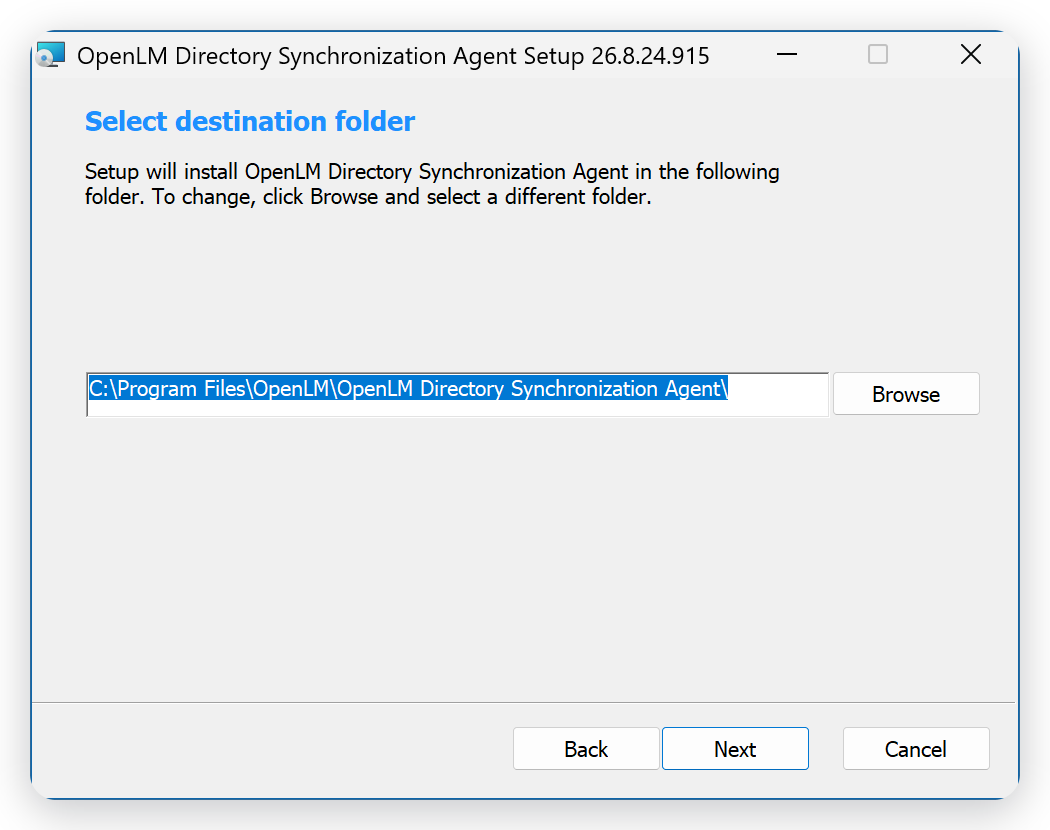 The default destination folder
-
Wait for the installation to finish.
At the end, the installer starts the DSA service.
-
On the DSA installation completed successfully page, select Finish to close the installer.
Then approve the agent in Directory Sync.
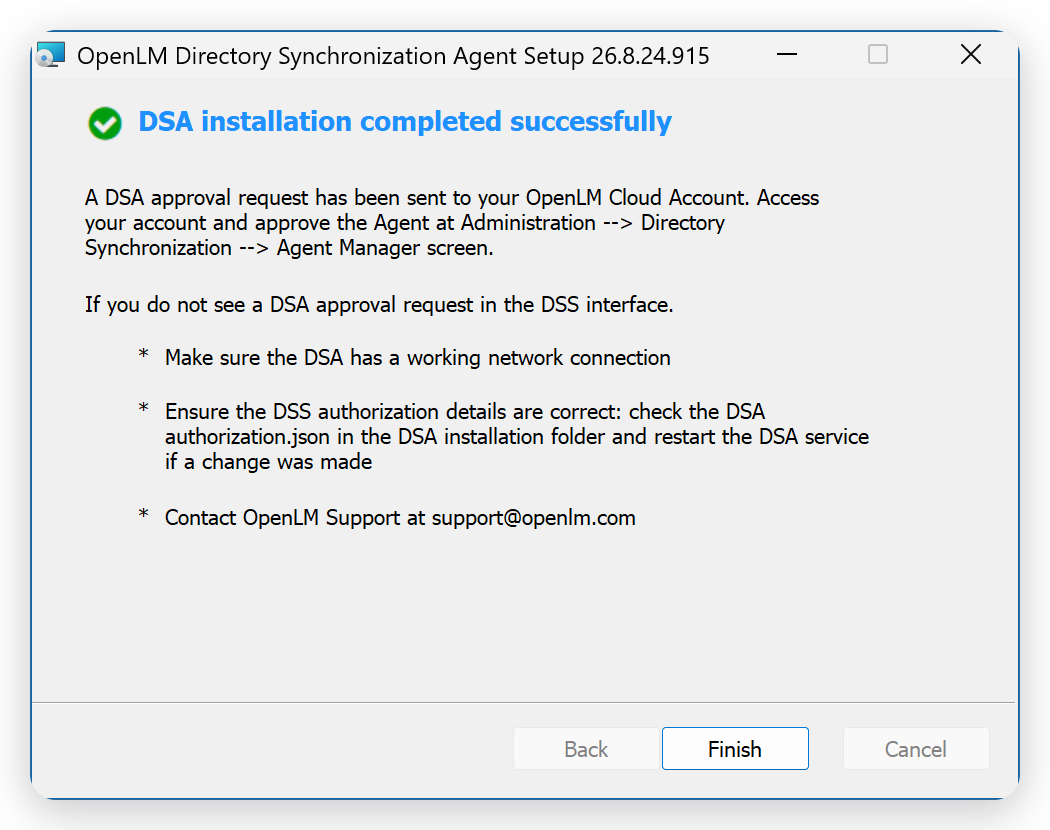 The last page of the installer
To approve the agent, see Approve the agent. If the installer rejects the authorization file, see Why does the installer reject the authorization file?. If it reports Failed to start DSA service, see Why does the installer fail to start the DSA service?.
Choose the connection option
The Choose your Open LM version page offers two options, and the installer then asks for different details:
- OpenLM Cloud: the installer asks for the authorization file on the DSA Authorization page. The DSA connects to the OpenLM Platform address in that file, and the agent registers in Directory Sync.
- OpenLM On-Premise: the installer asks for a DSS host name and port instead. This option is for the Version 26 Directory Synchronization Service (DSS), not for OpenLM Platform. See the Version 26 Directory Sync installation guide.
Select OpenLM Cloud for OpenLM Platform, including an OpenLM Platform that you run on your own servers. This differs from the Workstation Agent installer, where OpenLM On-Premise is the option for a self-hosted OpenLM Platform. In the DSA installer, OpenLM On-Premise means a Version 26 DSS.
For a self-hosted OpenLM Platform, generate the authorization file on your own OpenLM Platform, and make sure the DSA machine trusts its TLS certificate. See TLS certificates. Without that trust, the agent can't connect.
Silent installation
To deploy the DSA from a script, install it silently: msiexec installs the DSA with the options you pass on the command line, without the installer pages. A silent installation doesn't check the options the way the installer does, so check the agent in Directory Sync afterwards.
To install the DSA silently:
-
Open a command prompt as an administrator.
-
Run
msiexecwith the installation options, in this format:msiexec /i "<dsa-msi-path>" /qn AGENT_NAME="<agent-name>" CONNECTION_TYPE="Cloud" AUTHORIZATION_TYPE="1" DSA_AUTHORIZATION_FILE_PATH="<authorization-file-path>"Replace
<dsa-msi-path>with the full path of the DSA MSI file,<agent-name>with the name of the agent, and<authorization-file-path>with the full path ofdsa-authorization.json.Use these parameters:
AGENT_NAME: the name that Directory Sync lists the agent under, without spaces.CONNECTION_TYPE:"Cloud"for OpenLM Platform. Without it, the installer sets up an on-premises agent.AUTHORIZATION_TYPE:"1"to import the authorization file inDSA_AUTHORIZATION_FILE_PATH.DSA_AUTHORIZATION_FILE_PATH: the full path of the authorization file. The installer copies it into the installation folder asdsa-authorization.json.DSA_PORT: the agent service port. The default is8099.INSTALLFOLDER: the installation folder. The default isC:\Program Files\OpenLM\OpenLM Directory Synchronization Agent\.
To write a log file, add
/l*v "<log-file-path>", where<log-file-path>is the path of the log file. A verbose log can contain the authorization details, so store it like the authorization file, and delete it when you no longer need it. -
When the installation finishes, check that the OpenLM Directory Synchronization Agent service runs in Windows Services.
Then approve the agent, as described in Approve the agent.
Approve the agent
A new DSA reads nothing until you approve it. To approve the agent:
-
In OpenLM Platform, open Directory Sync. It opens on the Agents page.
-
Find the new agent, with the status Pending.
The agent registers a minute or two after its service starts. The list doesn't update by itself, so if the agent isn't listed, select Refresh data.
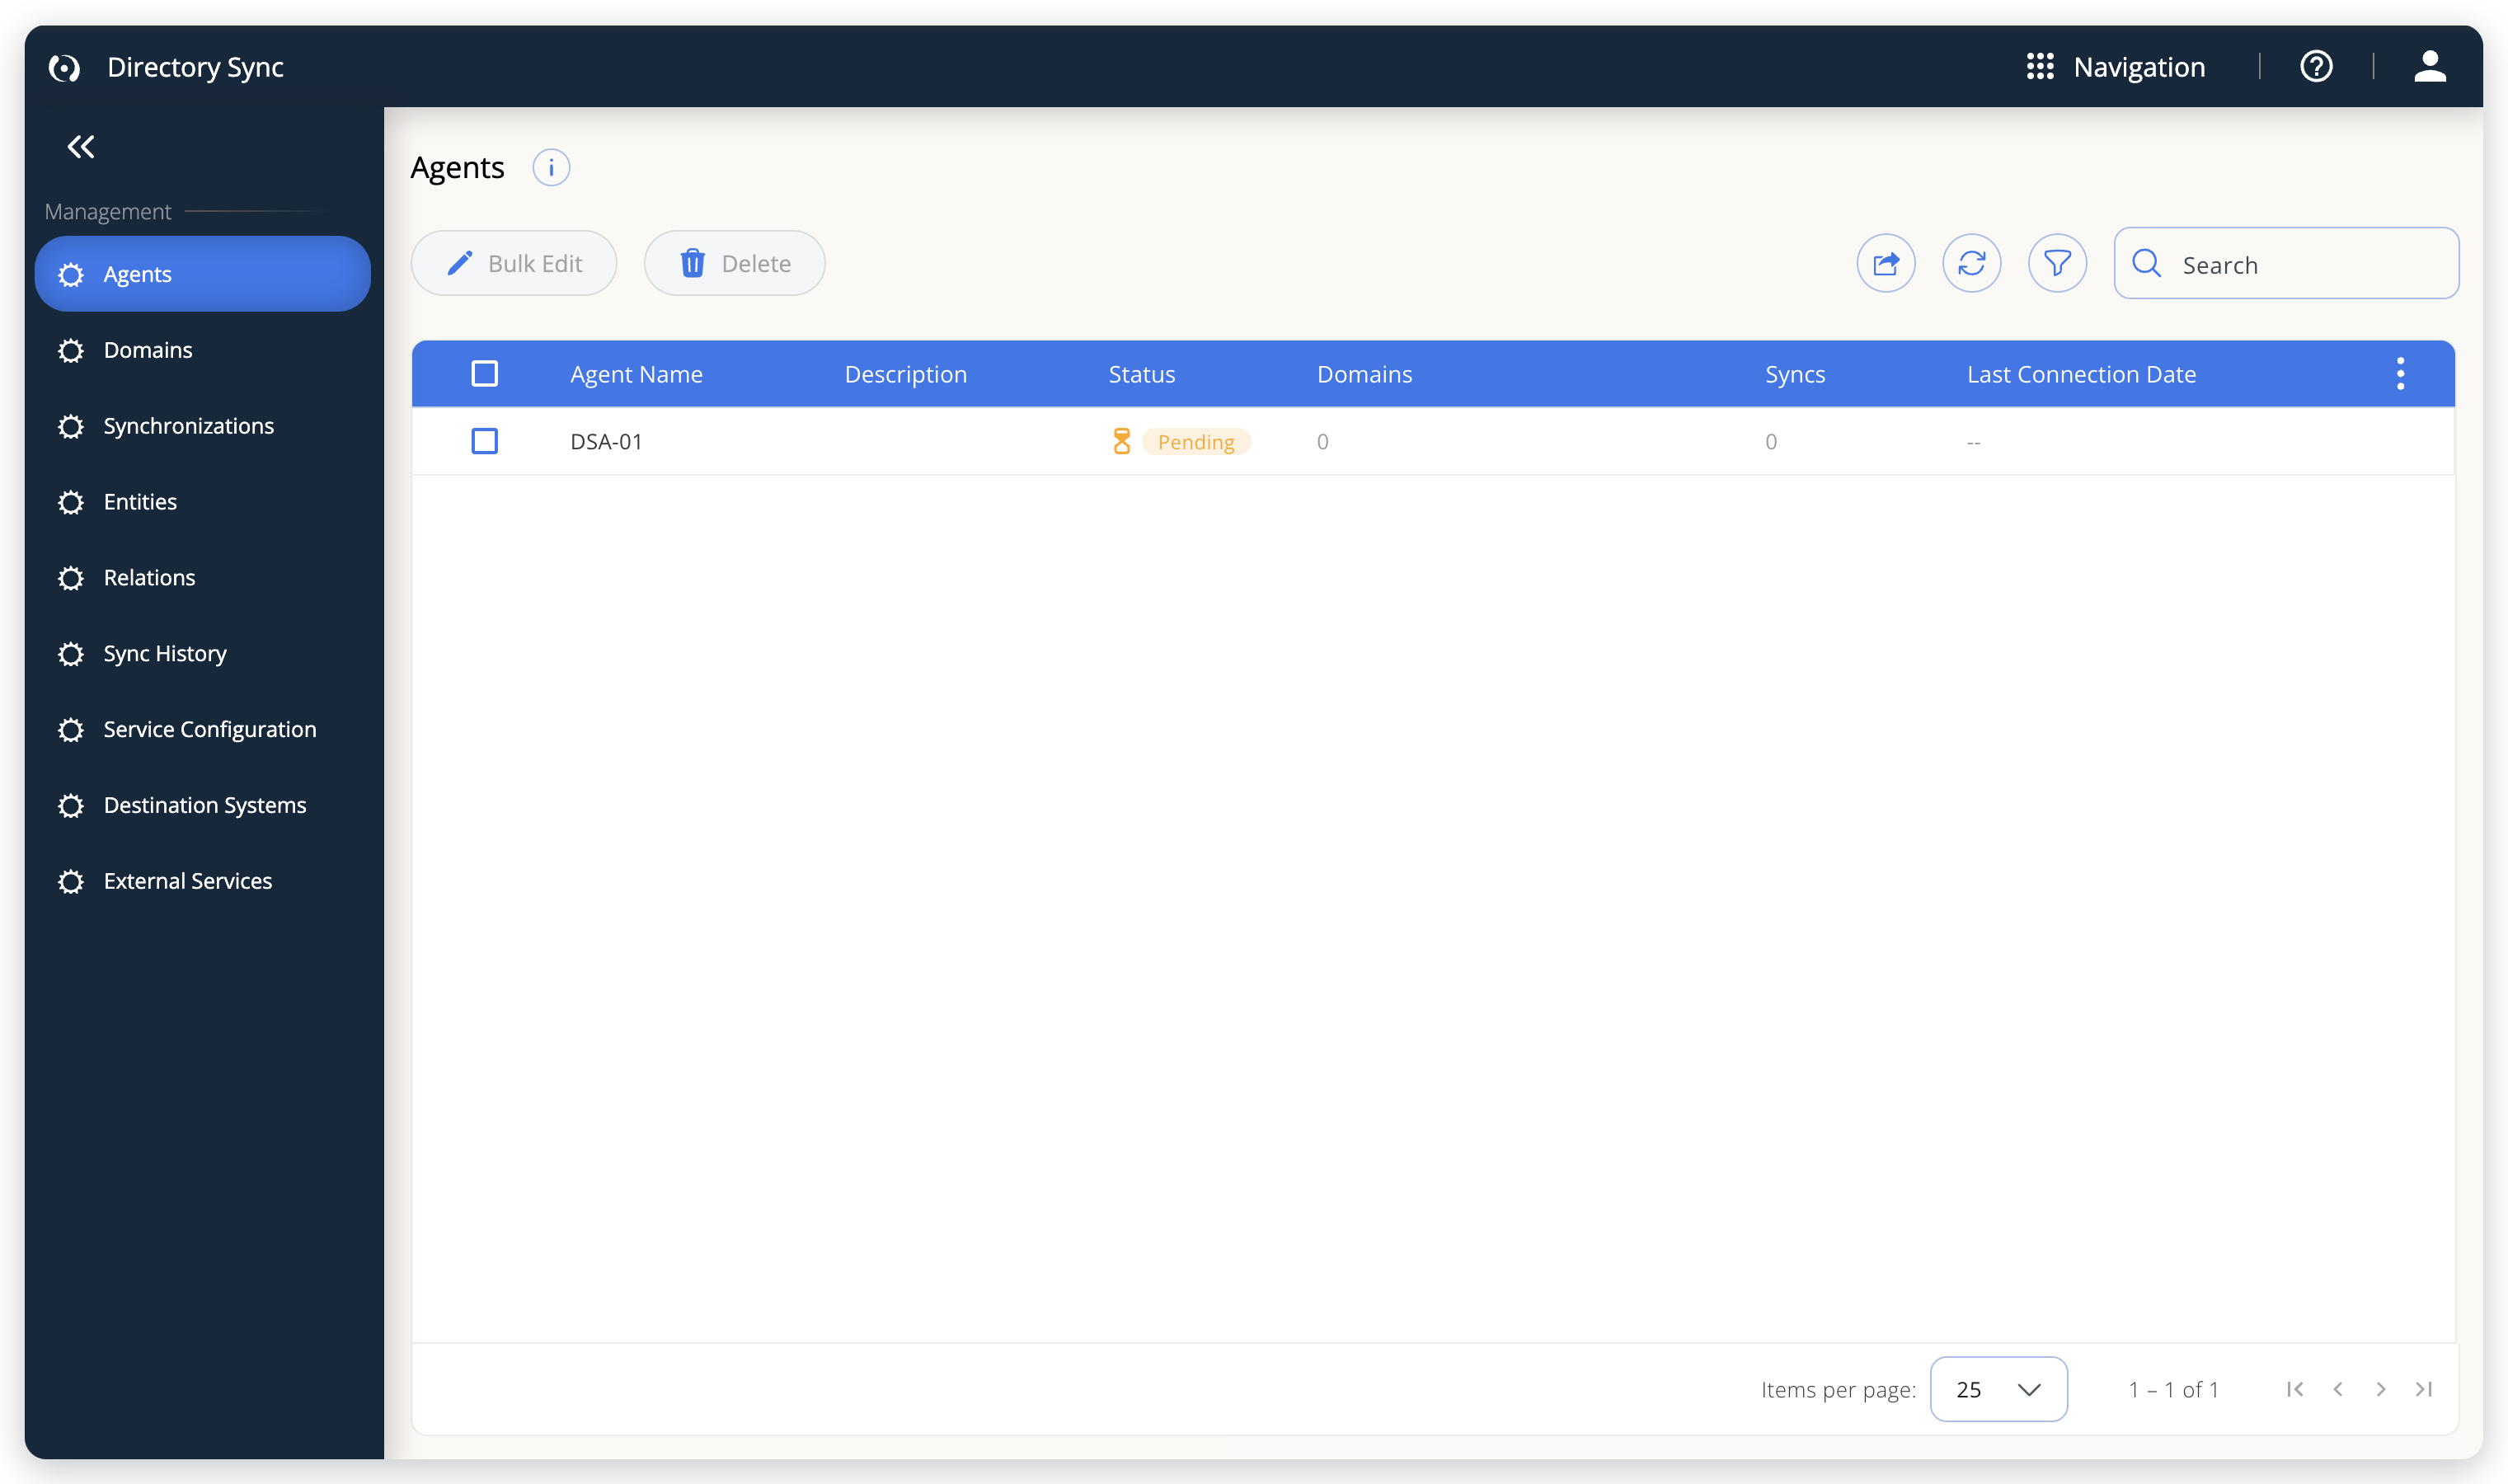 A new agent waits for approval with the status Pending
-
Hover over the agent, and then select the Approve agent icon.
The status changes to Enabled at once. Within a minute, the agent picks up the approval without a restart, and Last Connection Date shows when it last reported.
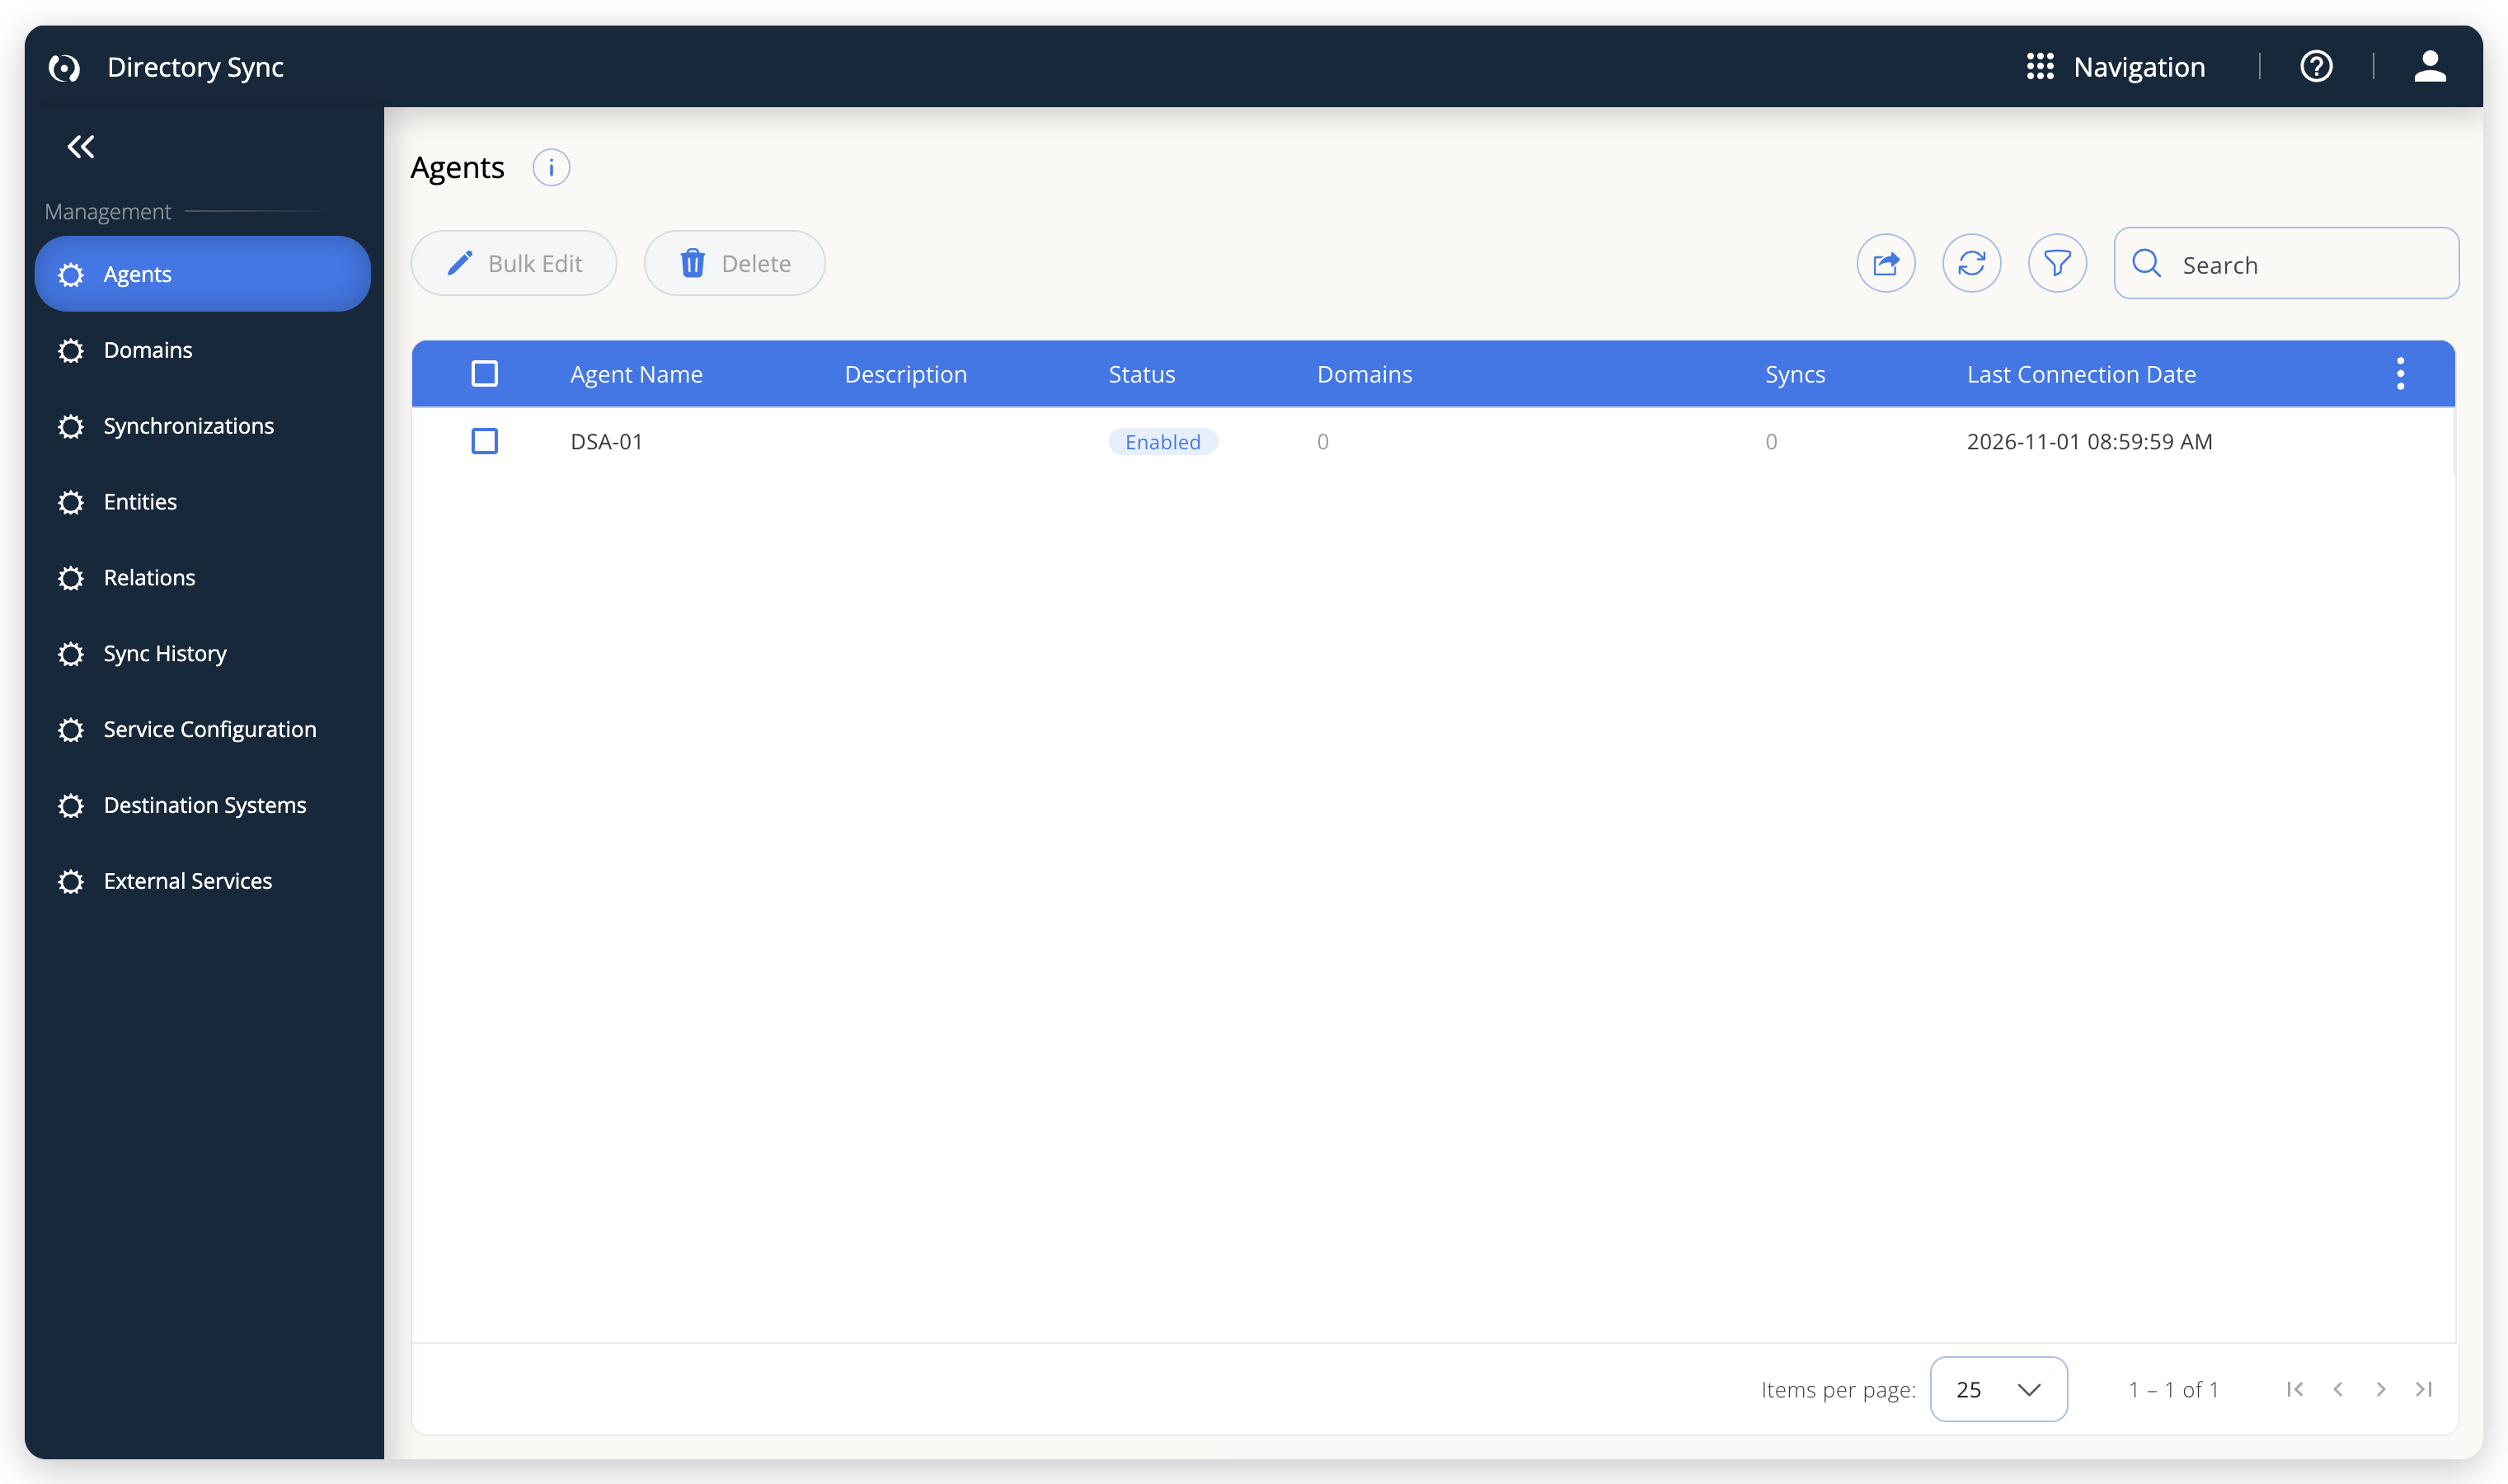 The approved agent, with its last connection date
Upgrade the DSA
The DSA sends your directory data to OpenLM Platform through the Directory Synchronization Service (DSS). To upgrade, you install the new DSA version over the old one on your machine. You don't uninstall first.
To upgrade the DSA:
-
Download the new installer from the Downloads page.
-
Sign in to Windows with an administrator account, and run the new
OpenLM_Directory_Synchronization_Agent_Setup.<version>.msi.For a silent upgrade, run the same
msiexec /icommand you used to install, with the new MSI path. -
On the first page, accept the license agreement and select Next. When the DSA is already installed, the installer goes straight to the installation: it shows no configuration pages and keeps the agent's settings.
-
Wait for the installation to finish, and then check that the OpenLM Directory Synchronization Agent service runs.
The upgrade keeps the agent's configuration files, including dsa-authorization.json. It also keeps the agent's ID, status, and name, so the DSA continues as the same agent in Directory Sync. It doesn't register a new agent that waits as Pending. After the upgrade, open the Agents page and check that the agent shows Enabled and a recent Last Connection Date.
The installer installs the same version again, but refuses an older version with the message "A newer version of OpenLM Directory Synchronization Agent is already installed." If the installation fails, the installer rolls back to the configuration it backed up before it started.
An uninstall followed by a new installation is different: it registers a new agent. See Why does a reinstalled DSA appear as a new agent?.
Change the DSA after installation
Use these procedures when the DSA is installed and you need to change it:
- A new authorization file: generate a new file of type Dsa, as described in Authorize components. Copy it into the installation folder as
dsa-authorization.json, and restart the OpenLM Directory Synchronization Agent service. - The agent service port: an upgrade keeps the port, and the installer shows no configuration pages when the DSA is already installed. To use another port, uninstall the DSA and install it again with the new Agent service port. A new installation registers a new agent: see Why does a reinstalled DSA appear as a new agent?.
- A second DSA, for a directory on another network: install a DSA on a machine that can reach that directory, with its own authorization file and an agent name that Directory Sync doesn't list yet. Approve it on the Agents page. Then select that agent when you add the domain.
- The log level: change it in Directory Sync, as described in Where are the DSA logs?.
Uninstall the DSA
Remove the DSA from Windows in one of these ways:
-
Programs and Features: in the Control Panel, select Programs, then Uninstall a program. Select OpenLM Directory Synchronization Agent, then Uninstall.
-
Silent uninstallation: run
msiexec /xwith the installer you installed from:msiexec /x "<dsa-msi-path>" /qnReplace
<dsa-msi-path>with the full path of the DSA MSI file.
Uninstalling keeps the installation folder, with the agent's configuration, its logs, and the authorization file dsa-authorization.json. To remove the DSA completely, delete the folder after you uninstall, because the authorization file holds the client secret.
Uninstalling also leaves the agent listed in Directory Sync, where it shows a warning icon when it stops reporting. To remove it there as well, delete it on the Agents page, as described in Delete an agent.
Troubleshooting
Use these answers when the DSA doesn't install, register, or read your directory as expected.
Where are the DSA logs?
Open the log folder in the installation folder, C:\Program Files\OpenLM\OpenLM Directory Synchronization Agent\log by default. The DSA writes one log a day, OpenLM_Ldap_Agent-<yyyy-MM-dd>.log, and archives a log that grows past 10 MB.
Each start of the service begins with Start OpenLM.Ldap.Agent, version <version>. When the agent registers, it logs saved info: agentId = <agent-id>, and a healthy agent then logs MonitorConfigStatus finished for agentId <agent-id>. Is monitoring = True every 30 seconds.
The DSA logs at the level set for the agent in Directory Sync. To change the level, edit the agent, and change Agent Log Level, as described in Edit an agent's properties. The new level applies without a restart. Trace also logs sensitive data, such as passwords, so set the level back when you finish troubleshooting.
Why does the installer reject the authorization file?
The installer checks the file when you select it, and reports a problem in a "DSA authorization file validation error" message:
DSA authorization file name should be: dsa-authorization.json: the file has another name, for exampledsa-authorization (1).jsonafter a second download. Rename it todsa-authorization.json, in lowercase. An encrypted authorization file can't be used. Generate a file for a client without Encrypted authorization client instead.clientType property value must be DSA.: the file belongs to another component, such as a Broker. Generate a file of type Dsa.- A message that a property can't be empty, or an error about the file contents: the file is incomplete or was changed. Download it again.
Why does the installer fail to start the DSA service?
At the end of the installation, the installer starts the DSA service and waits for it to run. If the service doesn't start, the installer shows Failed to start DSA service. Error: with the reason, and the buttons Cancel, Retry, and Ignore.
Cannot start service OpenLMLdapAgent on computer '.' usually means that the service took longer to start than Windows allows, 30 seconds by default. The Windows System log then has the events 7009 and 7000 for OpenLM Directory Synchronization Agent. This can happen on a slow or busy machine, for example while antivirus software scans the new files.
Select one of these options:
- Select Retry to start the service again.
- Select Ignore to finish the installation with the service stopped. Start OpenLM Directory Synchronization Agent later in Windows Services. The service also starts with Windows, after a delay.
- Select Cancel to roll back the installation.
Why doesn't the new agent appear in Directory Sync?
The agent registers a minute or two after its service starts. The Agents list doesn't update by itself, so first select Refresh data.
If the agent still isn't listed, check that the OpenLM Directory Synchronization Agent service runs, and look in the DSA log for these causes:
- No route to OpenLM Platform:
Request to ... finished unsuccessfully after <n> out of <max> attempts.Allow outbound HTTPS from the DSA machine to the address inbaseUrlin the authorization file. - Rejected credentials:
DSA failed to retrieve access token.The authorization client was deleted, or its secret was reset. Generate a new authorization file, copy it into the installation folder asdsa-authorization.json, and restart the service. - No authorization details:
Authorization settings are missing.You chose to add the authorization details later, or a silent installation didn't get the file. Copy the file into the installation folder asdsa-authorization.json, and restart the service. - Directory Sync isn't active:
Most likely DirectorySync product is not activated in Products Service.Ask an account administrator to activate Directory Sync in OpenLM Products. - The agent name is taken:
Agent name already exists.See Why doesn't a reinstalled DSA appear in Directory Sync?
Why does the log show an error in cloud mode?
When the service starts, the DSA logs DSA is working in cloud mode. It will work in secure mode with the level ERROR. The line means that the DSA connects to OpenLM Platform with the authorization file, which is the normal state. You can ignore it.
Why does the domain connection check fail?
Check Domain Connection runs on the DSA machine, through the agent you select. Check these causes:
- The agent isn't approved: a pending agent runs no checks and no syncs. Approve it, as described in Approve the agent.
- No route to the directory: the DSA machine needs access to the domain controller on the domain's port, 389 by default, or 636 with SSL.
- Credentials: the user needs read access to the directory. Anonymous Connection works only if your directory allows anonymous reads.
The DSA log names the domain, and the port and SSL setting it tried: Error connecting <type> domain: <name> ... with settings: port:<port>, Ssl:<true-or-false>. A successful check logs Successfully validated domain <name>.
Why does a reinstalled DSA appear as a new agent?
A new installation registers the DSA as a new agent, even when the configuration files of an earlier installation stay in the installation folder. The earlier agent stays in Directory Sync, with the last connection date of the old installation. Approve the new agent, and then delete the earlier one. Directory Sync asks you to hand its syncs over to another agent.
Why doesn't a reinstalled DSA appear in Directory Sync?
Agent names must be unique. If you reinstall the DSA with the name of an agent that Directory Sync still lists, the registration fails, and the DSA log shows Publishing agent configuration returned error : Agent name already exists. The DSA then stops trying to register, and logs Agent is disabled/ has Id 0 or don't have enouth data to perform MonitorConfigStatus every 30 seconds.
To register it, delete the earlier agent on the Agents page, or use another agent name. Then uninstall the DSA, and install it again.
Why doesn't a silent installation register the agent?
Check the installation command:
- Missing
CONNECTION_TYPE="Cloud": without it, the DSA installs as an on-premises agent, which doesn't connect to OpenLM Platform. The log then showsOpenLM.Ldap.Agent runs in on-premise mode, and requests tohttps://localhost/api/dss/that fail. Uninstall it, and install it again with the parameter. - The agent name is taken: see Why doesn't a reinstalled DSA appear in Directory Sync?
- The authorization file path is wrong: a silent installation doesn't check the file. Copy the file into the installation folder as
dsa-authorization.json, and restart the service.
Next steps
The approved agent reads nothing until you tell it what to sync. In Directory Sync, connect your directory and run a first sync:
- On the Domains page, add your directory. Select Check Domain Connection to test it through the new agent, and then select Save Domain & Add Sync.
- Define the synchronization: the agent, the start node in your directory, what to read, how to group it, and the schedule.
- On the Synchronizations page, select the synchronization, and then select Sync Now to run it once. Check the result in Sync History.
After that, continue the setup with Connect your first license manager.
The documentation team might draft this page using a large language model. A technical writer reviews every page and verifies it against the product before publishing it. A human makes the final decision.