OpenLM roles & permissions
Scope
This document describes the OpenLM Roles & Permissions Groups feature and serves as a reference guide to system administrators who seek intricate grouping and permission granting over their OpenLM-managed licensing control system.
General
The OpenLM SLM supports a role-based security feature that allows system administrators to implement customized access to OpenLM tools by setting access roles. This feature facilitates the implementation of OpenLM tools for diverse groups; like help desk, system administrators, managers, and developers. The role-based security system secures nearly all the resources of the OpenLM system's entities, such as listed servers, fields and action buttons.
Identity Service
OpenLM Identity Service handles identity and access management for OpenLM products.
If your license file doesn't have the Role&Permission feature, Identity Service still has basic Roles to assign users, and you can edit it only (No Adding, Deleting, or Duplicating).

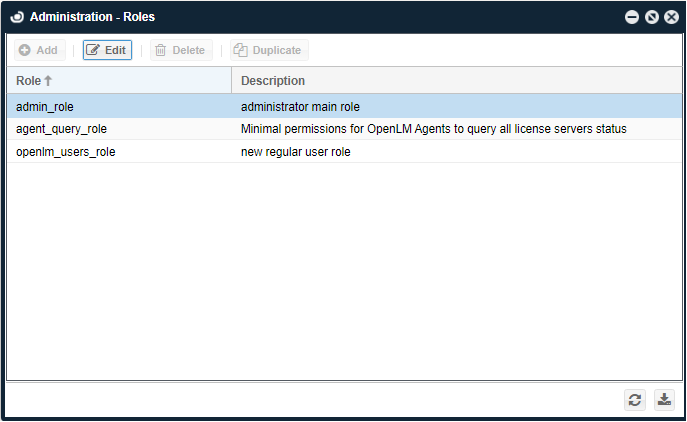 But if your license file has Role&Permission, it can give you the full range and functionality of Roles like the one below.
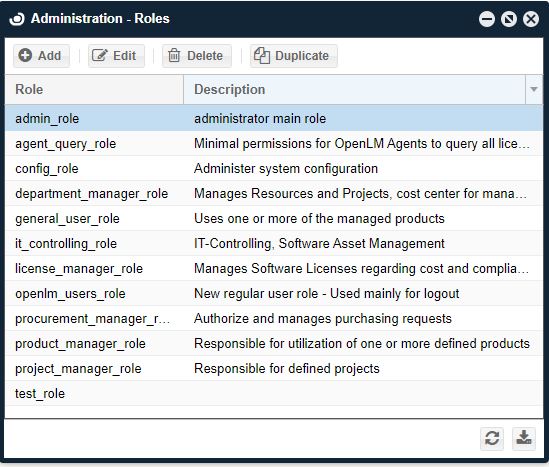 To learn about the full set of role features, contact sales@openlm.com.
The first default account is Admin in Identity Service. But if you want to create a new user, follow the below steps.
Creating a new user
- Create a User Account in EasyAdmin User Interface.

- Assign a desired role(s) to the created user.
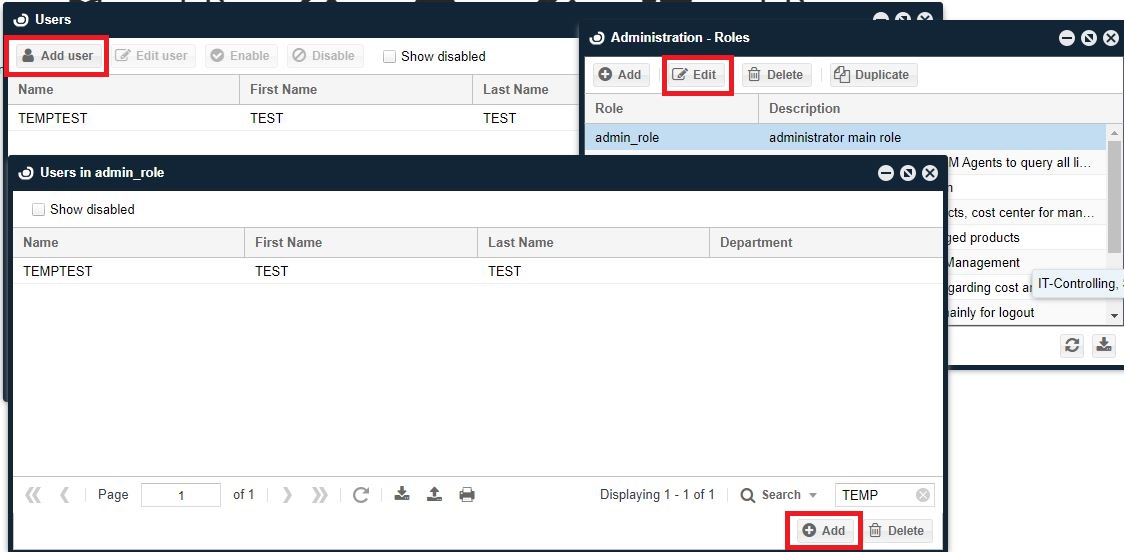
- Create the same user in Identity Service with Password.
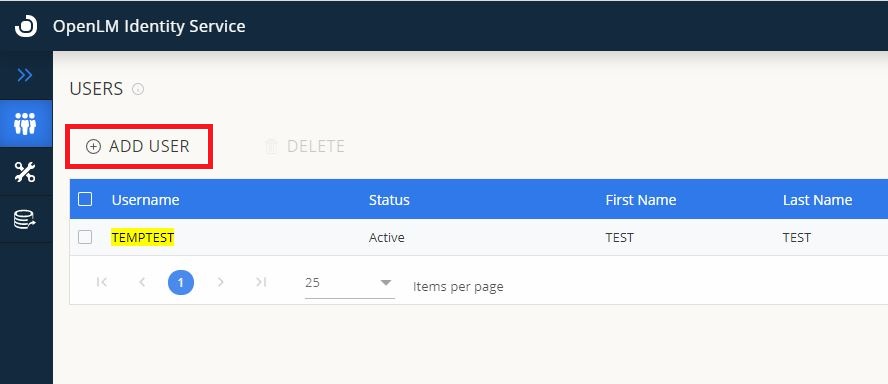
 Note: If you want the user to be able to edit Identity Service settings, activate the System Administrator toggle button.
- Login to EasyAdmin with the user account.
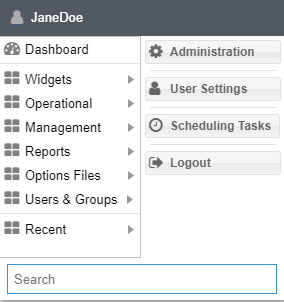
Right now, we have to manually add the same user in each EasyAdmin and Identity Service UI. Especially passwords, only the system administrator of Identity Service UI can change it.
Permissions and roles
Permitting a Resource is the act of granting a certain accessibility level to a certain resource. Each permission is attached to a specific Resource, granting it a permission attribute. Permission attributes may hold either one of the following values:
- Allow: The resource is accessible for a user or a user group.
- Disable: The resource is visible but not accessible for a user or a user group.
- Deny: The resource is neither visible nor accessible to a user or a user group.
A set of such Resource permissions is referred to as a role. Roles are attributed to certain groups of function holders in a company, each group having different accessibility options to OpenLM's resources. Roles' implementation may be set on, activating the differentiation of users and groups according to permission levels, or turned off altogether, thus granting all users and user groups full accessibility to all the system's resources. System administrators manage roles and permissions in the EasyAdmin administrative interface of the OpenLM system. The EasyAdmin control panel includes all the options required to configure roles and permission groups according to administration requirements.
Role inheritance
Permission groups possess an inheritance property. This property facilitates the application of similar permission schemes to different groups. By doing so, different groups may be easily created with only slight differences between their permission schemes.
Creating a new role
To create a new role, go through the following steps:
- Open the EasyAdmin User Interface, and log in with the Administrator's name and password.
- First, configure your organization's SMTP server: in the OpenLM User Interface, select Start → Administration → Email/SMS, fill in your organization's SMTP server details, send a test email, and then select Save.
- The Roles need to be created using OpenLM Administrator privileges, and duplicated in the Identity Service.
- Select the Start button on the EasyAdmin control panel. Select Administration → Roles tab. The Administration-Roles window appears, with some predefined default roles and their description.
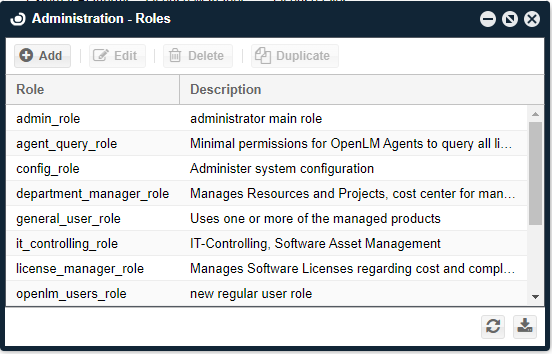
- Select the Add icon to add a role. The Role Details dialog window appears.
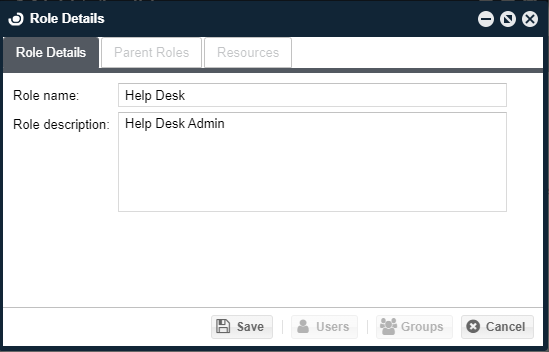 Type in the role name and description (for example, "HelpDesk" and "Help Desk Team" as they appear respectively in the image above). Select Save. Note that the new role name would be saved in lower-case format (that is, "helpdesk").
Adding resources to a role
Adding resources to the newly created role may be done in either one of two methods. The 1st is by manually selecting Resources and attaching them to the new role:
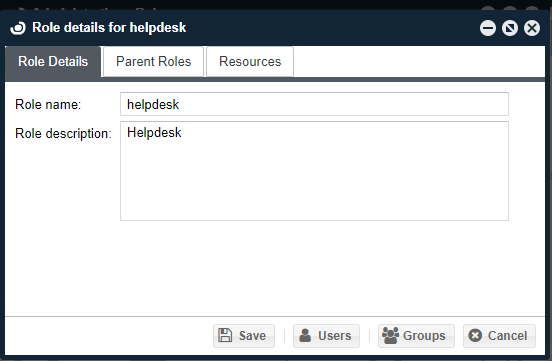
- In the Roles window, select the required role, for example, "helpdesk". Select the "Edit" icon. The "Role Details for helpdesk" window appears (Similar to the "Role Details" dialog window depicted above). Note that the default predefined roles may not be edited.
- Select the Resources tab, and select the Add button. The "Resources Search" dialog box appears. Note that each line in this table contains a Resource name and description, easing the linkage between a registry in the table and its actual function in the OpenLM system.
- Select a resource (for example, the add_project), and select the Select button. The "Role Details" window's Resources tab now appears with the newly attached "add_project" resource.
- Select the Resources tab and select any line while under the Permission heading. The drop-down functionality is engaged and the user may now select a permission attribute for a resource per user.
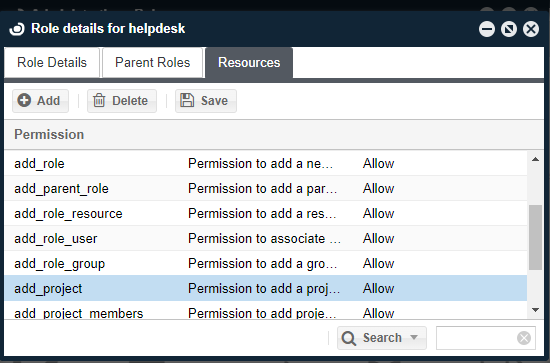
Adding resource permissions through inheritance property
- In the "Role Details for helpdesk" dialog window, select the "Parent Roles" tab and select the Add icon. The Roles search dialog window appears.
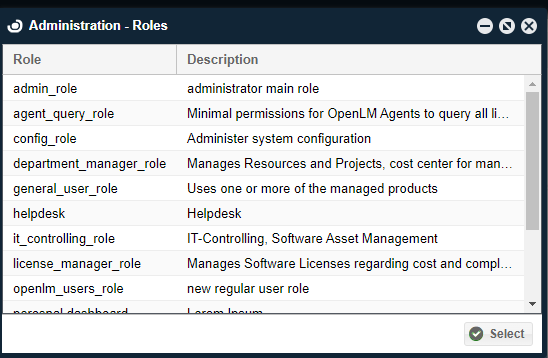
- Select the role that would serve as the parent of the newly created "helpdesk" role, for example, "admin_role" in the image above, and select the Select button. Note that the "admin_role" is the default basic role, and is always apparent for serving as a parent role. The new "helpdesk" role now possesses all the permission attributes of the parent "admin_role".
OpenLM users
To assign roles to users, we should first make sure such users exist in the OpenLM database. The list of users is shown in the EasyAdmin 'Start' → "Users & Groups" → "Users" tab. Users can be added to the OpenLM database in several ways:
- By synchronizing the OpenLM database with the organization's Active Directory, by using the OpenLM Directory Sync.
- Through monitoring of license usage.
- By reading the FlexLM License file
- By reading the FlexLM Options file
- Manually created, as described in the following section.
Manually creating a new user entry
To manually create a new user entry in EasyAdmin, go through the following steps:
- Follow this path, EasyAdmin Start→ Users & Groups → Users tab. The Users window appears.
- Select the Add User button. The User details form appears. Fill in the appropriate information items, check the Enabled box, and select Save as depicted below.
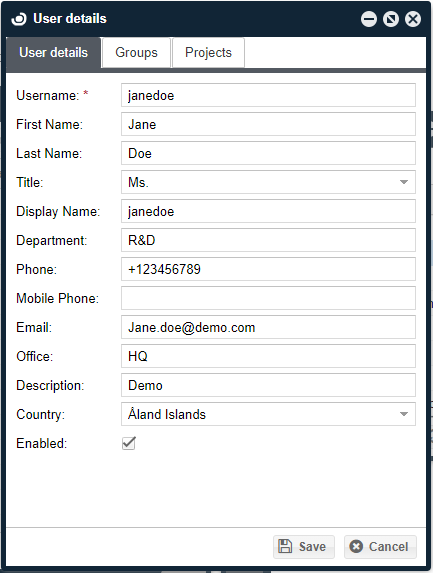
Manually adding a user to a group
Users can be made members of a group by either:
- Synchronizing the OpenLM database with the organization's Active Directory. See Directory Sync documentation for more information.
- Manually, as described in the following steps: a. Follow this path: EasyAdmin Start→ Users & Groups → Groups. The Groups window appears. b. Select a group from the Group window (for example, "GroupName"), and select the Members icon to view the members of the selected group. The Users in Group Name window appears. c. Select the Add icon, to add further users to Group Name's list of users.
Assigning roles to a user or group of users
After establishing a new role of permissions and introducing a new user or group of users, it is now possible to attach this role to the users, to assign the role's permission set to these users. To do so:
- Follow this path: EasyAdmin Start→ Administration → Roles.
- Select the new role (for example, "helpdesk"). The "Role details for helpdesk" dialog window appears.
- Select the Users or Groups buttons on the bottom of the window. The appropriate window (that is, the Users in the helpdesk or Groups in the help desk) appears.
- Select the Add icon. The appropriate window (User search or Groups) appears. Select the required instance of the user or group, and select the Select icon. The added user or Group instance has been added to the role, and may be seen there in the Users in the help desk or Groups in the help desk window.
Changing a resource's permission attribute
To change a Resource's permission attribute, for example, to deactivate accessibility to this Resource by a certain role, follow this procedure:
- Follow this path: EasyAdmin Start→ Users and Groups→ Workstations. In this example - this would be the affected Resource.
- Follow this path: EasyAdmin Start -> Administration→ "Roles" tab.
- Select a specific role, for example, "helpdesk". Select the Edit button. The Role details for the helpdesk dialog window appear.
- Select the Resources tab and select the Add icon.
- Select a resource, for example, "control_panel_menu_workstations" as depicted, and select Select. The control_panel_menu_workstations resource is added to the Role details for the helpdesk dialog window
- Stand and select the Permission attribute of that Resource. A drop-down list appears. Select the drop-down list, and select the required permission attribute value, for example, Disable.
- Select the Save icon, close, and reopen the OpenLM EasyAdmin UI.
- Select the Start button on the EasyAdmin control panel. Select the Users & Groups tab. Notice that the Workstation is no longer visible. It has been removed from the admin_role view.
License server resource visibility
If the permission of a Resource entry whose name starts with the word "server_*" is disabled or denied, the respective user groups would become unable to view items on that server. Moreover, that server would become omitted from the Workstation Agent "License usage information" window. The following is an administrator Frequently Asked Question: "Why is all license usage information on the Agent blocked whenever an admin account is created in the OpenLM SLM Configuration window?" The answer is that when permissions are activated, users need to be assigned a set of permissions that would allow them to view license servers' details. To achieve this, follow this action list:
- Uncheck, and then recheck the Require Login Credentials checkbox. Follow the Creating a New Role section above.
- Assign resources to the new role: After you save the new role, the Resources tab will become activated. Navigate to that tab. Note that it is assigned with one default resource. Now you need to add all resources that have this name pattern "server_servername" for example, server_srv1 (where srv1 is the name of the server that you will grant access to). To do so, Follow the description in the section Adding resources to a role above.
- Assign the new role to the admin user: To do so, Follow the description in the section Assigning roles to a user or group of users above.
Permission arbitration
Using the permissions tool, it is possible to grant resource permissions to single users independently. Also, as stated earlier, permissions may be inherited from parent roles. If one method grants permission and the other denies it, a mismatch condition may be present. In this case - an arbitration procedure runs; The closest entity to a single user, that is, a permission attribute granted to an individual user, or to the "youngest child" of an inherited attribute is the most "powerful". If two contradicting attributes of the same strength are applied: an unknown condition may occur. For example, picture the following circumstance:
- The admin role is parent to two roles: Role1 and Role2.
- Admin denies permission to a resource.
- Role1 does not explicitly refer to that resource, hence - it denies it implicitly.
- Role2 explicitly allows the resource permission.
User attributes:
- If the User is attached to any one single role, its permission attributes will be the same as that of the role.
- If the User is attached to roles Admin and Role1 the permission will be denied.
- If the User is attached to Role1 & Role2, the permission would be allowed, since Role2 is the "youngest child" to infer to that resource.
- If the User is attached to roles Admin and Role2, an unknown condition occurs.
List of resources
The following resources are available:
| Name | Description |
|---|---|
| currently_consumed_licenses_column_close_application | Currently Consumed Licenses Panel - Permission to close applications |
| currently_consumed_licenses_column_remove_license | Currently Consumed Licenses Panel - Permission to remove licenses |
| currently_consumed_licenses_column_username | Currently Consumed Licenses Panel - Show User Name column |
| configuration_form_read | Permission to open "OpenLM SLM Configuration" tool |
| configuration_form_update | Permission to make updates in the "OpenLM SLM Configuration" tool |
| control_panel_menu_currently_consumed_licenses | Control Panel - Show "Currently Consumed Licenses" (under "Operational" menu) |
| control_panel_menu_change_password | Control Panel - Show "Change Password" in "Start" menu |
| control_panel_menu_denials | Control Panel - Show "Denials" (under "Reports" menu) |
| control_panel_menu_features | Control Panel - Show "Features" (under "Option Files" menu) |
| control_panel_menu_group_usage | Control Panel - Show "Group Usage" (under "Reports" menu) |
| control_panel_menu_groups | Control Panel - Show "Groups" (under "Users & Groups" menu) |
| control_panel_menu_host_groups | Control Panel - Show "Host Groups" (under "Option Files" menu) |
| control_panel_menu_ips | Control Panel - Show "IPs" (under "Option Files" menu) |
| control_panel_menu_license_activity | Control Panel - Show "License Activity" (under "Reports" menu) |
| control_panel_menu_license_usage | Control Panel - Show "License Usage" (under "Reports" menu) |
| control_panel_menu_licenses | Control Panel - Show "Licenses" (under "Management" menu) |
| control_panel_menu_logout | Control Panel - Show "Logout" in "Start" menu |
| control_panel_menu_management | Control Panel - Show "Management" (include: "Licenses", "Licenses Not In Use", "License Utilization", "License Procurement", "Audit Report" and "Active Users Report") |
| control_panel_menu_option_files | Control Panel - Show "Options Files" (include: "IPs", "Host Groups" and "Options Files Management") |
| control_panel_menu_policy | Control Panel - Show "Policy" (under "Option Files" menu) |
| control_panel_menu_project_usage | Control Panel - Show "Project Usage" (under "Reports" menu) |
| control_panel_menu_released_licenses | Control Panel - Show "Released Licenses" (under "Operational" menu) |
| control_panel_menu_reports | Control Panel - Show "Reports" (include: "Project Usage", "Group Usage", "License Usage", "License Activity", "Denials") |
| admin_panel_roles | Administration Panel - Show "Roles" |
| control_panel_menu_users | Control Panel - Show "Users" (under "Users & Groups" menu) |
| control_panel_menu_users_permissions | Control Panel - Show "Users & Groups" in "Start" menu (include: "Users", "Groups", "Workstations") |
| control_panel_menu_workstations | Control Panel - Show "Workstations" (under "Users & Groups" menu) |
| control_panel_tab | Basic permission to open "OpenLM User Interface" |
| user_change_password | Permission to change other user's password |
| control_panel_menu_administration | Permission to configure administration actions |
| add_user | Permission to add a new user |
| edit_user | Permission to edit an existing user |
| add_group | Permission to add a new group |
| edit_group | Permission to edit an existing group |
| delete_group | Permission to delete an existing group |
| view_group_members | Permission to view group members |
| add_group_members | Permission to add group members |
| remove_group_members | Permission to remove group members |
| add_role | Permission to add a new role |
| edit_role | Permission to edit an existing role |
| delete_role | Permission to delete an existing role |
| duplicate_role | Permission to duplicate an existing role |
| add_parent_role | Permission to add a parent role |
| delete_parent_role | Permission to delete a parent role |
| add_role_resource | Permission to add a resource to a role |
| delete_role_resource | Permission to delete a resource from a role |
| add_role_user | Permission to associate a user with a role |
| remove_role_user | Permission to remove a user from a role |
| add_role_group | Permission to add a group to a role |
| remove_role_group | Permission to remove a group from a role |
| control_panel_menu_project_list | Control Panel - Show "Projects List" (under "Management" menu) |
| add_project | Permission to add a project |
| delete_project | Permission to delete a project |
| edit_project | Permission to edit a project |
| add_project_members | Permission to add project members |
| add_project_groups | Permission to add project groups |
| enable_project | Permission to activate projects |
| disable_project | Permission to deactivate projects |
| remove_project_members | Permission to remove project members |
| remove_workstation | Permission to remove workstations |
| remove_project_groups | Permission to remove project groups |
| control_panel_menu_general_statistics | Control Panel - Show "General Statistics" (under "Widgets" menu) |
| control_panel_menu_license_servers | Control Panel - Show "License Servers" (under "Widgets" menu) |
| control_panel_menu_alerts | Control Panel - Show "Alert" (under "Widgets" menu) |
| control_panel_menu_feature_usage_status | Control Panel - Show "Feature Usage Status" (under "Widgets" menu) |
| control_panel_menu_license_procurement | Control Panel - Show "License Procurement" (under "Management" menu) |
| license_servers_administer_host | Permission to start, stop, reread servers, and reset the Broker |
| control_panel_menu_license_not_in_use | Control Panel - Show "License not in use" (under "Management" menu) |
| enable_or_disable_users | Permission to activate or deactivate users |
| delete_history | Permission to delete historical data |
| control_panel_menu_all_features | Control Panel - Show "All Features" (under "Option Files" menu) |
| control_panel_menu_recent_feature_denials | Control Panel - Show "Recent Feature Denials" (under "Widgets" menu) |
| control_panel_menu_license_utilization | Control Panel - Show "License Utilization" (under "Management" menu) |
| control_panel_menu_license_usage_heatmap | Control Panel - Show "License Usage Heatmap" |
| enable_or_disable_groups | Permission to activate or deactivate groups |
| currently_consumed_licenses_column_workstation | Currently Consumed Licenses Panel - Show Workstation column |
| license_activity_column_workstation | License Activity Panel - Show Workstation column |
| license_activity_column_username | License Activity Panel - Show User Name column |
| control_panel_menu_operational | Control Panel - Show "Operational" (include: "currently consumed licenses", "Released licenses") |
| control_panel_menu_widgets | Control Panel - Show "Widgets" (includes: "License Servers", "License Usage Heat Map", "Host Availability", "General Statistics", "Alerts", "Recent Features Denials", "Features Usage Status", "Selected Feature Statistics") |
| control_panel_menu_host_availability | Control Panel - Show "Host Availability" (under "Widgets" menu) |
| control_panel_menu_audit_report | Control Panel - Show "Audit Report" (under "Management" menu) |
| control_panel_menu_active_users_report | Control Panel - Show "Active Users Report" (under "Management" menu) |
| control_panel_menu_user_settings | Control Panel - Show "User Settings" in "Start" menu |
| currently_consumed_licenses_column_host_id | Currently Consumed Licenses Panel - Show Host Id column |
| currently_consumed_licenses_column_first_name | Currently Consumed Licenses Panel - Show First Name column |
| currently_consumed_licenses_column_last_name | Currently Consumed Licenses Panel - Show Last Name column |
| currently_consumed_licenses_column_phone_number | Currently Consumed Licenses Panel - Show Phone Number column |
| currently_consumed_licenses_column_email | Currently Consumed Licenses Panel - Show Email column |
| currently_consumed_licenses_column_start_time | Currently Consumed Licenses Panel - Show Start Time column |
| currently_consumed_licenses_column_ip | Currently Consumed Licenses Panel - Show IP column |
| currently_consumed_licenses_column_duration | Currently Consumed Licenses Panel - Show Duration column |
| currently_consumed_licenses_column_borrowed | Currently Consumed Licenses Panel - Show Borrowed column |
| currently_consumed_licenses_column_linger_time | Currently Consumed Licenses Panel - Show Linger Time column |
| currently_consumed_licenses_column_linger_due | Currently Consumed Licenses Panel - Show Linger Due column |
| currently_consumed_licenses_column_recent_application_idle_period | Currently Consumed Licenses Panel - Show Recent Application Idle Period column |
| currently_consumed_licenses_column_workstation_idle_time | Currently Consumed Licenses Panel - Show Workstation Idle Time column |
| currently_consumed_licenses_column_idle_times | Currently Consumed Licenses Panel - Show Idle Times column |
| license_activity_filter_workstation | Permission To Run Filter On License Activity By Workstation |
| license_activity_filter_user | Permission To Run Filter On License Activity By User |
| license_activity_column_first_name | License Activity Panel - Show First Name column |
| license_activity_column_last_name | License Activity Panel - Show Last Name column |
| license_activity_column_ip | License Activity Panel - Show IP column |
| license_activity_column_host_ids | License Activity Panel - Show Host Ids column |
| denials_filter_workstation | Permission To Run Filter On Denials By Workstation |
| denials_filter_user | Permission To Run Filter On Denials By User |
| denials_column_user_name | Denials Panel - Show User Name column |
| denials_column_first_name | Denials Panel - Show First Name column |
| denials_column_last_name | Denials Panel - Show Last Name column |
| denials_column_workstation | Denials Panel - Show Workstation column |
| add_project_members_groups | Permission to add members groups to a project |
| remove_project_members_groups | Permission to remove members groups to a project |
| view_unmanaged_processes | Permission to view unmanaged processes (under "Administration" menu) |
| edit_unmanaged_processes | Permission to edit unmanaged processes |
| license_activity_column_email | License Activity Panel - Show Email column |
| view_system_messages | Permission to view system messages |
| license_usage_filter_user | Permission to run filter on License Usage by Users |
| view_dashboard | Permission to view the Dashboard |
| view_router_monitoring | Permission to view the Router Monitoring |
| control_panel_menu_feature_usage_per_group | Control Panel - Show "Feature Usage per Group" (under "Reports" menu) |
| control_panel_menu_feature_usage_per_user | Control Panel - Show "Feature Usage per User" (under "Reports" menu) |
| license_servers_upload_license_file | Allows to upload license file in License Servers -> Files window |
| scheduling_reports_show_all | Show Scheduling Reports from all users |
| scheduling_reports_show | Using Scheduling Reports |
| denials_column_email | Denials Panel - Show Email column |
| license_servers_show_candidates | Show candidate servers in "License Servers" window |
| add_workstation | Permission to add workstations |
| view_token_flex_reports | Permission to view Token Flex reports |
| control_panel_menu_named_license_analysis | Control Panel - Show "Named License Analysis (NNU)" report (under "Reports" menu) |
| currently_consumed_licenses_filter_user | Permission to filter by Users in Currently Consumed Licenses report |
| currently_consumed_licenses_filter_workstation | Permission to filter by Workstations in Currently Consumed Licenses report |
| currently_consumed_licenses_column_group | Currently Consumed Licenses Panel - Show Group Name column |
| currently_consumed_licenses_column_project | Currently Consumed Licenses Panel - Show Project Name column |
| currently_consumed_licenses_column_vendor | Currently Consumed Licenses Panel - Show Vendor Name column |
| currently_consumed_licenses_column_server | Currently Consumed Licenses Panel - Show Server Name column |
| currently_consumed_licenses_column_feature | Currently Consumed Licenses Panel - Show Feature Name column |
| currently_consumed_licenses_column_product_name | Currently Consumed Licenses Panel - Show Product Name column |
| currently_consumed_licenses_column_version | Currently Consumed Licenses Panel - Show Version column |
| currently_consumed_licenses_column_additional_key | Currently Consumed Licenses Panel - Show Additional Key column |
| currently_consumed_licenses_column_license_type | Currently Consumed Licenses Panel - Show License Type column |
| currently_consumed_licenses_column_handle | Currently Consumed Licenses Panel - Show Handle column |
| currently_consumed_licenses_column_total_licenses | Currently Consumed Licenses Panel - Show Total Number of Licenses column |
| currently_consumed_licenses_column_consumed_tokens | Currently Consumed Licenses Panel - Show Consumed Tokens column |
| view_token_flex_released_idle_licenses | view_token_flex_released_idle_licenses |
| license_servers_admin_read | Permission to read License Server |
| license_servers_admin_update | Permission to update License Server |
| view_license_files | View License Files |
| edit_license_files | Edit License Files |
| server_OpenLM reusable tokens | Display data of server OpenLM reusable tokens over any panel in "OpenLM User Interface" |
| admin_server_OpenLM reusable tokens | License Servers Panel - Permission to Stop/Start/Reread server OpenLM reusable tokens |
The documentation team might draft this page using a large language model. A technical writer reviews every page and verifies it against the product before publishing it. A human makes the final decision.