Reports Scheduler SSL configuration
Overview
This document explains how to enable and configure SSL (HTTPS) for the OpenLM Reports Scheduler component.
Prerequisites
If the Identity Service is used, the Reports Scheduler should be secured with Identity Service first. SSL Certificate: .pfx is recommended.
Note: Some .pfx files can’t be read by a certain version of Java. Please change the version accordingly.
- Access to the server hosting Reports Scheduler
- Administrative rights to install certificates
- A valid SSL certificate (CA-signed or internal PKI) for the Reports Scheduler hostname
- Private key associated with the certificate
- (Optional) Intermediate CA bundle
Identity Service security mode configuration
-
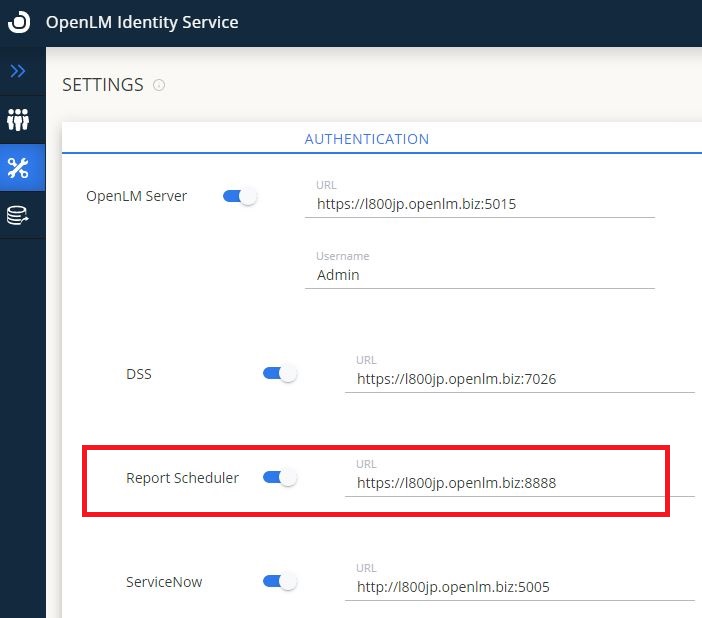
Navigate to the Identity Service instance→Autentication tab.
-
Change the URL for Reports Scheduler by adding the s to the http: https:FQDN:8888.
-
Save the changes.
-
Check if the new Client ID and Secret Key was filled in the Reports Scheduler Property file.
-
Restart the Reports Scheduler Service in Windows Service.
- To verify if the configuration is successful, navigate to “C:\Program Files\OpenLM\OpenLM Reports Scheduler\report_scheduler.properties” and make sure the openlm.client.secret and openlm.client.scope parameter has a value, as depicted below:
# OpenLM Reports Scheduler Identity Service connection
openlm.connect.retries=5
openlm.protocol=https
openlm.host=1800jp.openlm.biz
openlm.soap.port=5015
openlm.ea.port=5015
openlm.ea.protocol=https
openlm.client.id=openlm.reportscheduler.client
openlm.client.secret=<REDACTED>;
openlm.client.scope=openlm.server.scope openlm.cloud.scope**
Preparing the Keystore / PFX
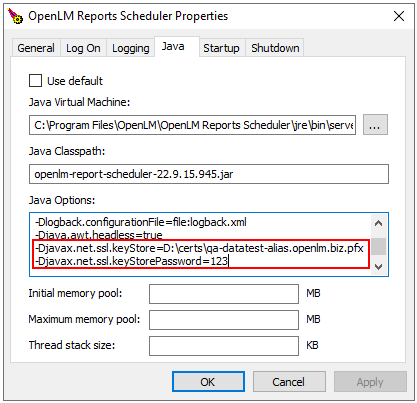
- Locate the Reports Scheduler Property Program file. (typically located at C:\Program Files\OpenLM\OpenLM Reports Scheduler\bin\OpenLM Reports Scheduler.exe)
- Open the Java tab and add the following lines: -Djavax.net.ssl.keyStore=“C:\Program Files\OpenLM\OpenLM Server\bin\cert\yourcertificate.pfx” -Djavax.net.ssl.keyStorePassword=yourpassword
- Click ok and Apply.
How to configure the SSL
-
Locate the OpenLM Report Scheduler folder and open the report_scheduler.properties file in a text editor, typically located at “C:\Program Files\OpenLM\OpenLM Reports Scheduler\report_scheduler.properties”
-
Change the following variables:
server.address=FQDN (fully qualified domain name, ex: janedoe.openlm.com)
Server.protocol=https
-
Save the changes.
-
Open Windows Services and restart the “OpenLM Report Scheduler” service.
#server.context.path=report_scheduler
server.address=1800jp.openlm.biz
server.port=8888
server.protocol=https
server.context.path=report_scheduler
browser.path=chromium/chrome.exe
Updating Configuration Files
# Placeholder snippet
ssl.enabled=true
ssl.port=8443
ssl.keystore.path=/path/to/reports-scheduler.jks
ssl.keystore.password=********
ssl.key.alias=reports-scheduler
ssl.protocols=TLSv1.2,TLSv1.3
-
Locate the OpenLM Server folder and open the params.js file in a text editor (typically located at “C:\Program Files\OpenLM\OpenLM Server\bin\wwwroot\params.js).
-
Change the following variables:
var _schedulingTaskURL = ‘https://FQDN:8888/reprot_scheduler/job’;
-
Save the changes.
-
Open Windows Services and restart the “OpenLM Server” service.
If OpenLM Server is SSL secured
-
Locate the OpenLM Report Scheduler folder and open the report_scheduler.properties file in a text editor (typically located at C:\Program Files\OpenLM\OpenLM Reports Scheduler)
-
Change the following variables:
openlm.host=FQDN
openlm.protocol=https
openlm.ea.protocol=https
-
Save the changes.
-
Open Windows Services and restart the “OpenLM Report Scheduler” service.