Azure Active Directory と OpenLM の統合
このドキュメントでは、Microsoft Entra ID を Identity Service と構成し、OpenLM の外部 Identity Provider として Microsoft Entra ID を設定するための手順を説明します。
前提条件
- アプリケーションを登録する権限を持つ Azure Portal へのアクセス
- オンプレミスユーザーの場合: OpenLM SLM と Identity Service が SSL で保護 されていること
Microsoft Entra ID の構成
-
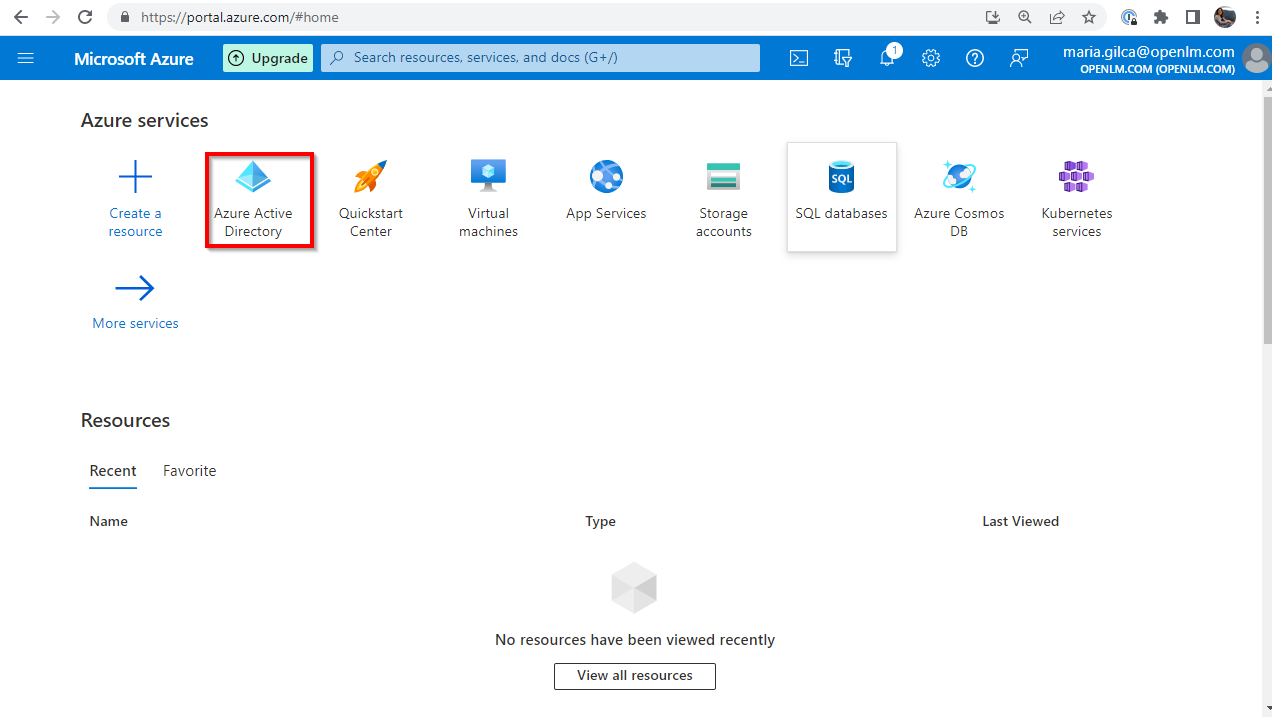
Azure Portal にログインします。Microsoft Entra ID ディレクトリに移動します。
-
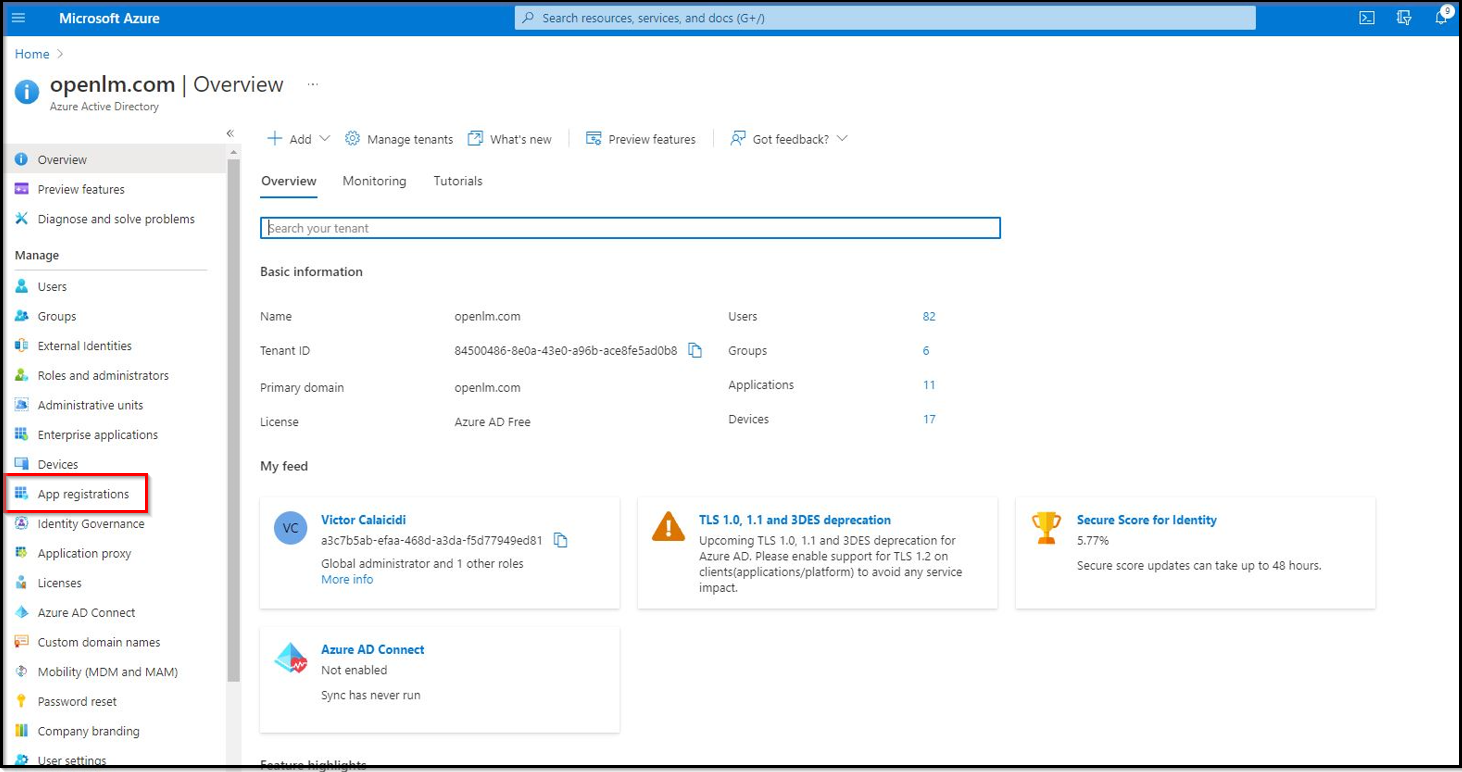
App Registrations セクションに移動します。
-
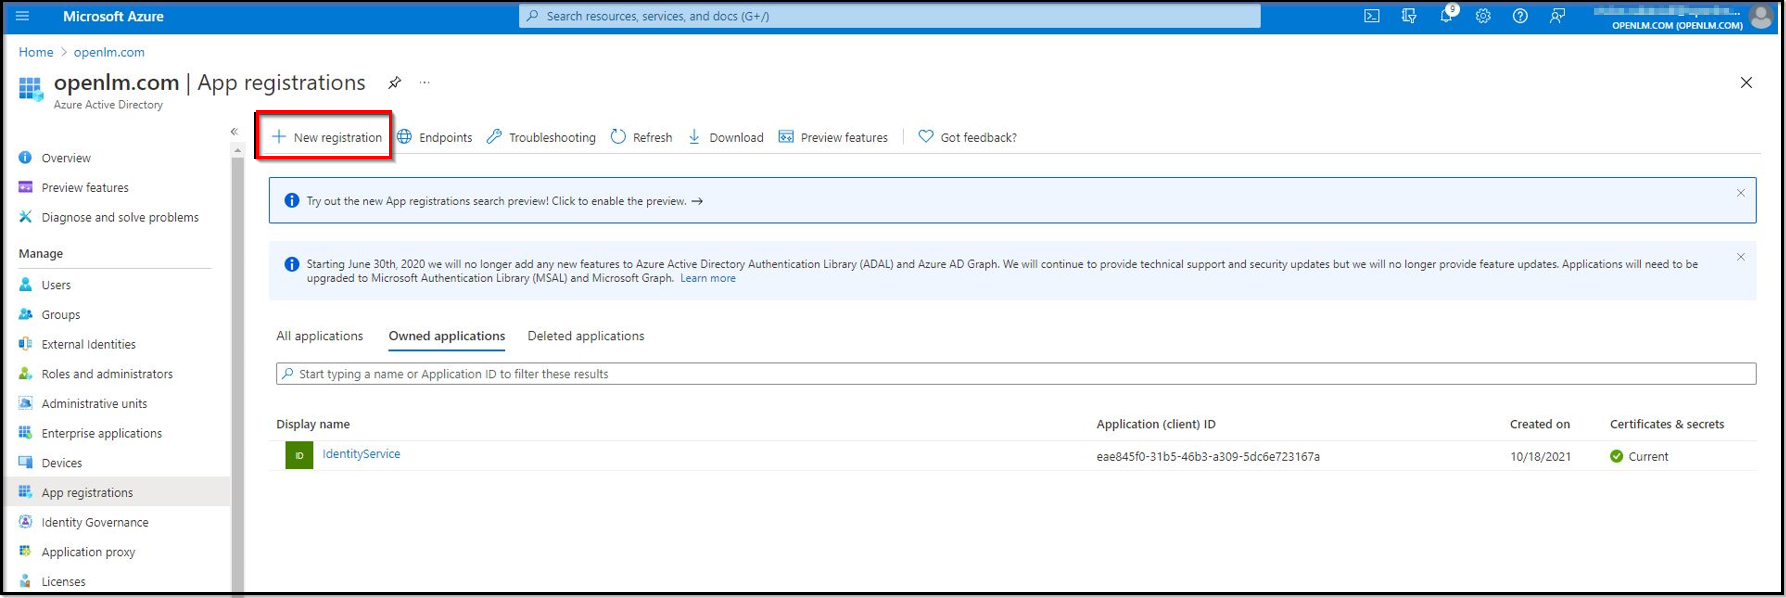
新しい登録を作成します。New Registration ボタンをクリックします。
-
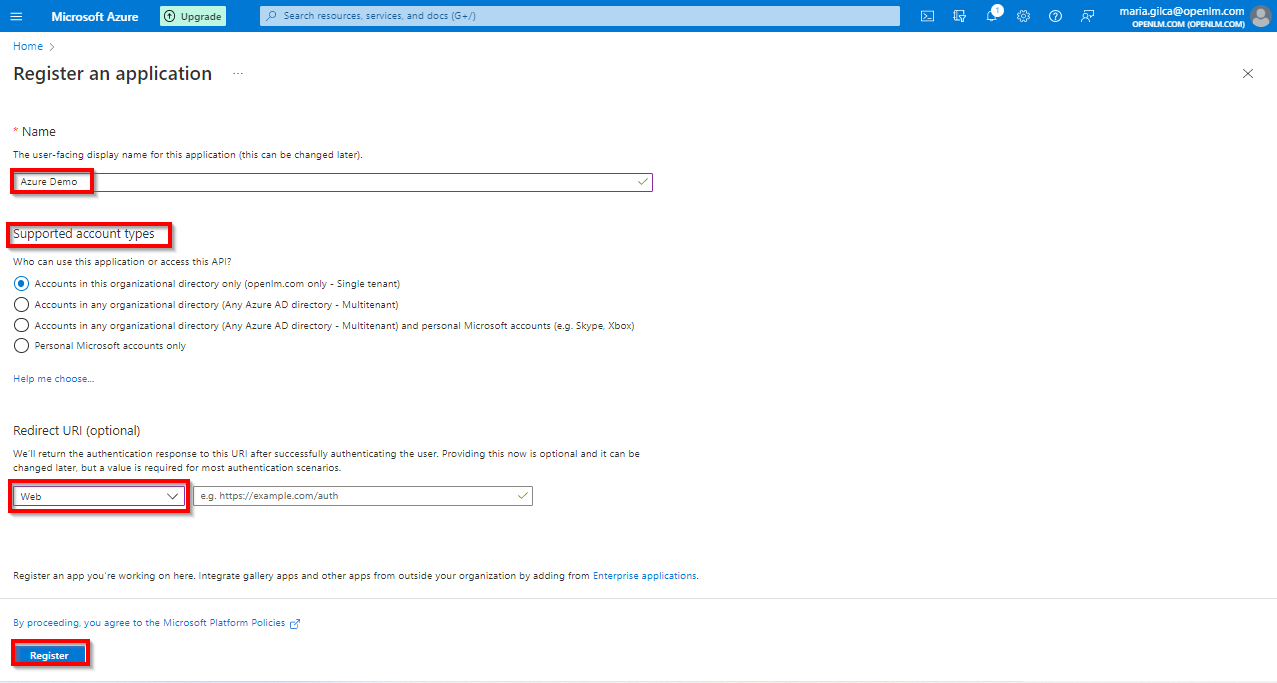
アプリケーションの display name を入力します(例: Identity Service)。Redirect URI フィールドでは、ドロップダウンから Web を選択します。URI フィールドは空のままにしておき、後で構成時に更新します。Register ボタンをクリックします。
-
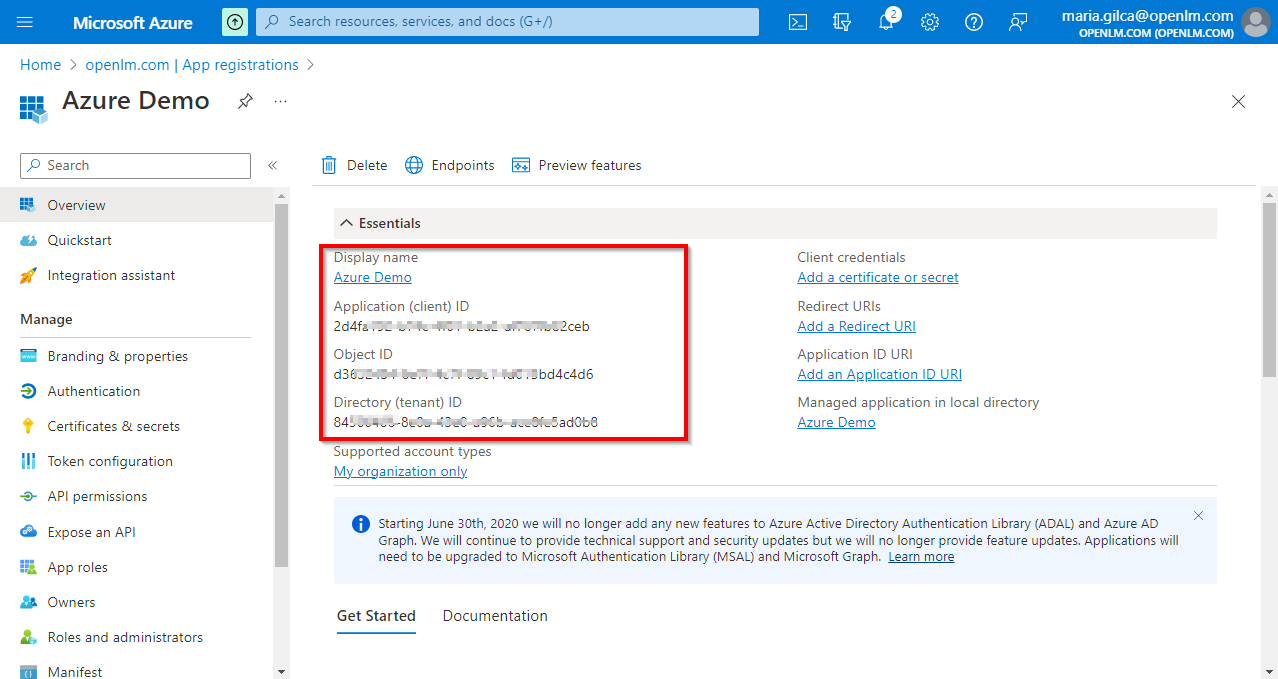
アプリケーションが登録されました。概要ページに表示される Application (client) ID と Directory (tenant) ID を控えてください。以降の手順でこれらの値が必要になります。
-
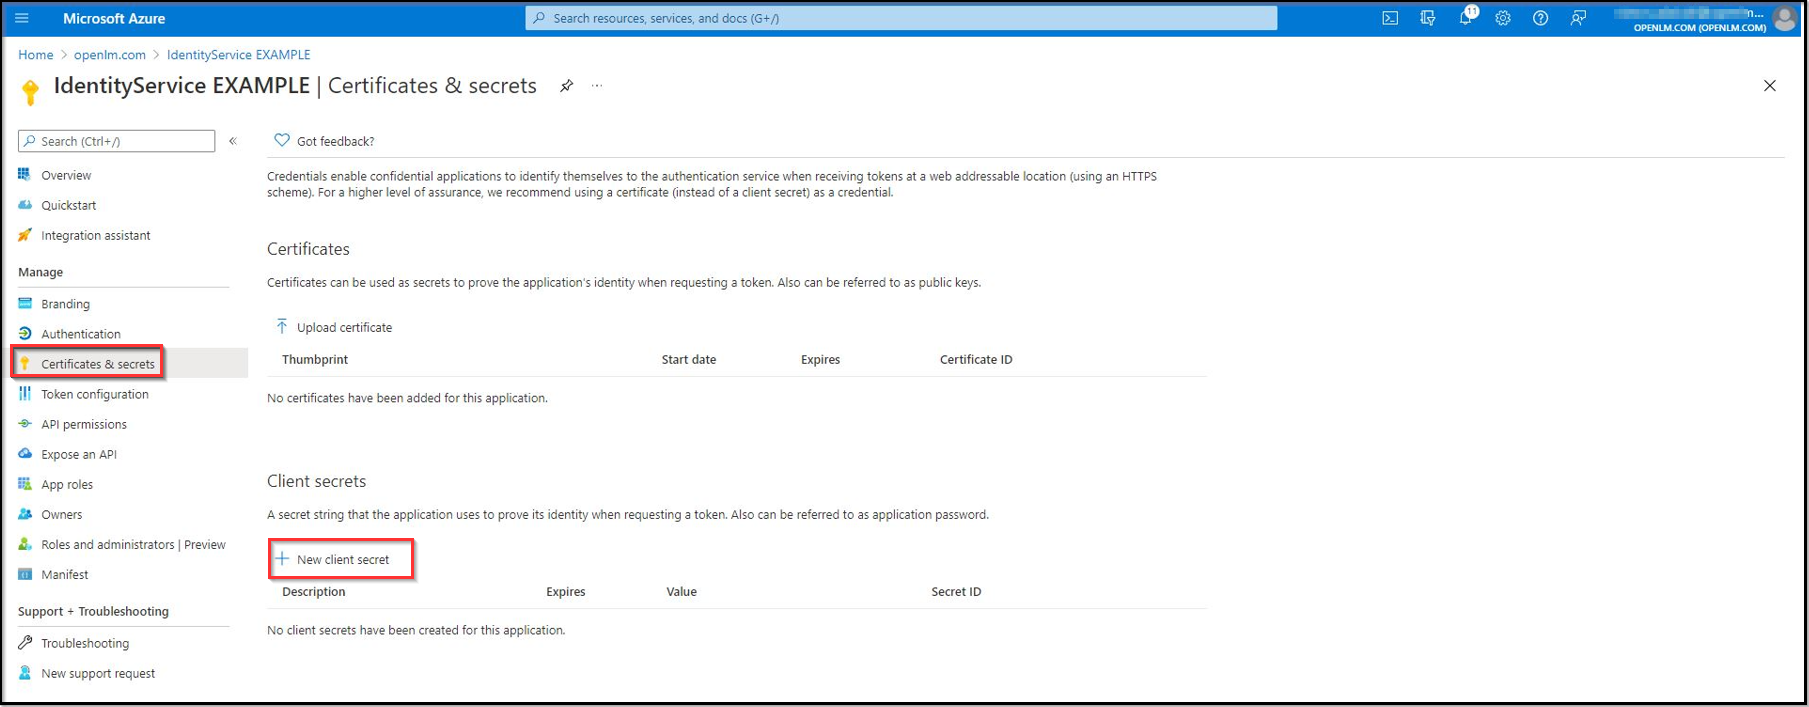
Certificates & Secrets セクションに移動し、新しい client secret を作成します。New client secret をクリックします。
Pro tip: このセクションは新しいタブで開いておくことをおすすめします。
-
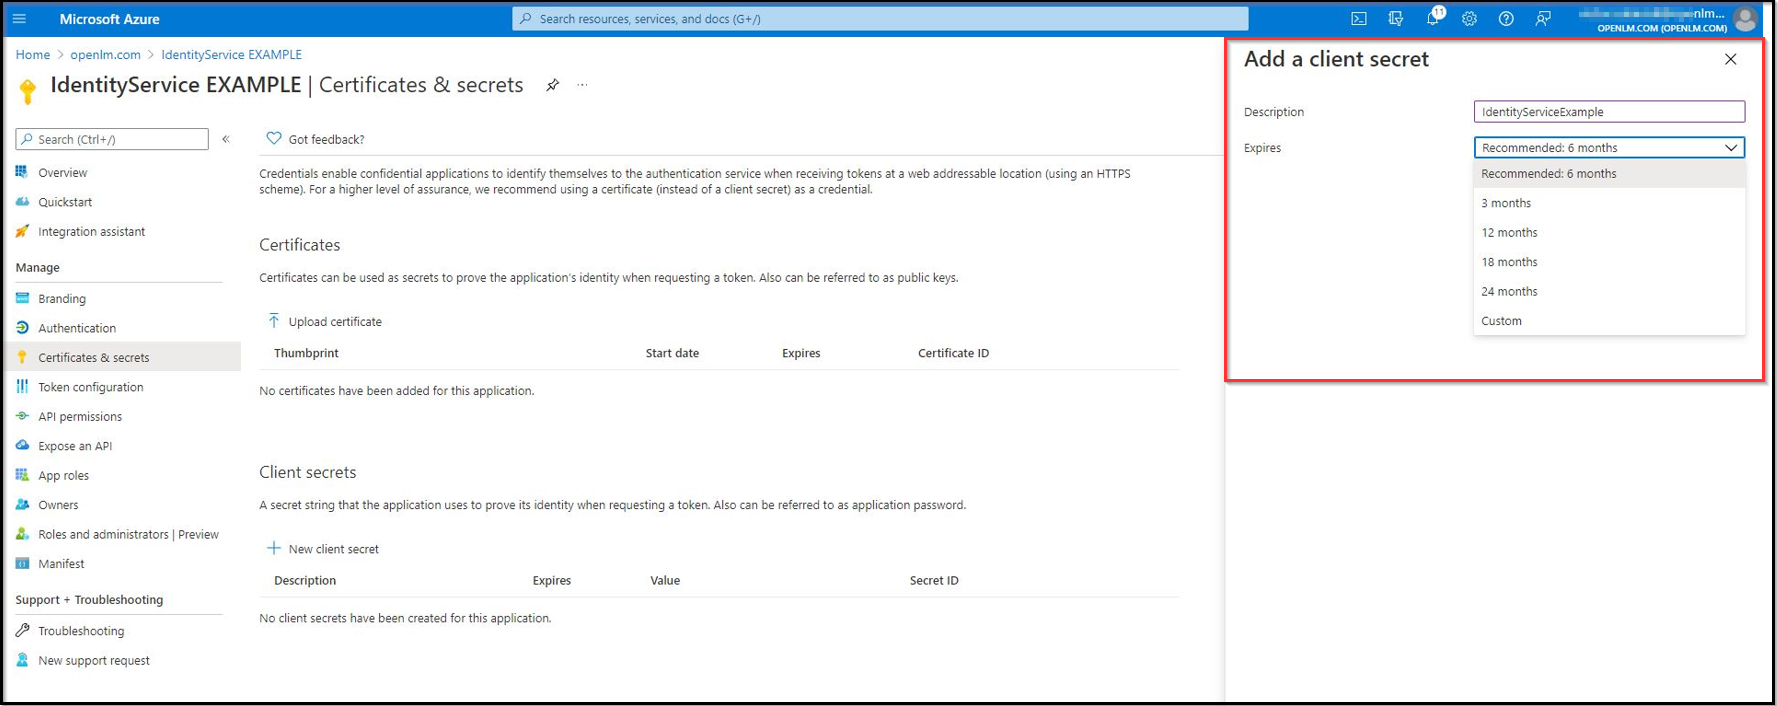
client secret の description と lifespan を指定し、ADD をクリックします。
-
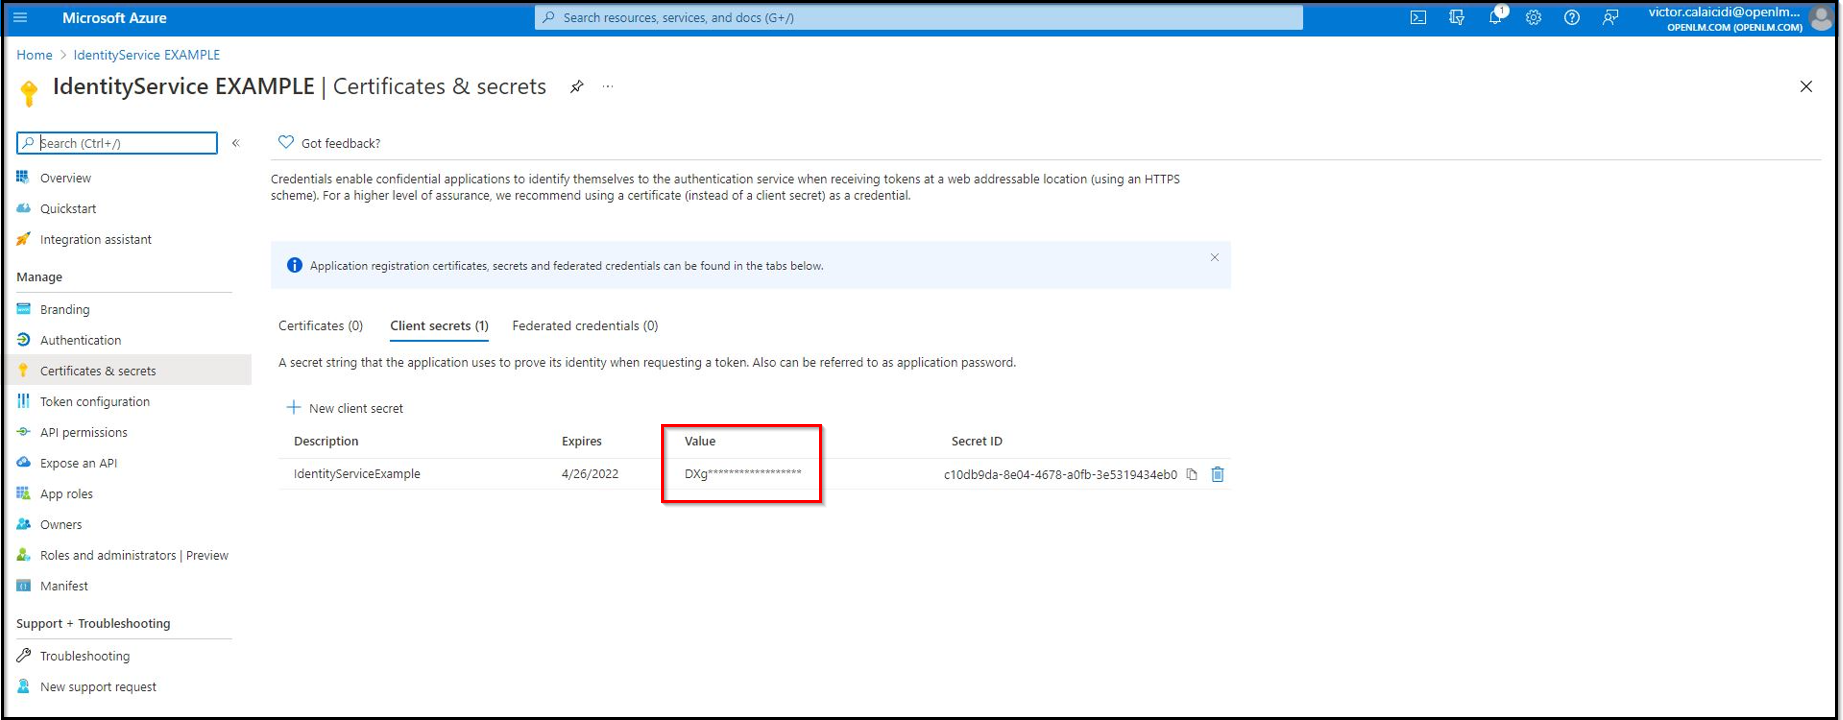
Client Secret が作成されました。Value と Secret ID を控えてください。
警告Client secret の値は作成直後にしか表示されません。ページを離れる前に必ずシークレットの値を保存してください。
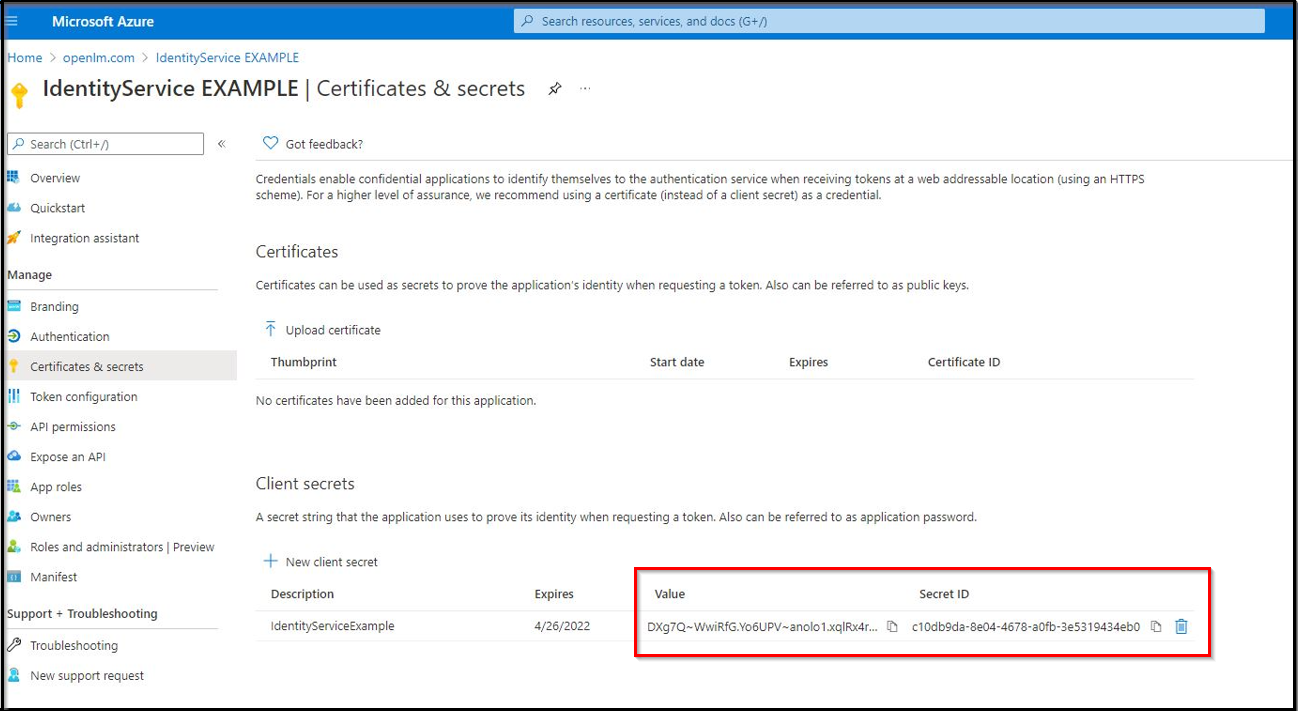
ページを離れると、値は伏せ字で表示され、再取得できなくなります:
OpenLM オンプレミスユーザー — Microsoft Entra ID を外部 Identity Provider として追加
-
Identity Service アカウントに移動し、External Providers アイコンをクリックして外部プロバイダを追加します。
-
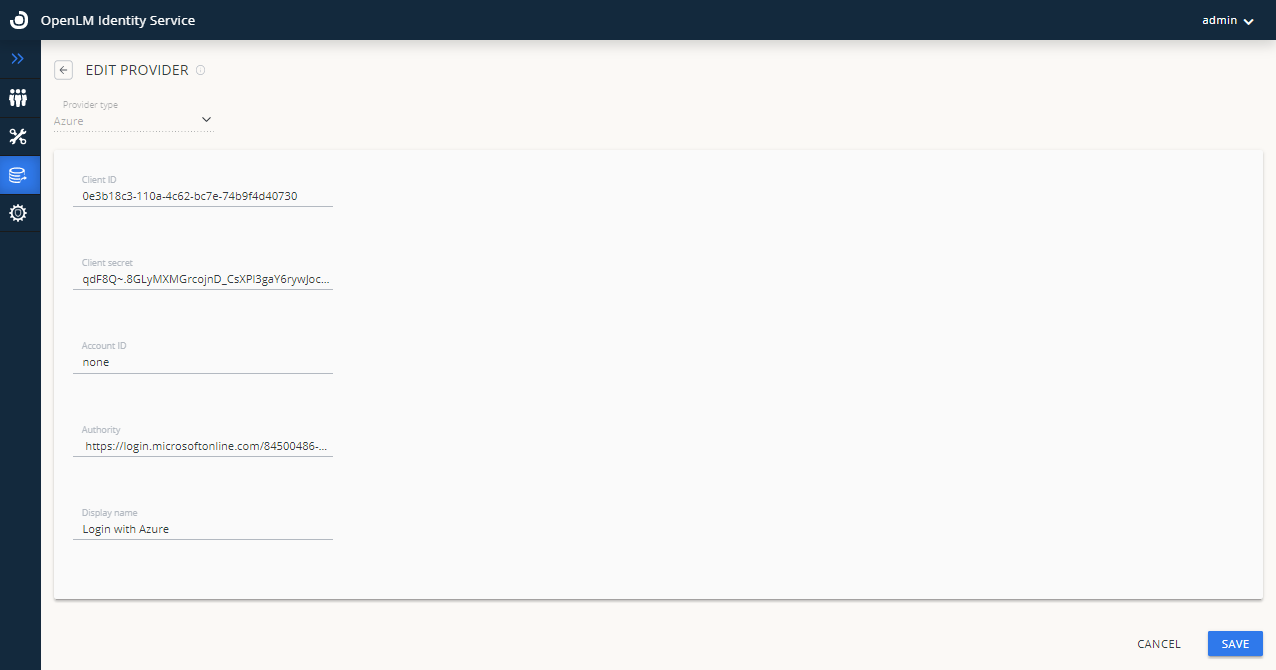
ドロップダウンからプロバイダタイプ Azure を選択します。
-
Client ID を入力します。これは上記 手順 5 の Application (client) ID です。
-
Client Secret を入力します。これは上記 手順 8 の Value です。
-
Account ID フィールドに none と入力します。
警告Account ID フィールドを空白のままにしないでください — 必ず
noneと入力してください。空白のままにすると設定が失敗します。 -
Authority フィールドに、次の形式で authority URL を入力します:
https://login.microsoftonline.com/{Directory (tenant) ID}
{Directory (tenant) ID}は上記 手順 5 の tenant ID に置き換えます。 -
Display Name フィールドにプロバイダの表示名(例: Login with Azure)を入力します。
-
Save をクリックします。
-
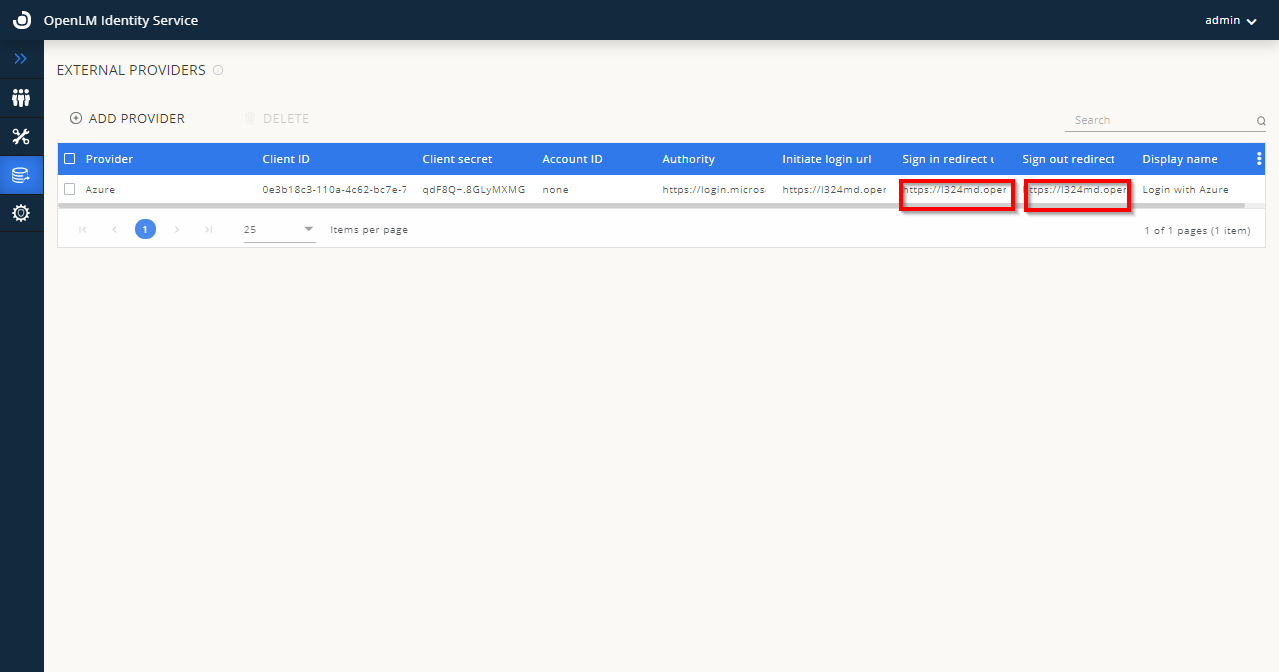
Save をクリックすると、追加した外部プロバイダ (Azure) が External Providers リストに表示されます。画面に表示される Redirect URLs を控えてください。次の手順で必要になります。
-
ここに表示される Redirect URLs が必要になるため、このウィンドウは開いたままにしてください。
-
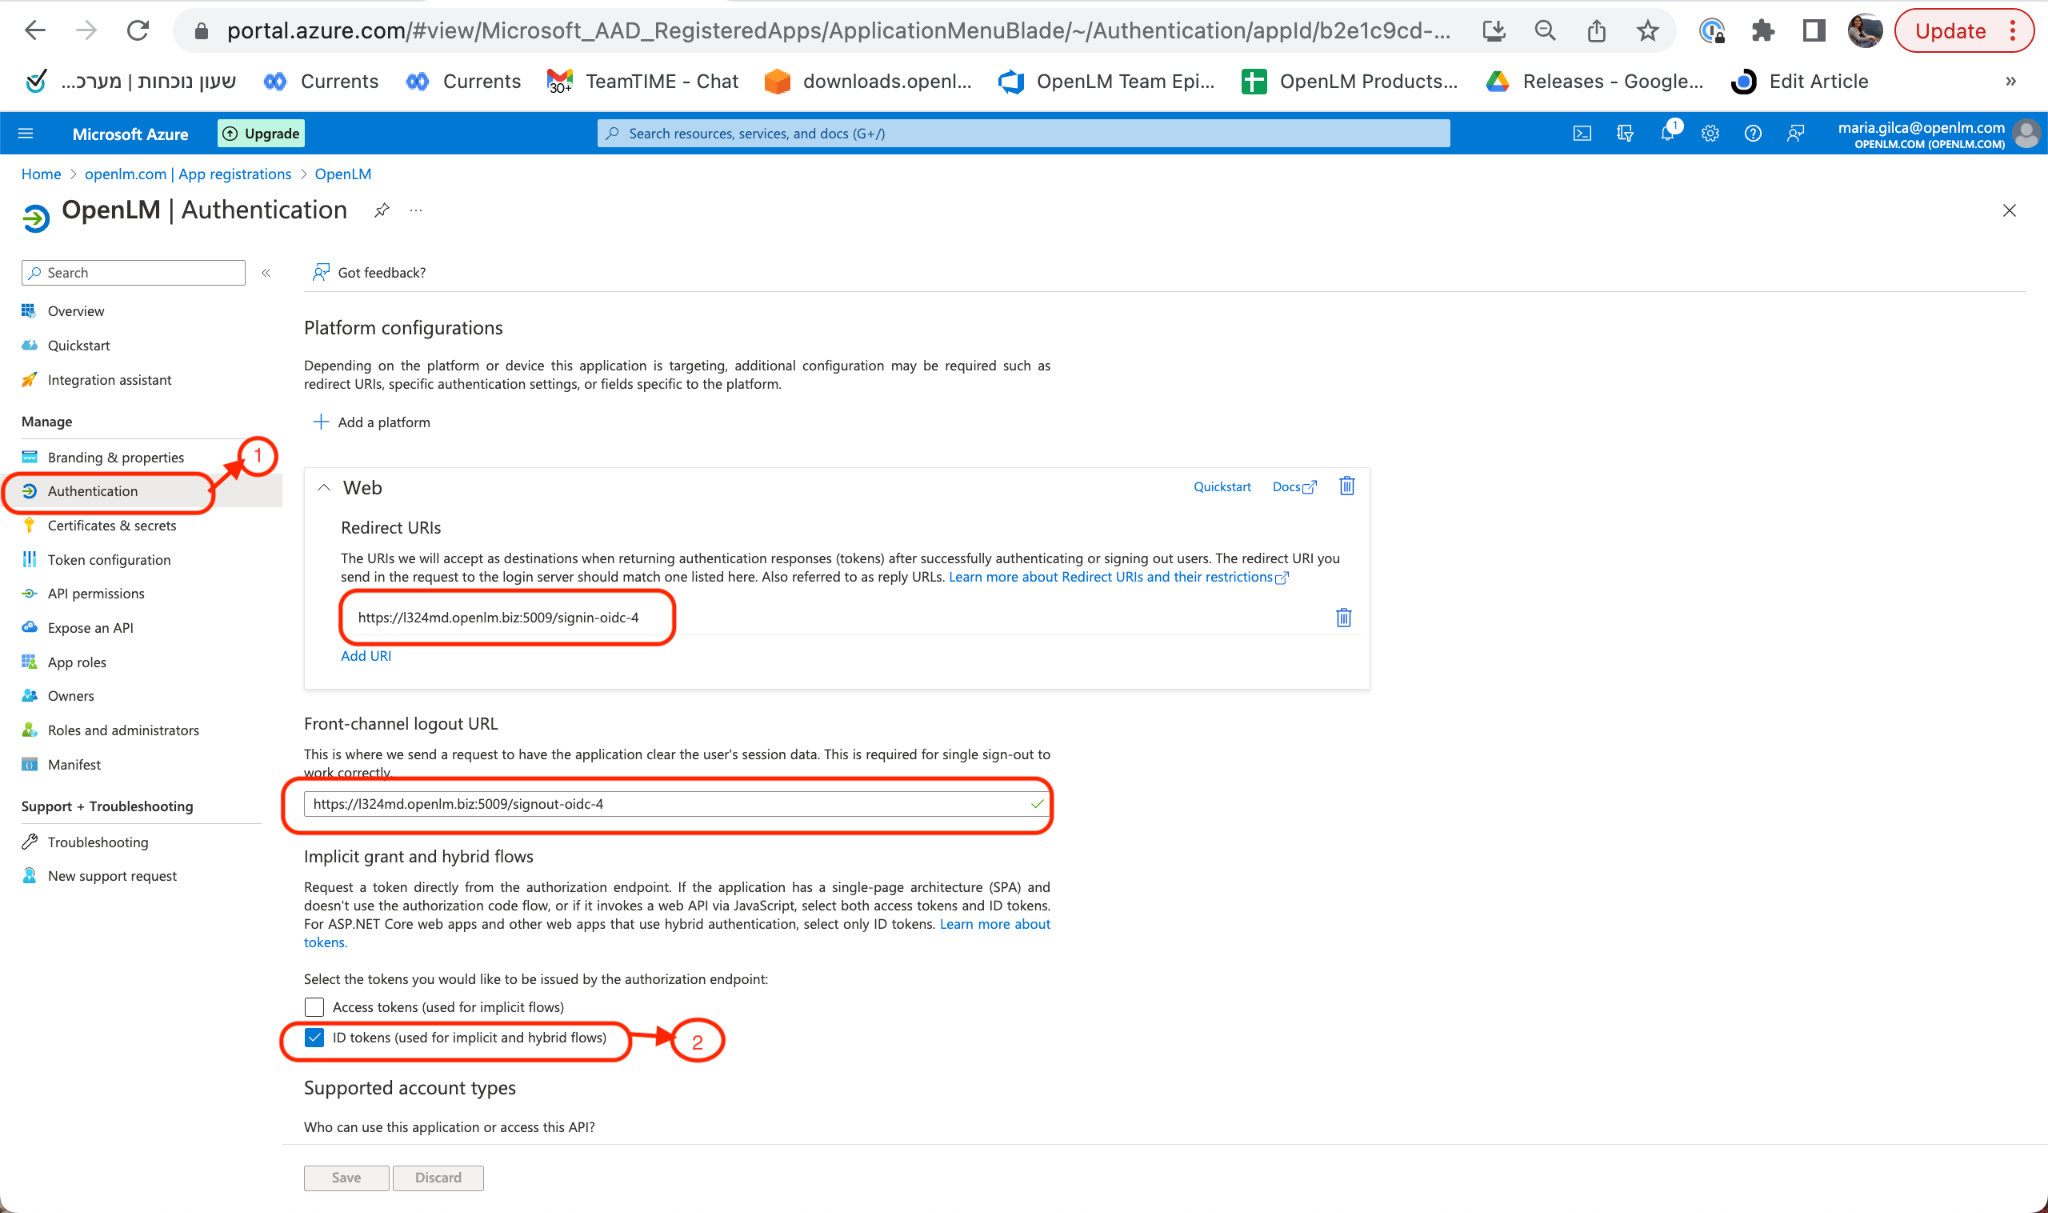
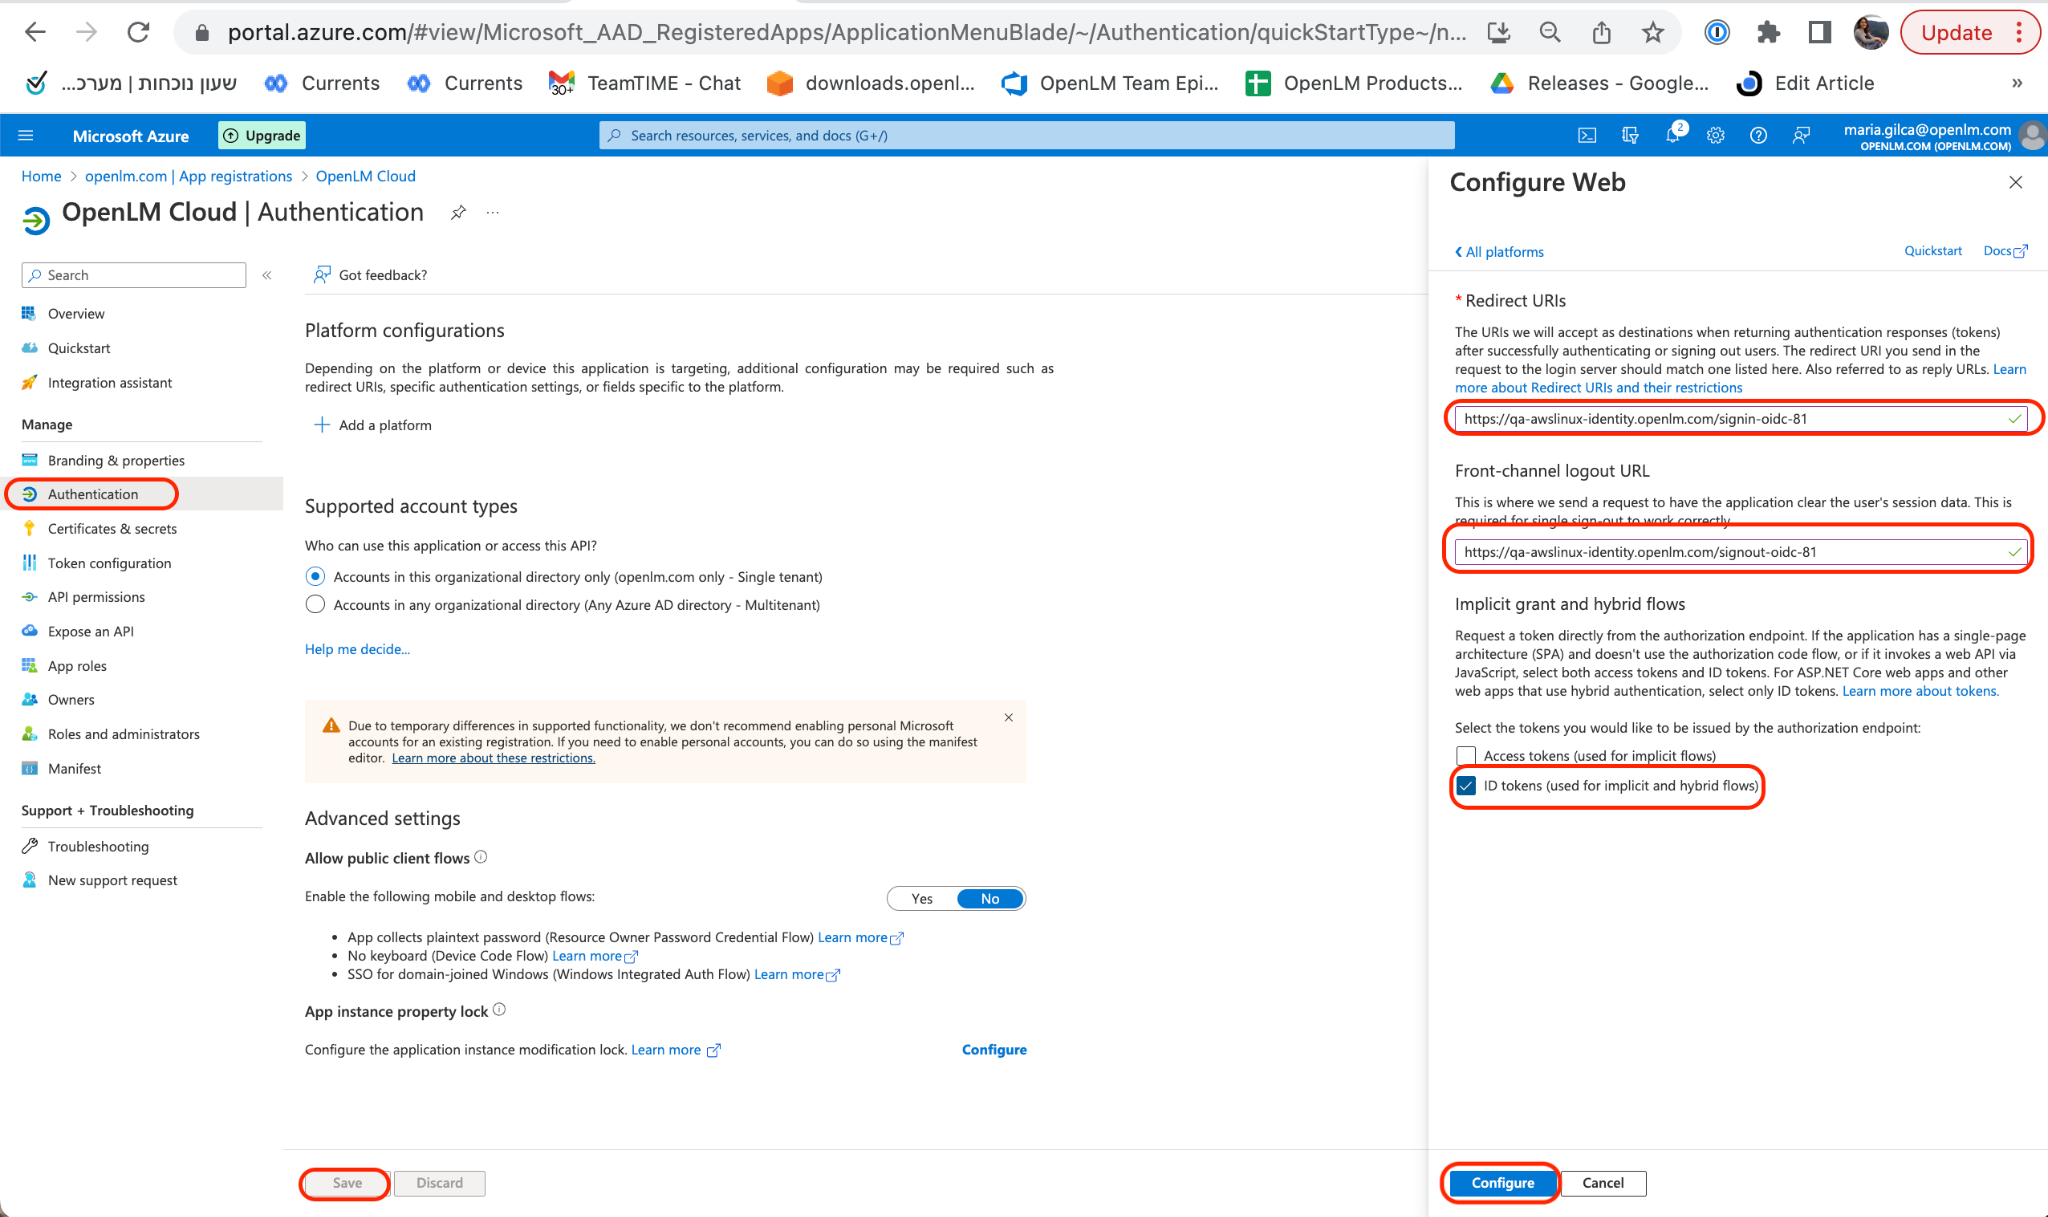
Microsoft Entra ID アカウントに戻り、Authentication セクションに移動します。Add Platform をクリックし、Web を選択して次を入力します:
- Front-channel Logout URL
- Web Redirect URL
ID Tokens をチェックし、このアプリケーションを使用できるユーザーを選択します。Configure をクリックし、Save をクリックします。
注意Redirect URLs は OpenLM Identity Service の UI(上記手順 9 の画面)からコピーする必要があります。
-
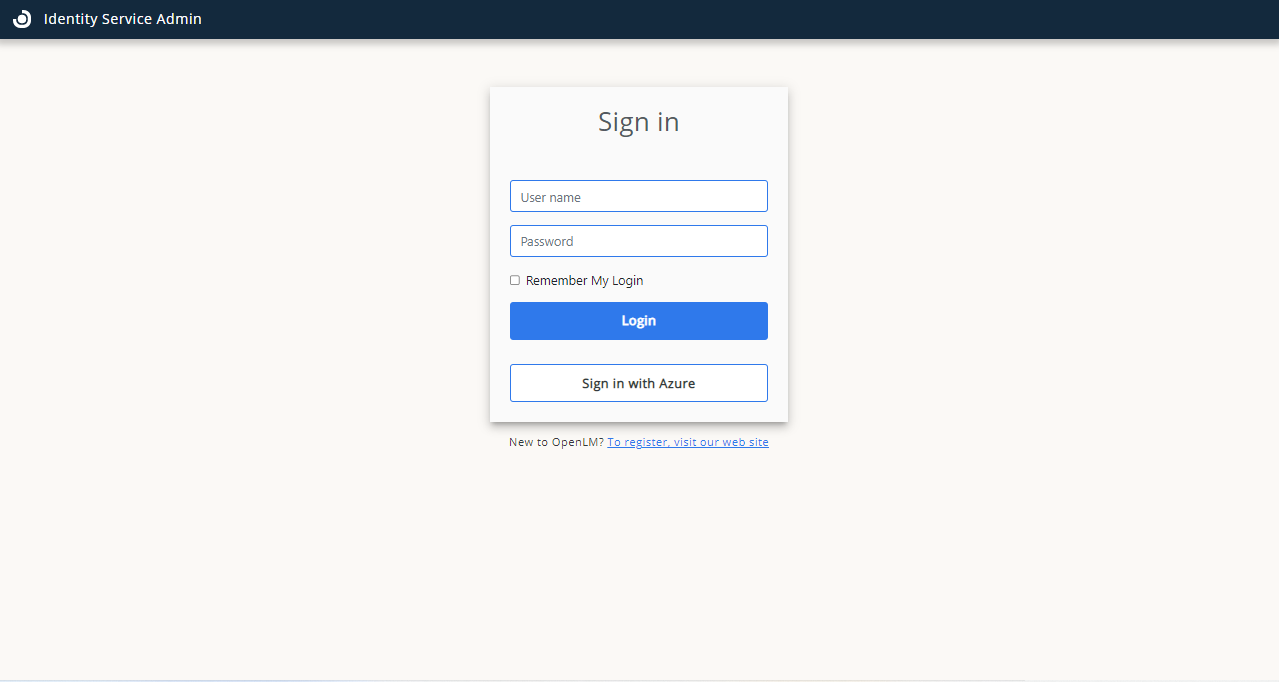
Identity Service アカウントに移動してログアウトします。Azure のログインボタンがログインオプションとして表示されます:
OpenLM Cloud ユーザー — Microsoft Entra ID を外部 Identity Provider として構成
-
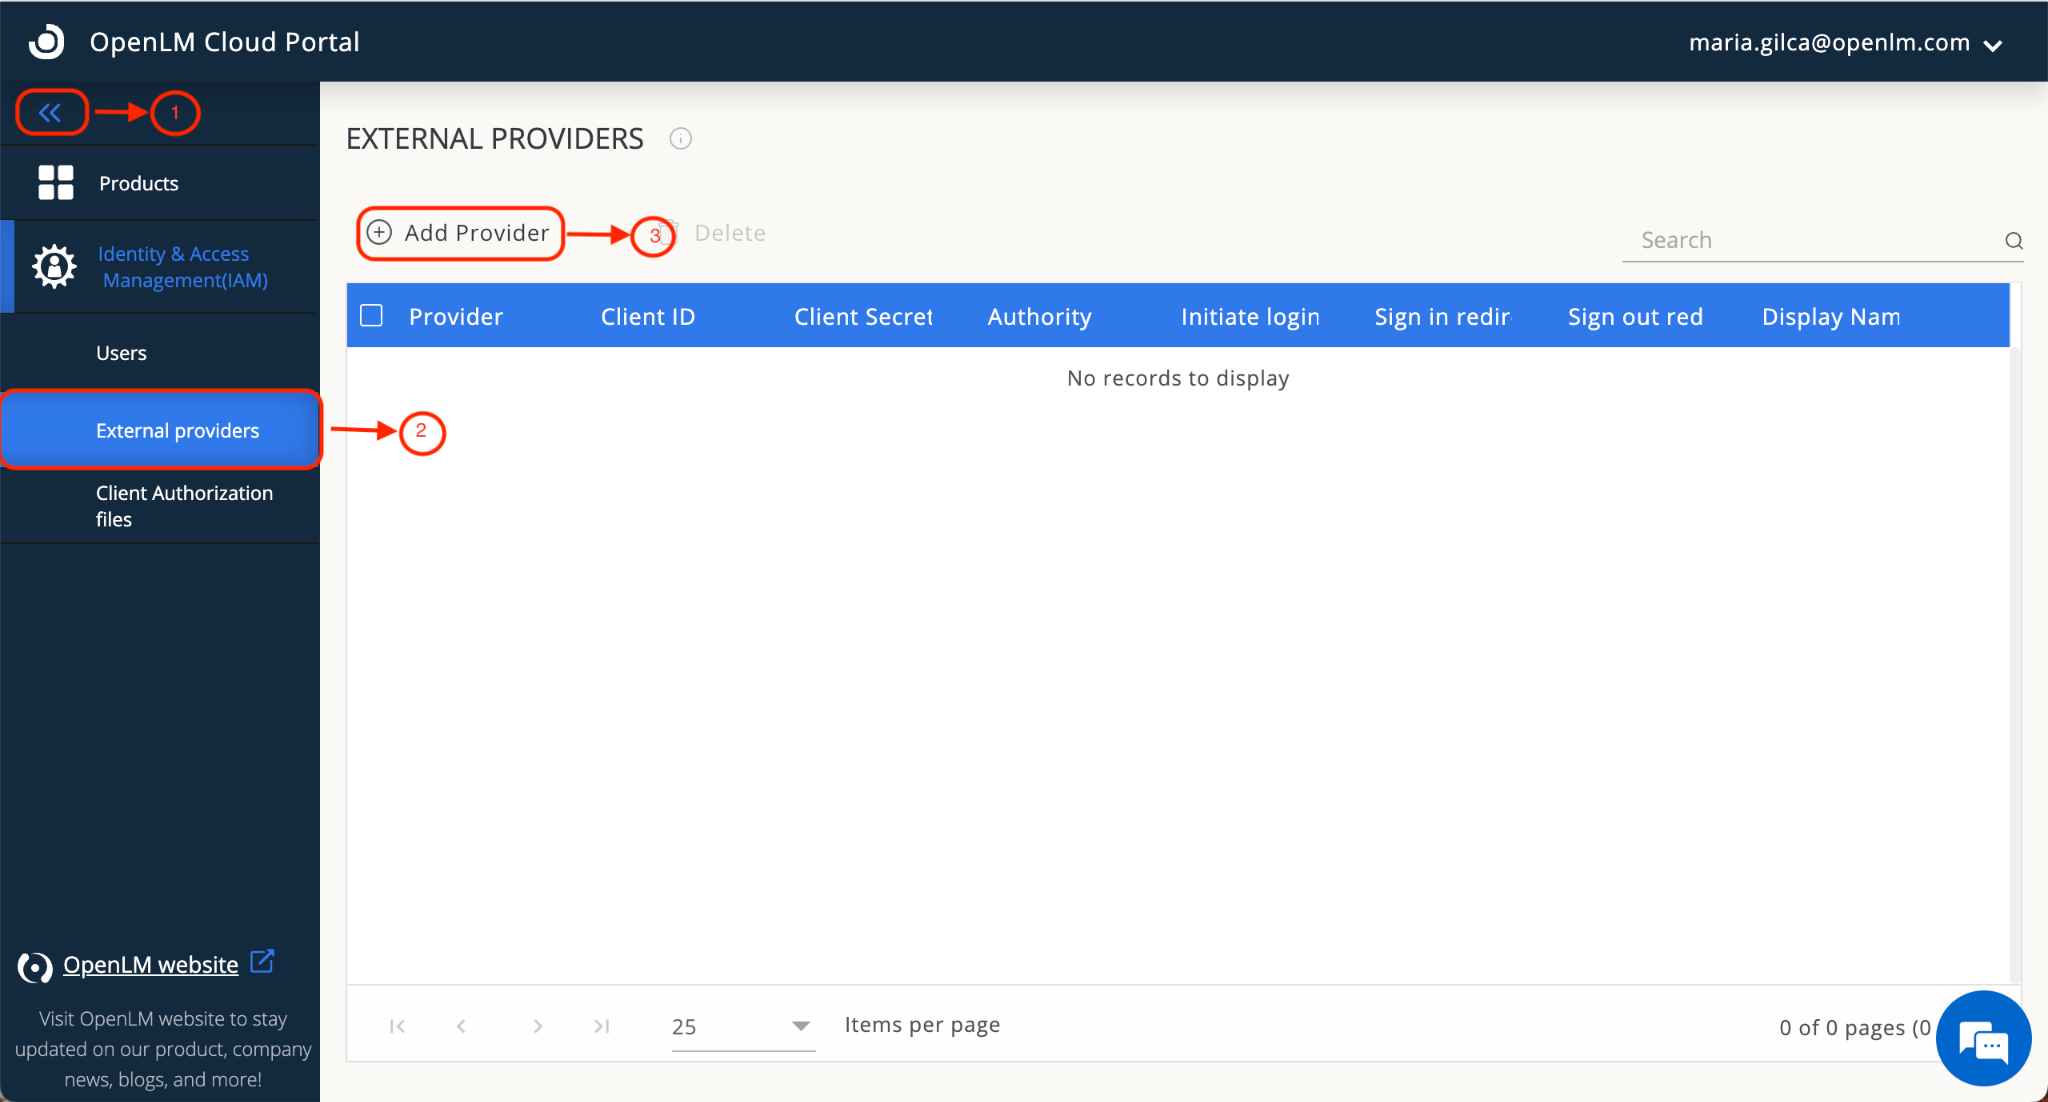
OpenLM Cloud Portal の External Providers タブに移動し、Add Provider をクリックします。
-
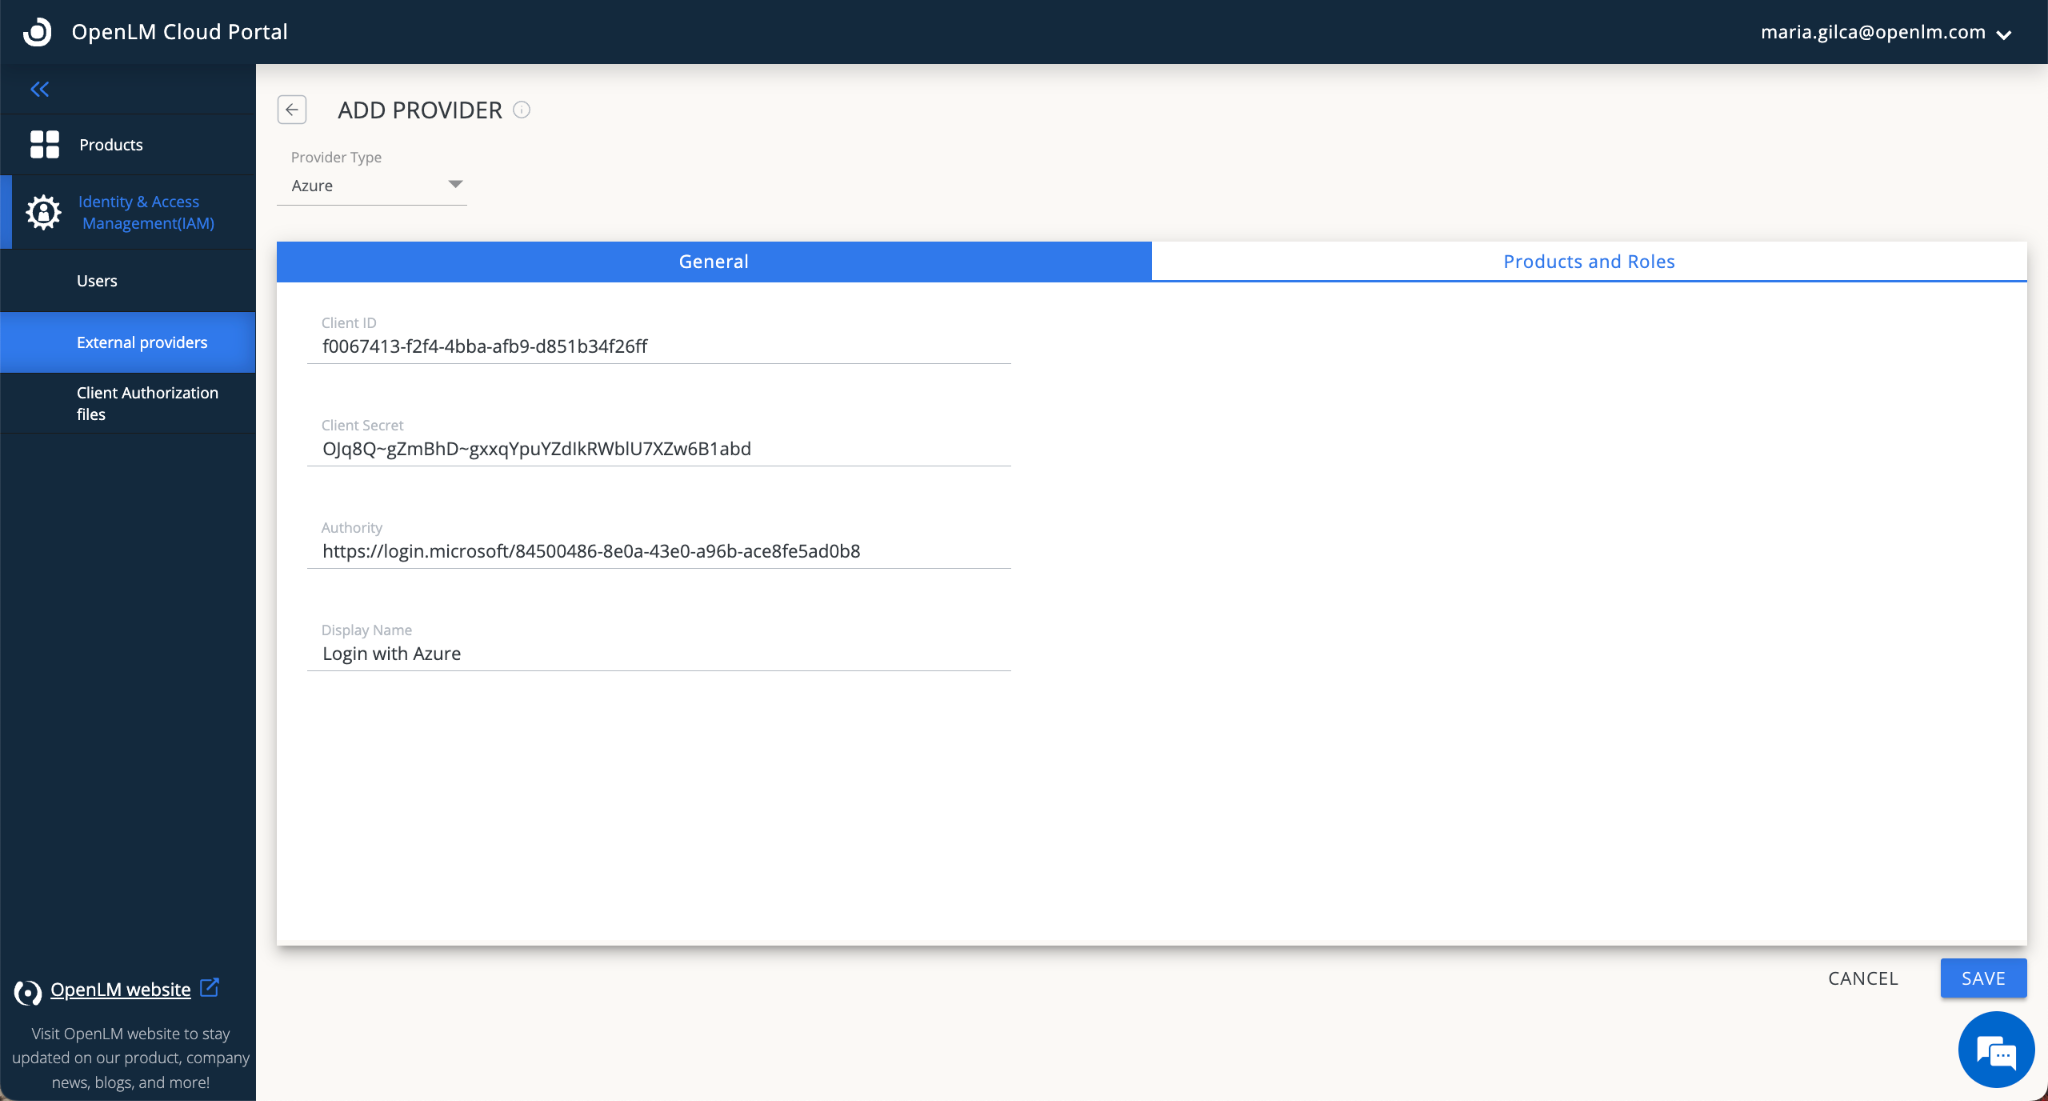
Client ID を入力します。これは上記 手順 5 の Application (client) ID です。
-
Client Secret を入力します。これは上記 手順 8 の Value です。
-
Authority フィールドに次を入力します:
https://login.microsoftonline.com/{Directory (tenant) ID}
{Directory (tenant) ID}は上記 手順 5 の tenant ID に置き換えます。 -
表示名を入力します(例: Login with Azure)。
-
Save をクリックします。
-
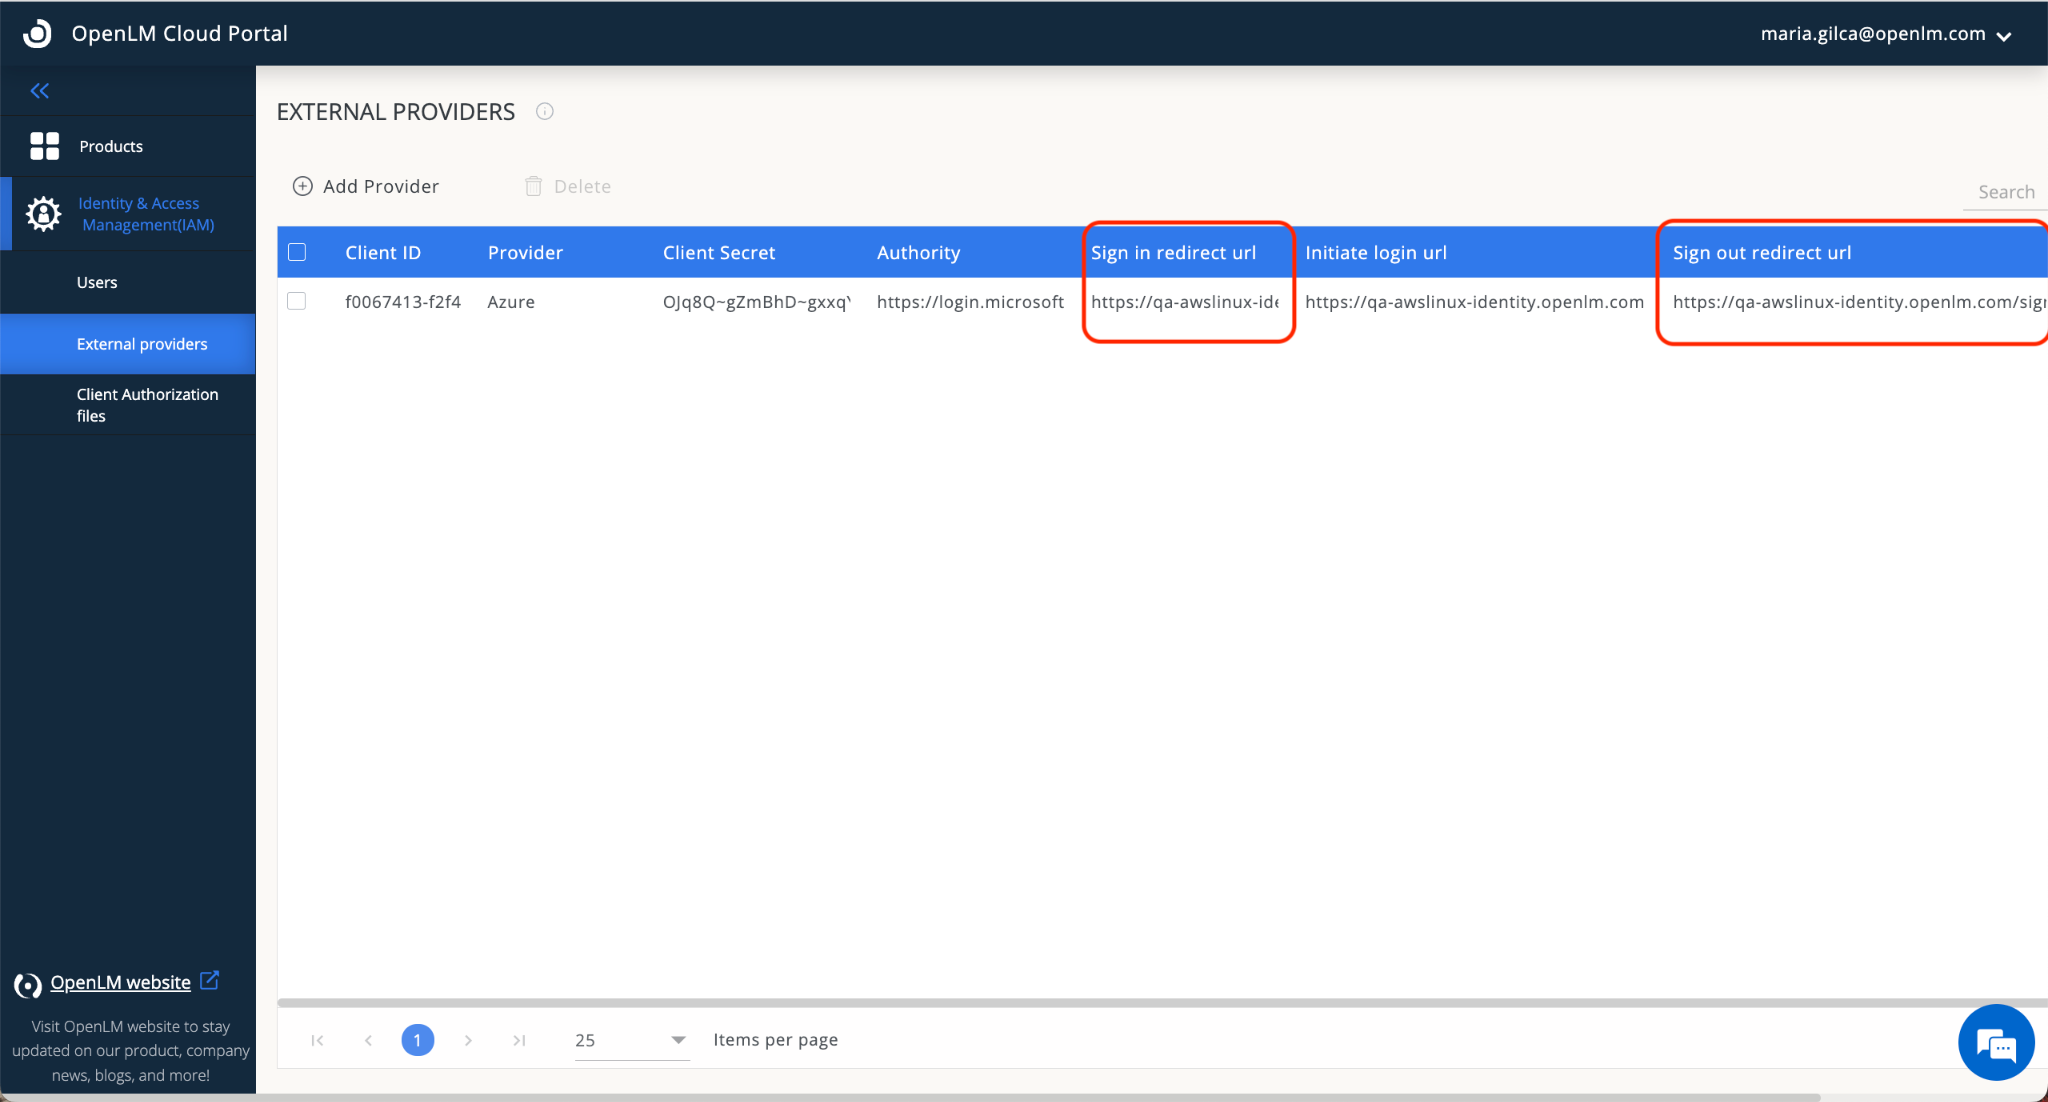
Save をクリックすると、追加した外部プロバイダ (Azure) が External Providers リストに表示されます。画面に表示される Redirect URLs を控えてください。次の手順で必要になります。
-
ここに表示される Redirect URLs が必要になるため、このウィンドウは開いたままにしてください。
-
Microsoft Entra ID アカウントに戻り、Authentication セクションに移動します。Add Platform をクリックし、Web を選択して次を入力します:
- Front-channel Logout URL
- Web Redirect URL
ID Tokens をチェックし、このアプリケーションを使用できるユーザーを選択します。Configure をクリックし、Save をクリックします。
注意Redirect URLs は OpenLM Cloud Portal(上記手順 7 の画面)からコピーする必要があります。
-
Cloud Portal に移動し、右上のユーザー名をクリックしてプロフィール情報を表示します。
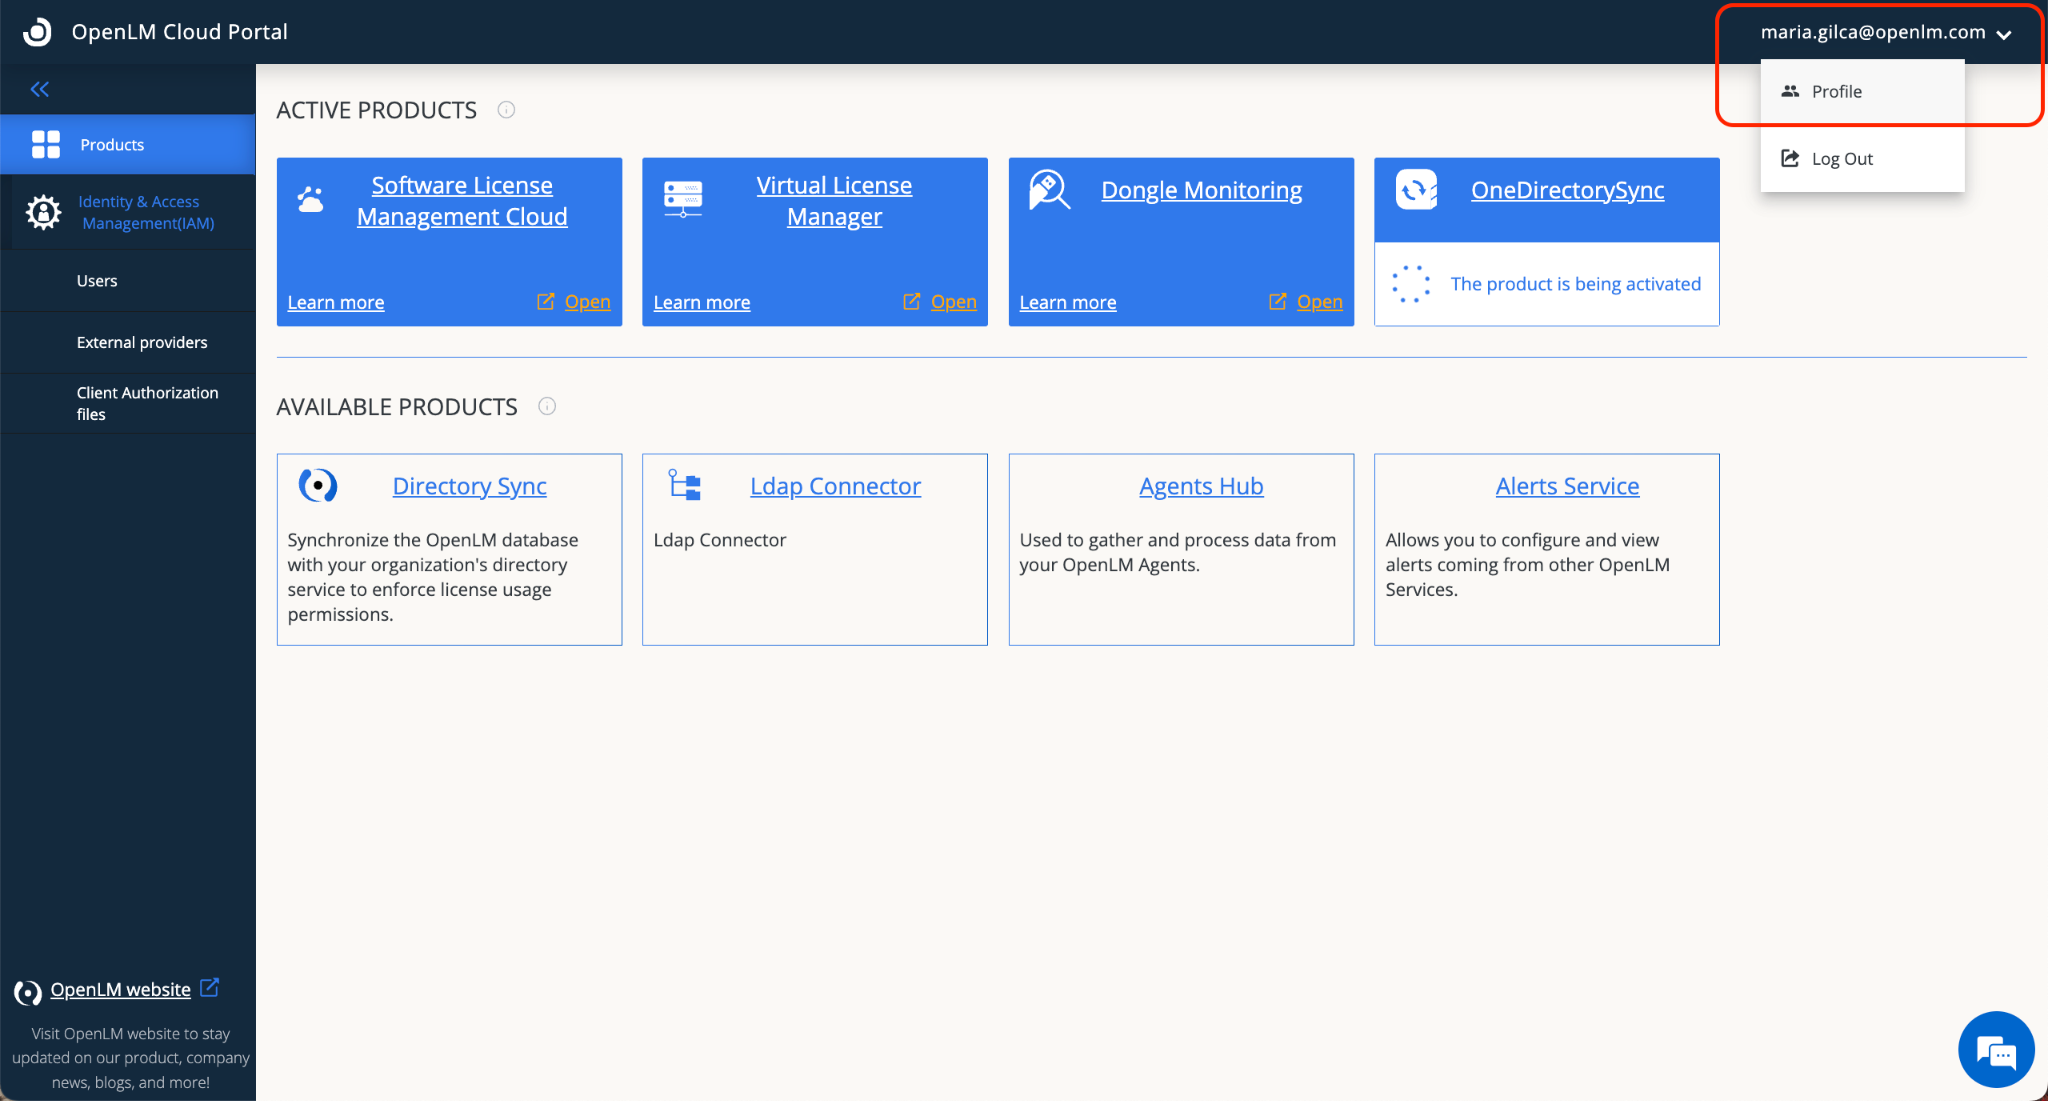
-
OpenLM account ID を控えてコピーします。
-
Microsoft Entra ID を使って OpenLM Cloud アカウントにアクセスするには、次のいずれかの URL を使用します:
https://cloud.openlm.com/portal?loginAccountId=<YOUR_ACCOUNT_ID>または
https://eu-cloud.openlm.com/portal?loginAccountId=<YOUR_ACCOUNT_ID><YOUR_ACCOUNT_ID>は手順 11 でコピーしたアカウント ID に置き換えます。
新しい構成で Cloud Portal にアクセスする前に、ブラウザのキャッシュをクリアしてください。