Sentinel RMS
This guide explains how to configure OpenLM with Sentinel RMS to monitor license usage and generate license statistics.
Requirements
To query Sentinel RMS:
- Install OpenLM Server v4.3 or higher on a machine in your organization (or use a Cloud account).
- (Optional) Install OpenLM Broker v4.x or higher on the Sentinel RMS machine to take advantage of advanced monitoring features.
Monitoring capabilities
Monitoring features depend on whether you use OpenLM Server alone or together with OpenLM Broker.
| Feature | Resolution | License totals | License usage | Denials reporting | Borrowed license reporting | Expiration date reporting | Multiple server redundancy |
|---|---|---|---|---|---|---|---|
| Support | By second | ✔ | ✔ | ✔ | ✔ | ✔ | ❌ |
- Yellow cells: Features available with OpenLM Server.
- Blue cells: Extra features available with OpenLM Server + Broker.
Using Broker also allows buffered communication and remote start/stop of the license manager service.
Monitoring with OpenLM Server only
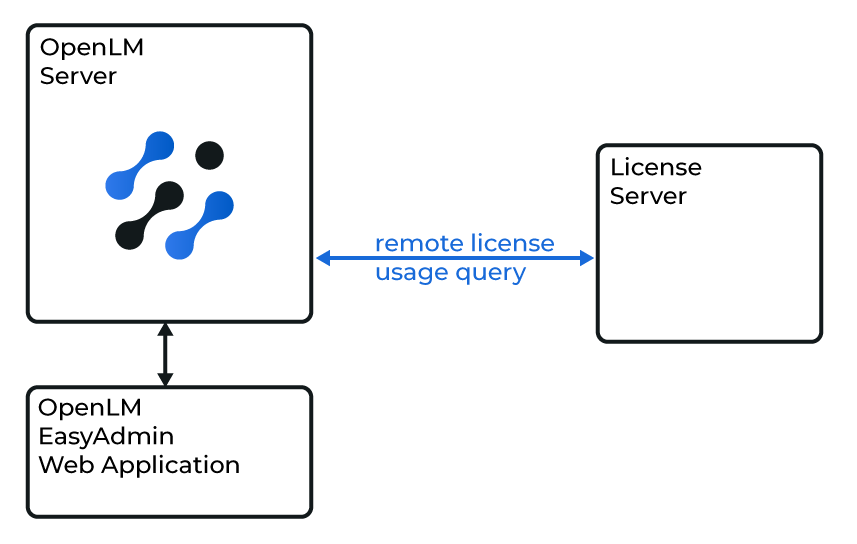 Diagram of OpenLM Server querying Sentinel RMS directly
OpenLM Server can query Sentinel RMS directly through RMS command-line tools. This option provides license totals and usage only.
LM tools configuration
To allow OpenLM Server to query Sentinel RMS:
- Copy
lsmon.exe,lservnt.exe, andlsapiw32.dllfrom the Sentinel RMS machine (for example,
C:\Program Files (x86)\Common Files\SafeNet Sentinel\Sentinel RMS License Manager\WinNT)
to the OpenLM Server installation folder (for example,
C:\Program Files\OpenLM\OpenLM Server\LM). - Open EasyAdmin → Start → Administration → License Manager Servers.
- Select LM type RMS.
- Set the full path to the RMS executable (
lsmon.exe). - Select Save.
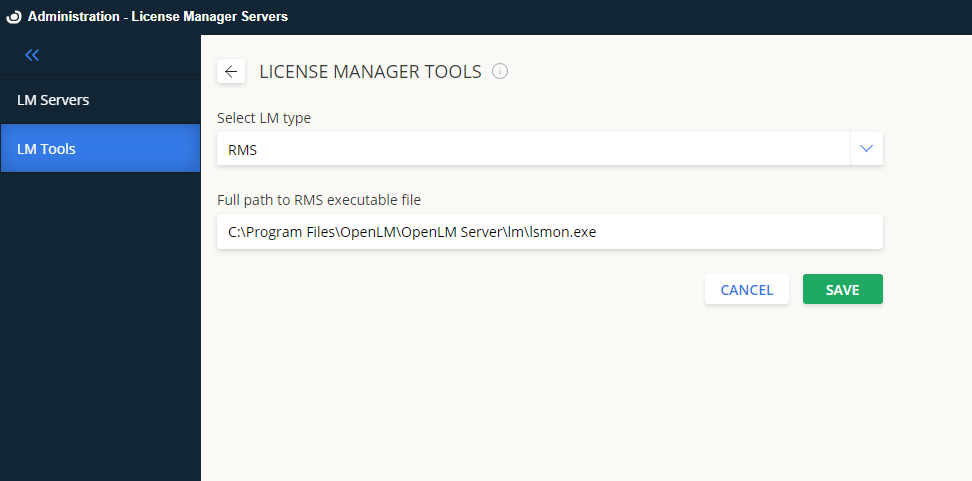 Configuring LM tools for Sentinel RMS
Adding a new Sentinel RMS server
After setup:
- Open the License Servers tab.
- Select Add LM.
- Enter a Display Name.
- Select RMS as LM type.
- Enter Server Host Name and Port (for example, 5093).
- Set the correct Time Zone.
- Turn Use Broker toggle off.
- Select Save.
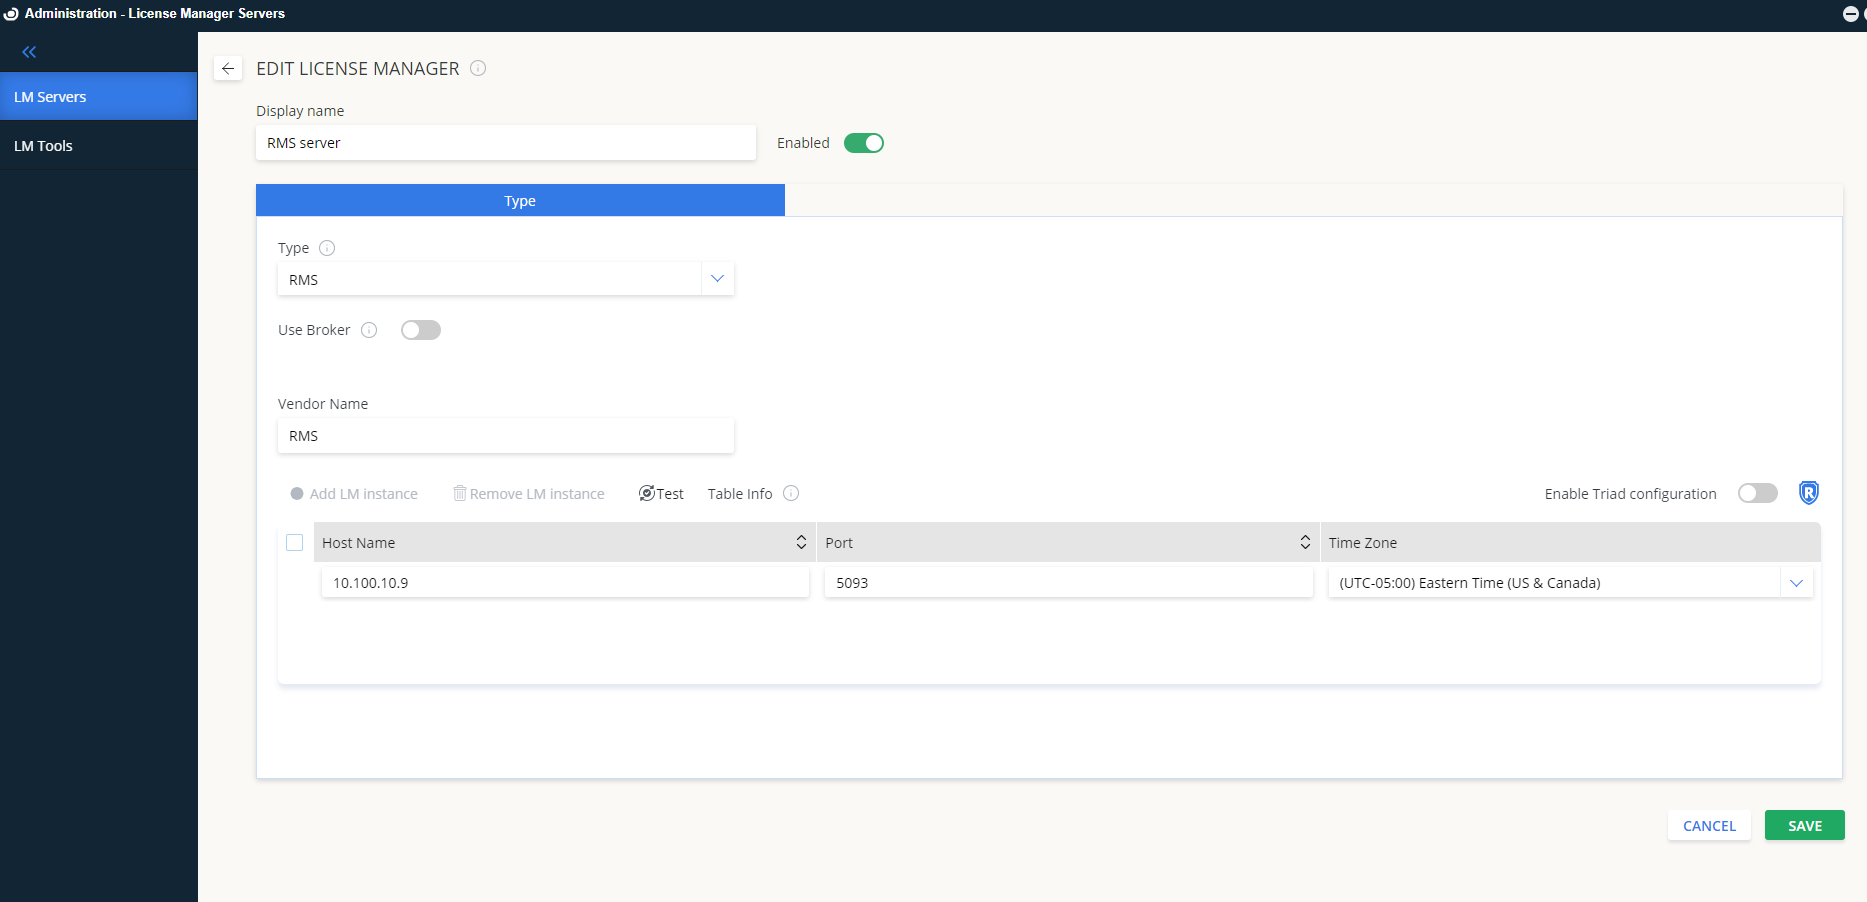 Adding Sentinel RMS server in EasyAdmin
Monitoring with OpenLM Server and Broker
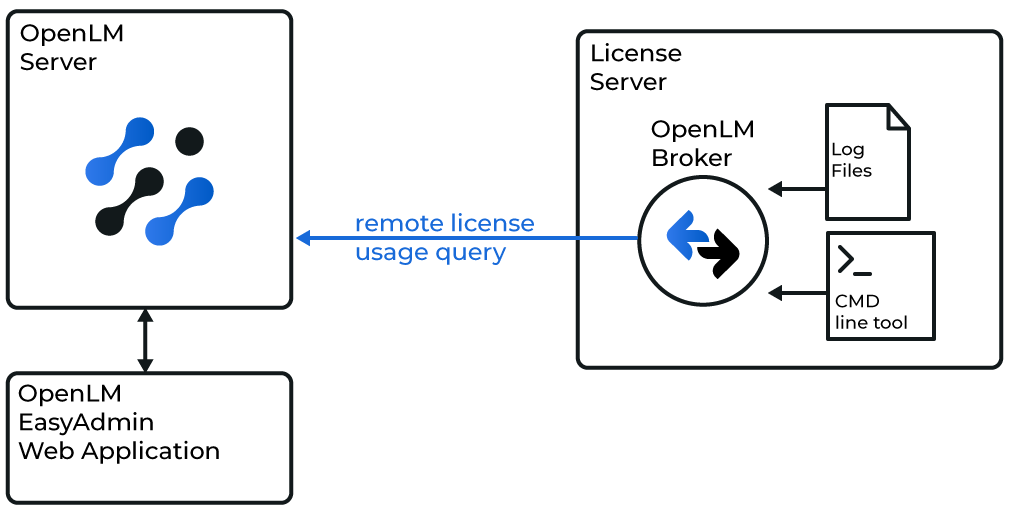 Diagram of OpenLM Broker querying Sentinel RMS locally
When Broker queries Sentinel RMS locally using RMS command-line utilities and log files, you gain full monitoring capabilities. Broker then forwards the data to OpenLM Server.
You must install and configure OpenLM Broker before continuing.
See the Broker installation guide and the Broker configuration guide.
Activating Sentinel RMS usage log
By default, RMS does not record usage logs. Activate logging with the -l <usage-log-filename> argument in the RMS startup command (lservnt/lserv) or the LSERVOPTS environment variable.
For detailed steps, see the Sentinel RMS documentation.
Logs are required for denial monitoring.
OpenLM Broker configuration
Automatic detection
In the Broker configuration tool:
- Select Detect.
If the Sentinel RMS service is running, Broker detects the port and utility path automatically.
Detection may not capture all settings. Continue with manual configuration if needed.
 Automatic Broker detection
Manual configuration
If detection fails:
- Select Add Port → enter RMS port (for example, 5093).
- Select RMS as license manager type.
- Under Commands, update the utility path to the RMS tools folder.
- (Windows only) Check Use Service and enter Sentinel RMS License Manager.
- Select Apply.
- Run a data_inquiry to verify valid output.
- Add the RMS usage log under Log Files.
- Restart Broker.
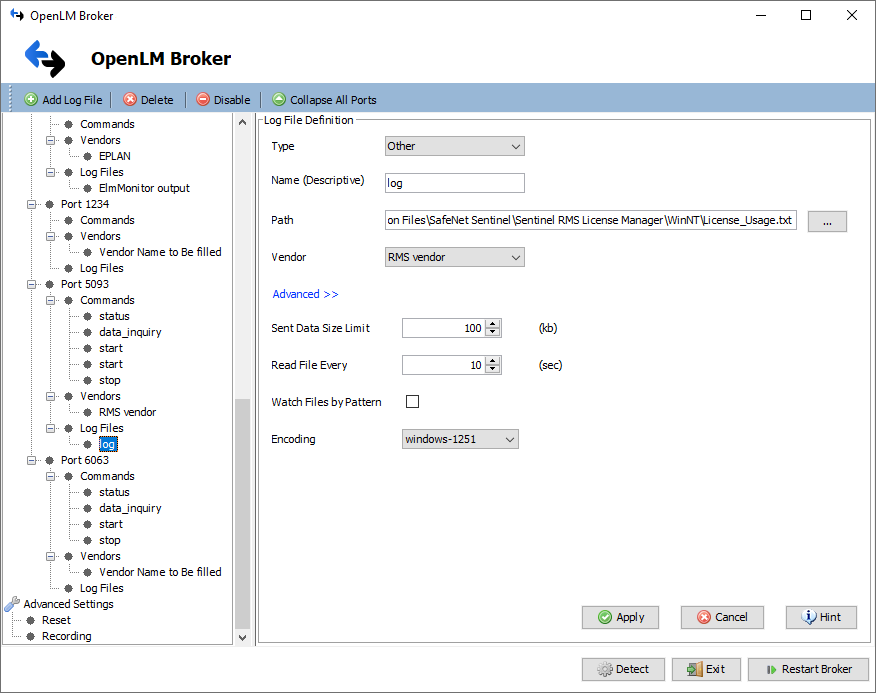 Manual Broker configuration
Broker UI configuration
Alternatively, configure through the Broker UI in your browser:
- Go to License Manager → Add License Manager.
- Select RMS, enter port, and add.
- Check the executable path.
- (Windows only) Set service to Sentinel RMS License Manager.
- Run data_inquiry and verify output.
- Add vendor information if required.
- Configure Log Files for RMS usage logs.
- Save changes.
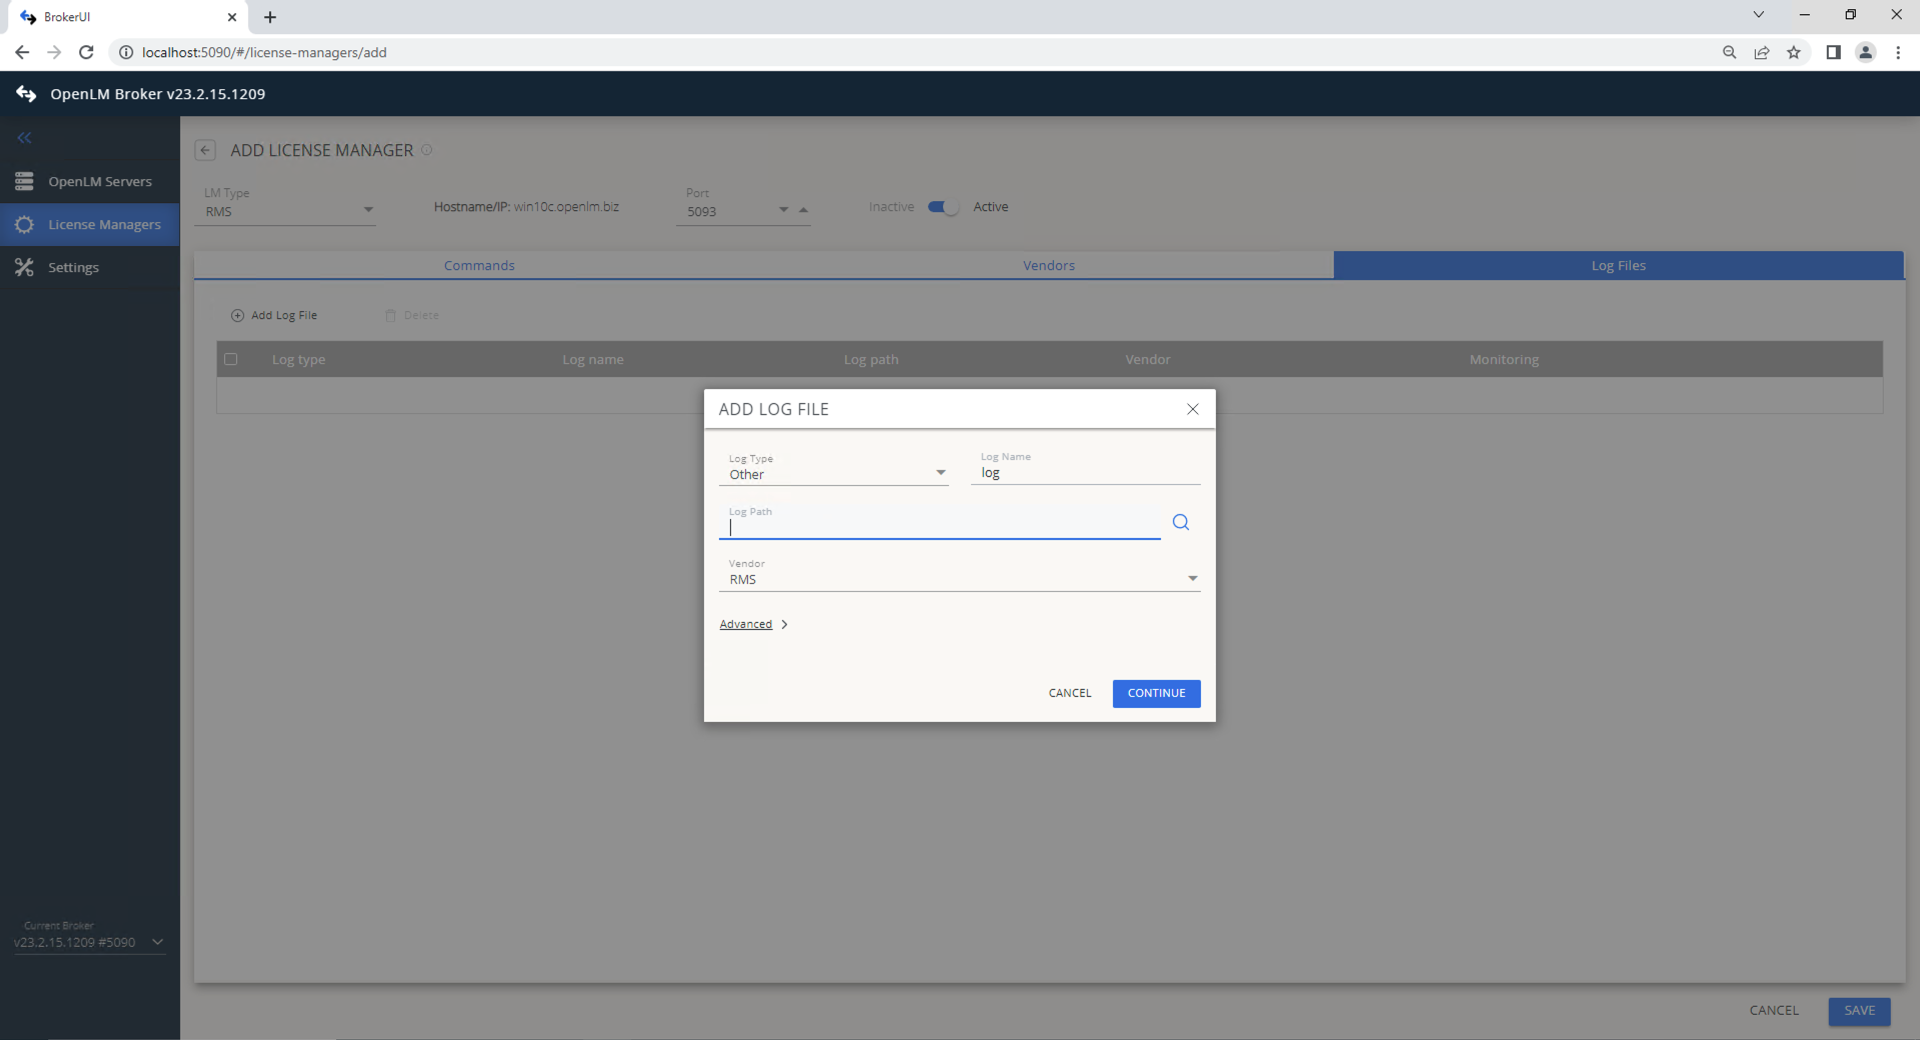 Broker UI settings for RMS
OpenLM Server configuration
If Broker was configured successfully, Sentinel RMS is added automatically to OpenLM Server.
If automatic setup fails, configure manually:
- In OpenLM Server configuration, add Sentinel RMS server.
- Enter hostname and port from Broker.
- Check Use Broker.
- Save.
Activating token calculator (Server v24.6+)
By default, token calculations are deactivated. To activate:
- Back up
appsettings.json. - Open the file (default:
C:\Program Files\OpenLM\OpenLM Server\bin). - Locate this section:
},
"AspenTokens": {
    "AspenTechTokensFile": "../config/aspen_tokens_breakdown.json",
    "EnableTokenCalculations": false
}

4. Change EnableTokenCalculations to true:
```json
},
"AspenTokens": {
    "AspenTechTokensFile": "../config/aspen_tokens_breakdown.json",
    "EnableTokenCalculations": true
}
- Save the file.
- Restart OpenLM Server:
net stop "OpenLM Server"
net start "OpenLM Server"
- Verify in OpenLM Server that token calculations are enabled.
Verifying Sentinel RMS configuration
To confirm monitoring is active:
- Open EasyAdmin UI.
- Go to Start → Widgets → License Servers.
- Check that Sentinel RMS servers appear in the list.
A green circle indicates an active connection. It may take up to 3 minutes for new connections to display as active.