EPLAN
You must have OpenLM Broker installed and reporting to OpenLM Server before starting this configuration.
Requirements
To query the EPLAN license manager, you must have:
- EPLAN License Manager Professional installed on the license server.
Note: EPLAN License Manager Basic does not have a reporting interface and cannot be queried by OpenLM. - OpenLM Server v2.x or higher installed on a machine in your organization.
- OpenLM Broker v4.8.8 or higher installed on the same machine as the EPLAN license manager.
Monitoring capabilities and features
The monitoring capabilities available for the EPLAN license manager through OpenLM Broker are:
| Feature | Resolution | License totals | License usage | Denials reporting | Borrowed license reporting | Expiration date reporting | Multiple server redundancy |
|---|---|---|---|---|---|---|---|
| Support | By second | ✔ | ✔ | ✔ | ✔ | ❌ | ❌ |
Using Broker also allows buffered communication in case of network interruptions.
OpenLM Broker configuration

Diagram of how OpenLM interfaces with the EPLAN license manager.
The process works as follows:
- Broker runs ElmMonitor.exe at set intervals to generate portions of the log file.
- These fragments are compiled into one log file, then converted into an XML file in the OpenLM Generic format.
- Broker sends all gathered license usage information to OpenLM Server. You can then view the data in EasyAdmin.
Locating ElmMonitor.exe
To obtain license usage data, Broker must run the ELM Monitor application. The default location is:
C:/Program Files/EPLAN/ELM/ElmMonitor.exe
If it is not available, install the License Tools add-on (ELMLicense Tools (x64)setup.exe) from your EPLAN installation media or download it from the EPLAN website.
For more details, see the Installing the EPLAN License Manager Monitor section in the EPLAN installation guide.
Configuring Broker
To set up Broker in the configuration tool:
- Select Add Port.
- Enter any port number (for example
27001). The actual value does not matter because Broker interfaces with EPLAN using only the log file. - From the License Manager Type drop-down menu, select EPLAN. Select Apply.
- Select the Commands node. Next to Update path for commands, select […], browse to the location of ElmMonitor.exe, then select Update and Apply.
- To change the default name or location of the log generated by Broker, go to Log Files → ElmMonitor output. Type a new path or select […] to browse to an empty text file. Select Apply.
- In a text editor, open the
EPLAN@PORT.propertiesfile created in the OpenLM Broker folder (typicallyC:\Program Files\OpenLM\OpenLM Broker\). - Adjust values as described in the EPLAN.properties configuration. Save and close the file.
- Select Restart Broker.
- Continue with OpenLM Server configuration.
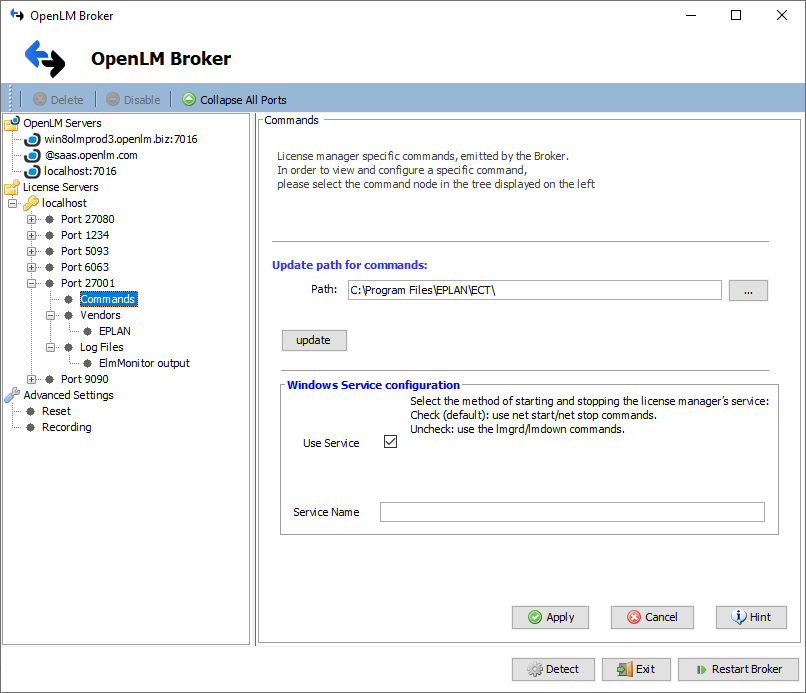
OpenLM Broker settings for EPLAN.
EPLAN.properties configuration
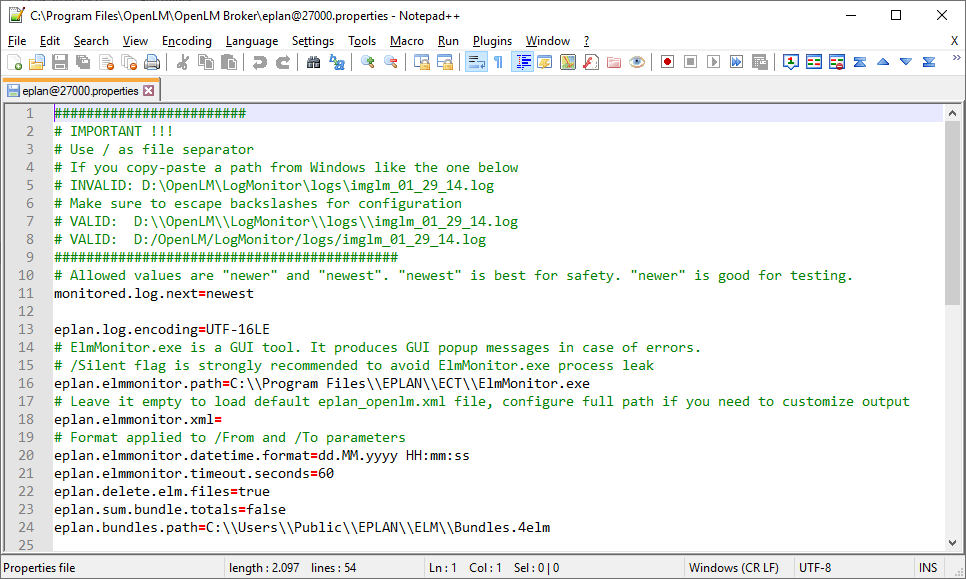
Configuring the eplan@port.properties file.
Configure these values in EPLAN@PORT.properties:
- monitored.log.next – specifies which log file Broker should read.
newest(default): always selects the latest file.newer: useful for testing with historical data. Not guaranteed to load all data.
- eplan.log.encoding – encoding for the generated log file (default:
UTF-16LE). - eplan.elmmonitor.path – path to
ElmMonitor.exe. Add/Silentat the end to avoid process leaks. - eplan.elmmonitor.xml – leave empty to use the default
eplan_openlm.xmlfile, or enter a custom path. - eplan.elmmonitor.datetime.format – date format applied to
/Fromand/Toparameters in the log file (default:dd.MM.yyyy HH:mm:ss). - eplan.delete.elm.files – default is
trueto clean up generated log files. Set tofalsefor debugging. - eplan.bundles.path – path to the EPLAN bundles (default:
C:\Users\Public\EPLAN\ELM\Bundles.4elm).
Alternative: Manual Broker web UI configuration
- Install the latest OpenLM Broker version.
- Go to your Broker web UI (
http://localhost:5090/). - Navigate to the License Managers tab.
- If the license manager service is running, select Detect. Broker should automatically configure the EPLAN license manager.
- If Detect does not work, follow these steps:
- In the License Managers tab, select Add License Manager.
- From the LM type drop-down list, select EPLAN. Enter a port number (for example
80). Select Add. - In the configuration window, switch to the Commands tab. Browse to ElmMonitor.exe in the Executable path field. Select Execute to validate output.
- Switch to the Vendors tab. Select Add Vendor, type EPLAN (or another name), and select Continue.
- Select Save.
- Continue with OpenLM Server configuration.
OpenLM Server configuration
Automatic configuration through EasyAdmin
If Broker is transmitting data to OpenLM Server, you only need to approve the configuration in EasyAdmin:
- Open EasyAdmin in your browser at
http://<OpenLM Server IP>:5015or from Windows Start → OpenLM → OpenLM EasyAdmin User Interface. - In the License Servers window, find the row for the EPLAN server (unapproved rows are highlighted red), hover over it, and select Approve.
Manual configuration
If EasyAdmin does not show an approve/clear message for the EPLAN server, configure manually:
- Open EasyAdmin and go to OpenLM Start → Administration → License Manager server.
- Select Add LM.
- Enter a description (for example EPLAN license manager).
- From the Type drop-down menu, select EPLAN.
- Toggle Use Broker to ON.
- Enter the Hostname and Port of the machine where the EPLAN license manager is installed (same as in Broker).
- Set the Time Zone to where the license server is located.
- Select Save.
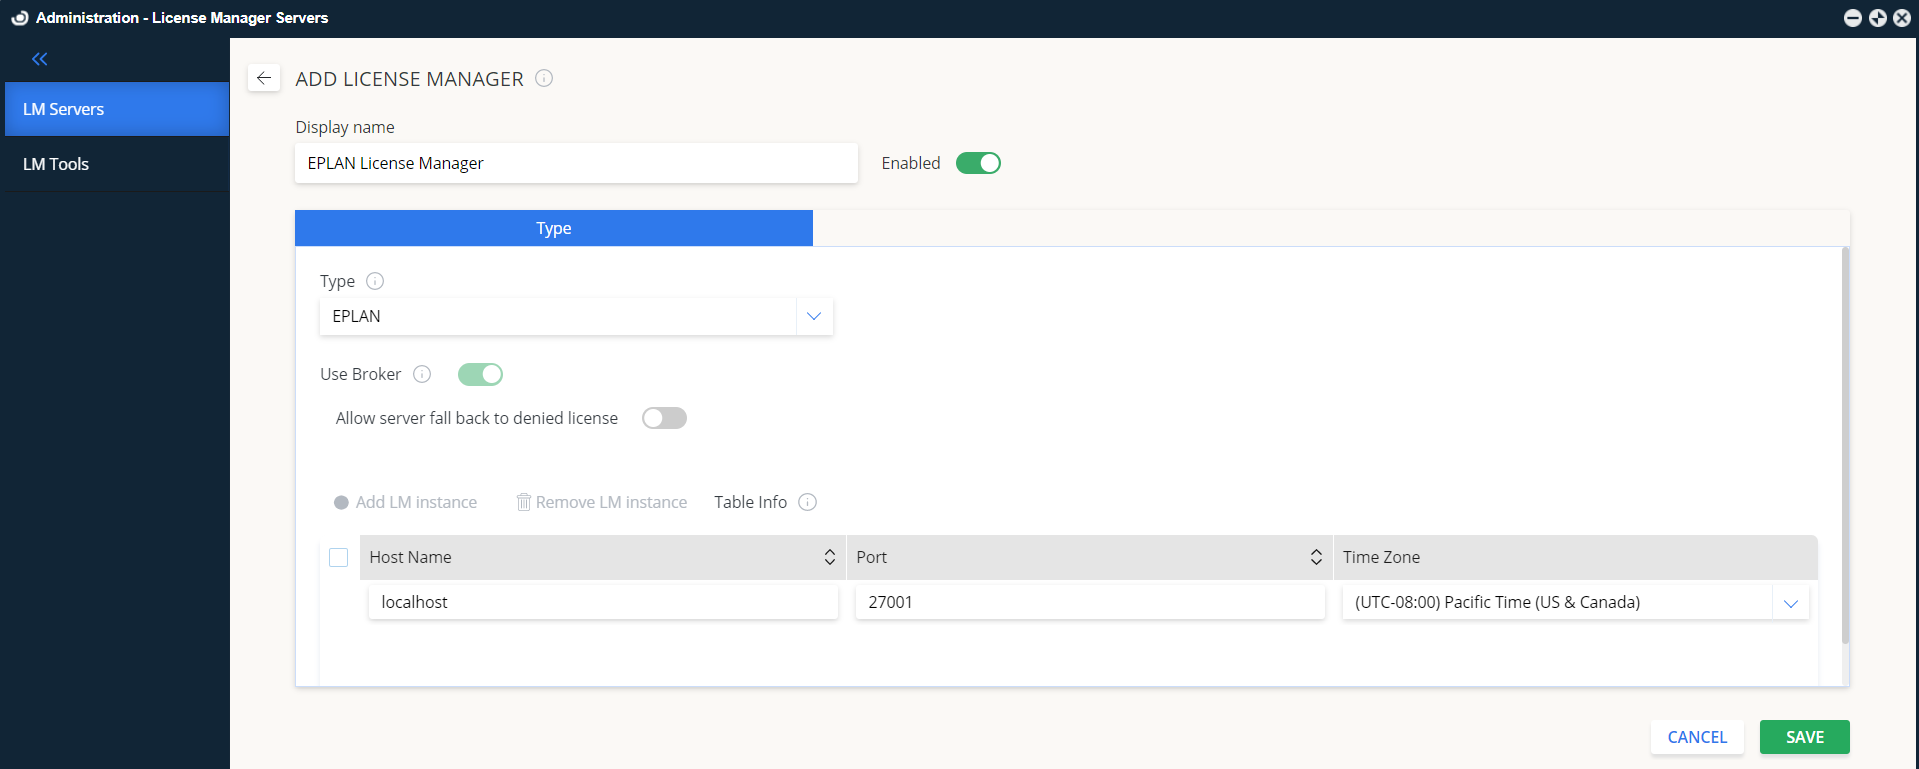
Adding an EPLAN server in EasyAdmin.
Verifying configuration
To confirm monitoring is working:
- Open EasyAdmin at
http://<OpenLM Server hostname>:5015. - Go to EasyAdmin Start → Widgets → License Servers.
Verify that the configured license manager appears in the list.- A green circle means the connection is active.
Note: It may take up to 3 minutes for a new connection to display as active.