OSKA
OpenLM supports monitoring of the OSKA License Manager to provide reliable license reports and usage statistics.
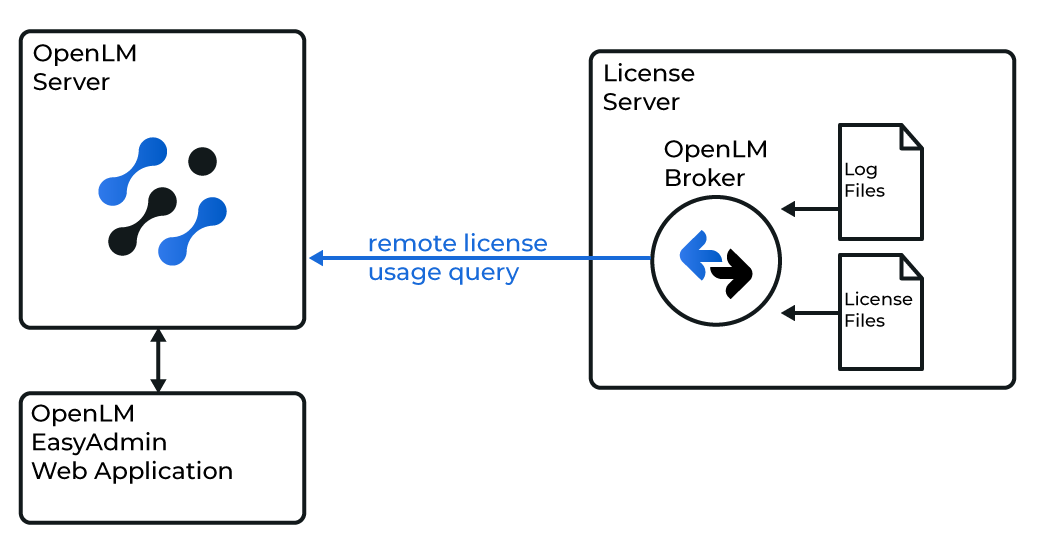
The OSKA license server generates a periodic XML file, which OpenLM parses to present usage data in EasyAdmin.
Prerequisites
Monitoring OSKA requires:
- OpenLM Broker installed on the OSKA license server machine.
- OpenLM Server installed on any Windows machine in the network (can be the same OSKA server).
The Broker queries the OSKA license server locally and sends data to the OpenLM Server.
Configuration
Configure OpenLM Broker
-
If auto-detect fails, select the license manager node → select Add Port.
-
Add a port to the new license server:
- Select on oska_server.
- Select Add Port.
- Enter the Port number provided by OSKA (for example,
12345). - From License Manager Type, select OpenLM Generic.
- Select Apply → OK.
-
In the Commands node:
- Enter the full path to the
OpenLMConsole.exefile. - Select Update → Apply.
- Enter the full path to the
-
For data_inquiry, enter the full path to the OSKA data inquiry command:
C:\Program Files (x86)\OSKA\OpenLMConsole.exeYou can download it from: OpenLMConsole.exe 6. Select Execute to test. Then select Apply. 7. Repeat for the status command. 8. Expand Vendors → Add Vendor. Enter OSKA. 9. Select Apply (select No if prompted to update commands). 10. Restart the Broker. 11. (Optional) Configure through Broker Web UI.
Add LM configuration in EasyAdmin
- Open EasyAdmin → Start → Administration → License Manager Servers.
- Select the LM Servers tab → select Add License Manager.
- From Type, select OpenLM_Generic.
- Enter a descriptive Display Name (for example, My OSKA License Server).
- Set the Time Zone (for example, Istanbul UTC+3).
- Enter the Hostname and Port (for example, oska_license_server, 12345).
- Check Use Broker.
- Select Save.
Verify OSKA configuration
- Open the EasyAdmin web interface.
- Approve OSKA under Pending Approval.
- Verify that the OSKA license manager appears in the server list. • A green circle indicates an active connection.