FlexLM
FlexLM (also known as FlexNet Publisher) is a widely used license management system that supports many licensed applications across different industries.
This guide explains how to configure OpenLM to interface with FlexLM, monitor license usage, and collect license statistics.
There are two main ways to query the FlexLM license server:
-
Quick method: Query the license server remotely from OpenLM Server.
This provides license usage reporting in the EasyAdmin interface. -
Enhanced method: Query the license server locally using OpenLM Broker, then forward the data to OpenLM Server.
This option adds:- Borrowed license tracking
- License denial monitoring
- Options file management
- Greater robustness against network or security issues
Interfacing FlexLM with OpenLM Server only
The first option is to configure OpenLM Server to query FlexLM directly.
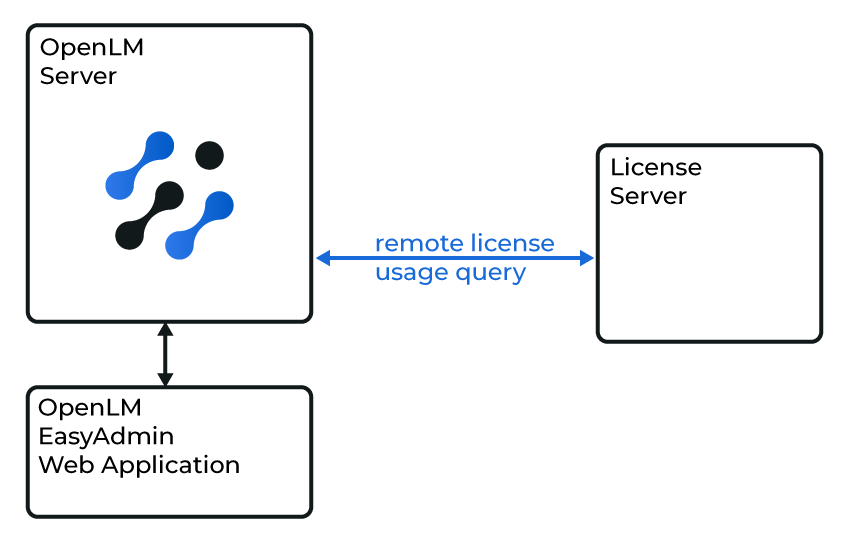
OpenLM Server querying FlexLM remotely
Before you begin, make sure OpenLM Server is installed and configured.
Steps
-
In EasyAdmin → Start → Administration → License Manager Servers, select Add LM.
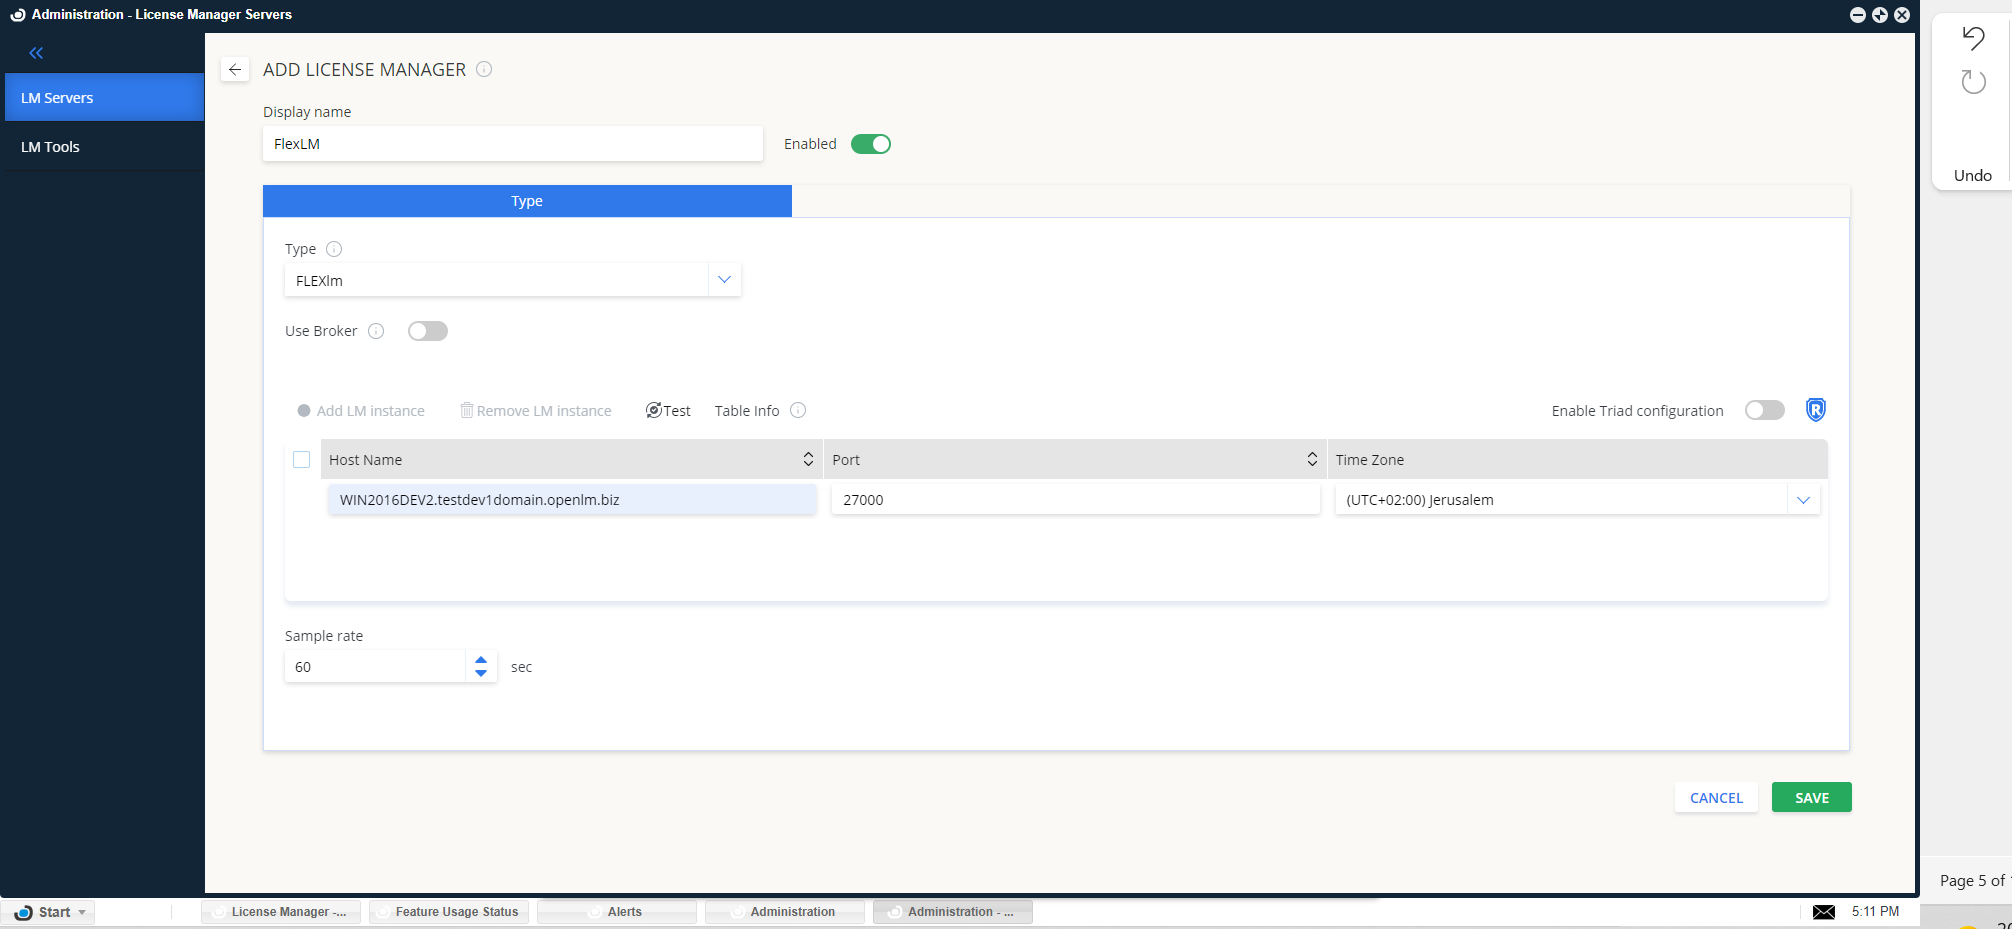
Adding a new license manager in EasyAdmin -
Enter a description to recognize the license manager.
-
Select FlexLM as the type.
-
Enter the Hostname and Port (for example,
win2016dev2,27000). -
Set the correct Time Zone.
-
Activate Triad Configuration if using a FlexLM redundancy setup.
- Checked: Monitor all triad servers.
- Unchecked: Monitor a single server (default).
-
Set Use Broker toggle to off.
-
Test the connection.
-
Success:
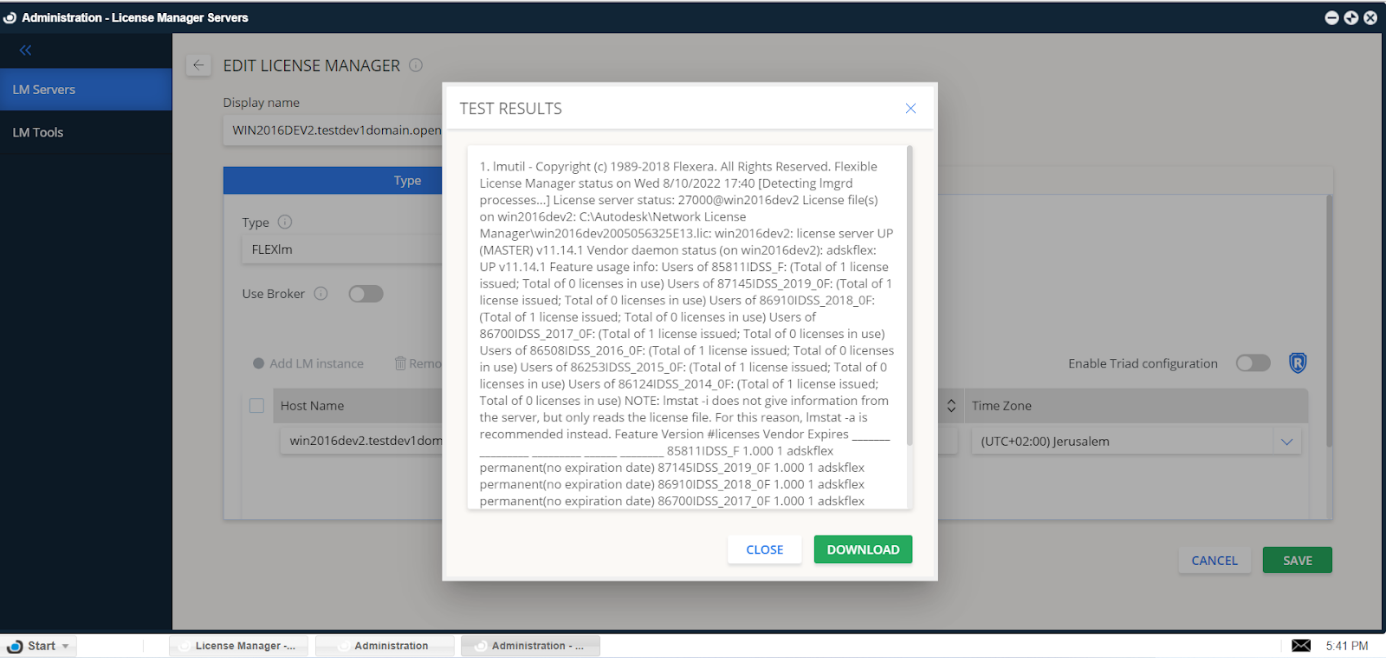
Successful connection test -
Failure:
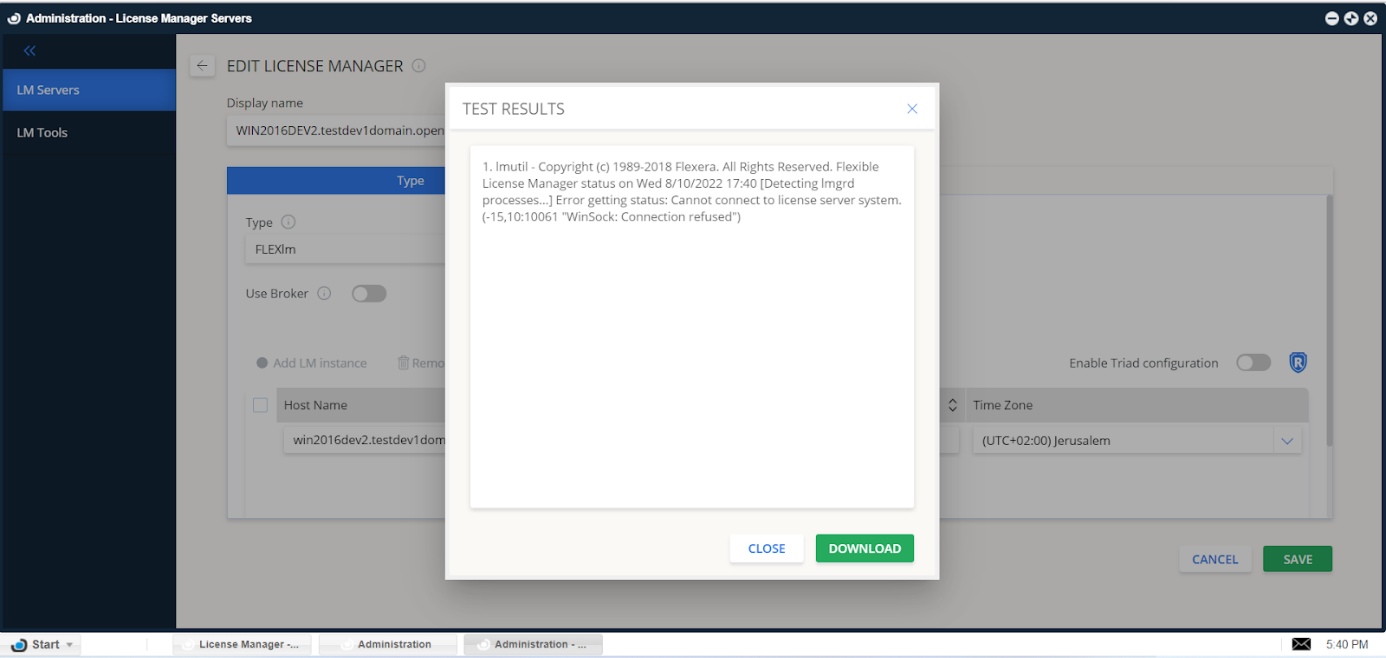
Failed connection test
-
-
Select Save.
OpenLM Server is now ready to query FlexLM and show license usage in EasyAdmin.
LM tools tab
- Go to LM Tools tab.
- Select FlexLM from the drop-down list.
- Copy
lmutil.exetoC:\Program Files\OpenLM\OpenLM Server\LM. - Enter the full path (for example,
C:\Program Files\OpenLM\OpenLM Server\LM\lmutil.exe). - Select Save.
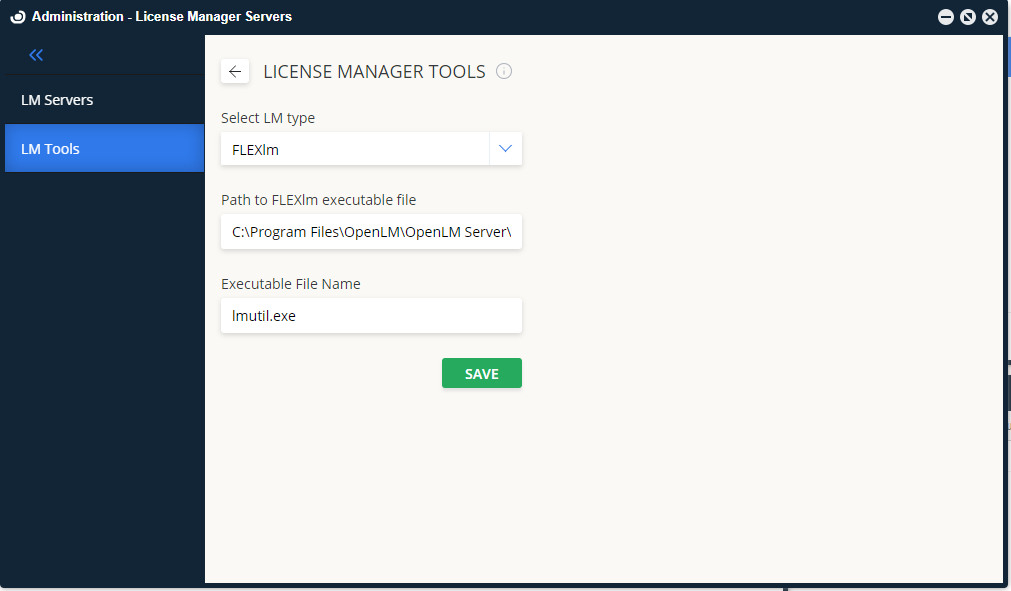
LM Tools configuration for FlexLM
Monitoring with OpenLM Server and Broker
OpenLM Broker provides extended monitoring and administration features.
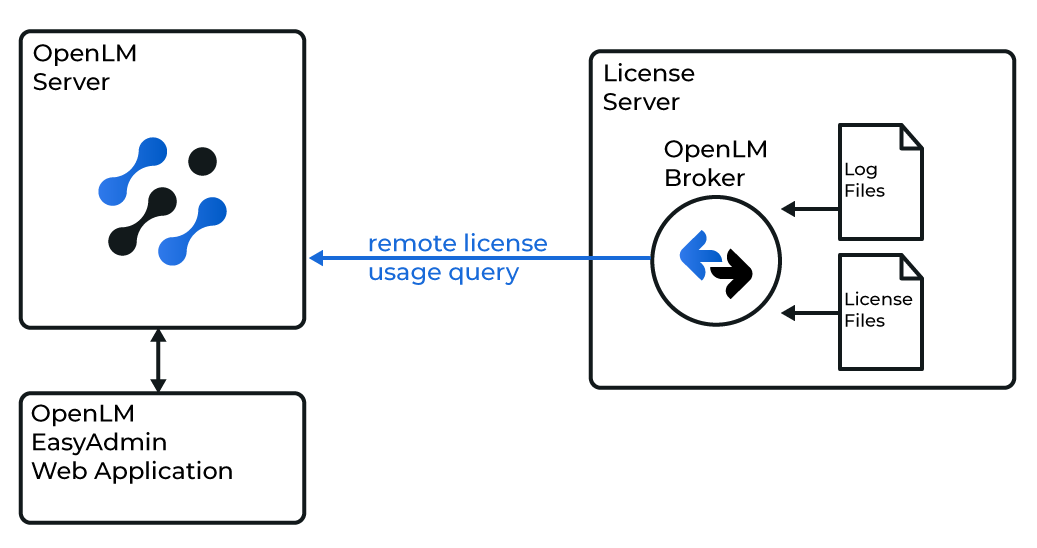
Broker interfacing with FlexLM logs and license files
Benefits of using Broker
- License usage statistics with 1-second resolution
- Buffered, robust communication with the server
- Borrowed license tracking
- Denial reporting
- License pools, node-locked, and named users monitoring
- Packaging details
- Automatic maintenance of options files
- Remote import/export of license and log files
Broker installation
Download and install the latest OpenLM Broker.
Broker configuration
Automatic detection
- Open Broker.
- Select Detect.
If the FlexLM service is running, Broker will configure the port and utility path automatically.
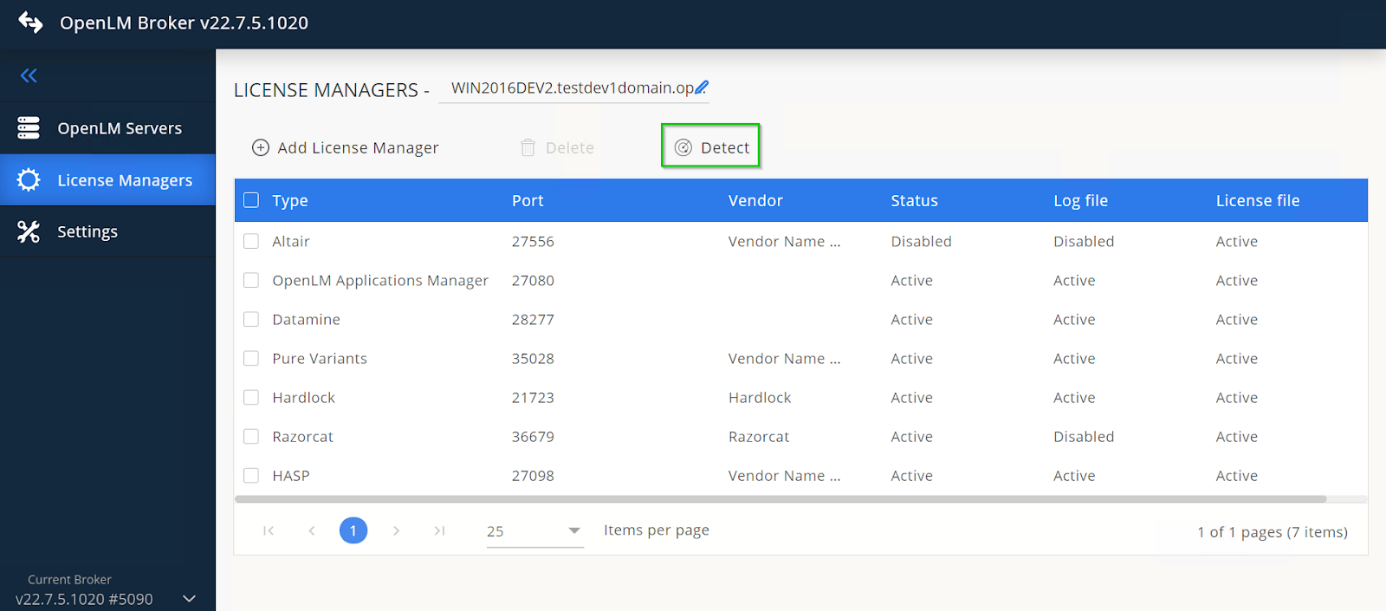
Automatic Broker detection
Auto-detection may not configure everything correctly. If needed, continue with manual configuration.
Manual configuration
-
Select Add License Manager.
-
Enter the Port number.
-
Select FlexLM as license manager type.
-
Select Add.
-
In Settings, add the license file path.
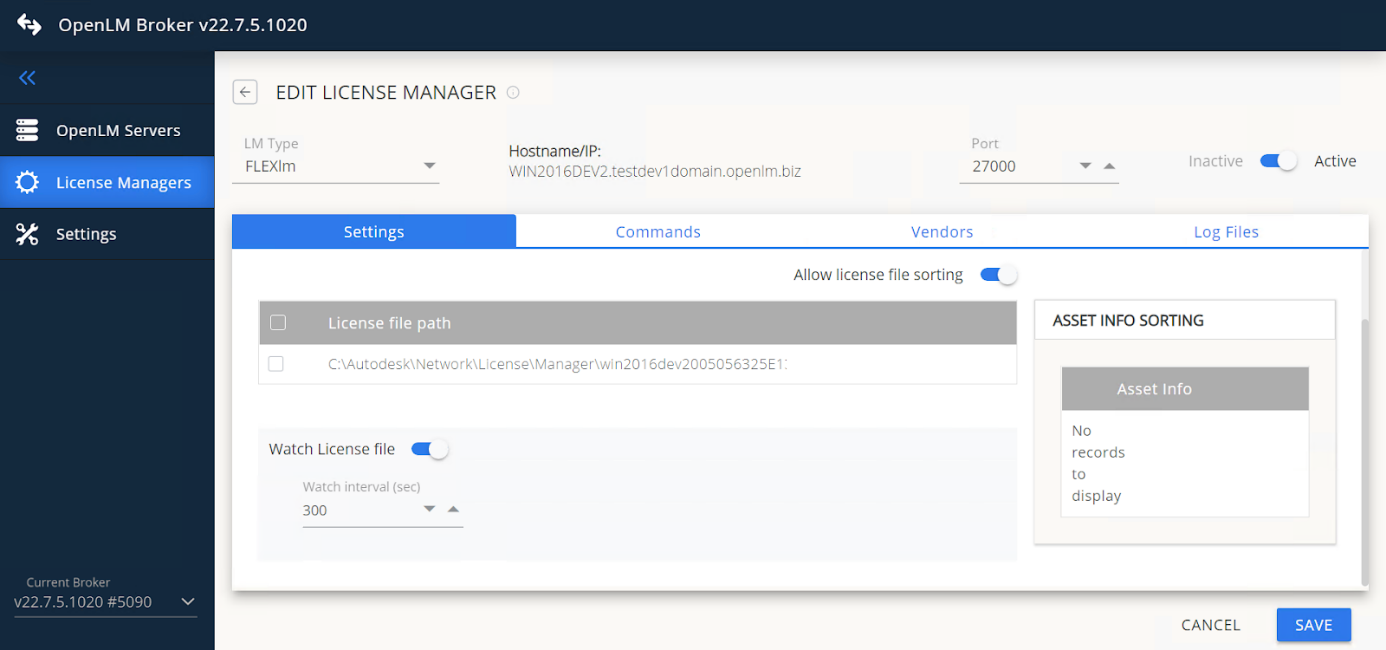
-
In Commands, verify the correct path and select Execute.
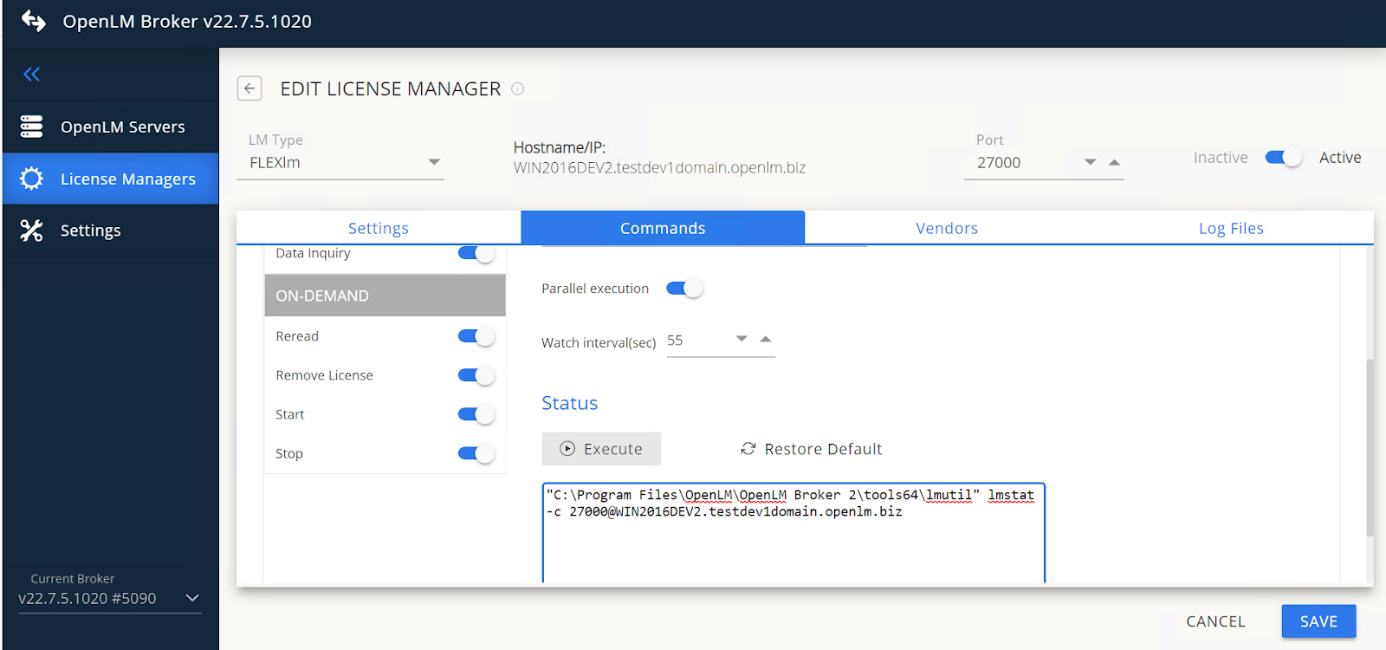 tip
tipOn some installations,
lmutilis in a different folder. If so, update the data_inquiry node manually. -
(Windows only) If FlexLM runs as a service, activate Use OS start/stop commands and enter FlexLM License Manager.
-
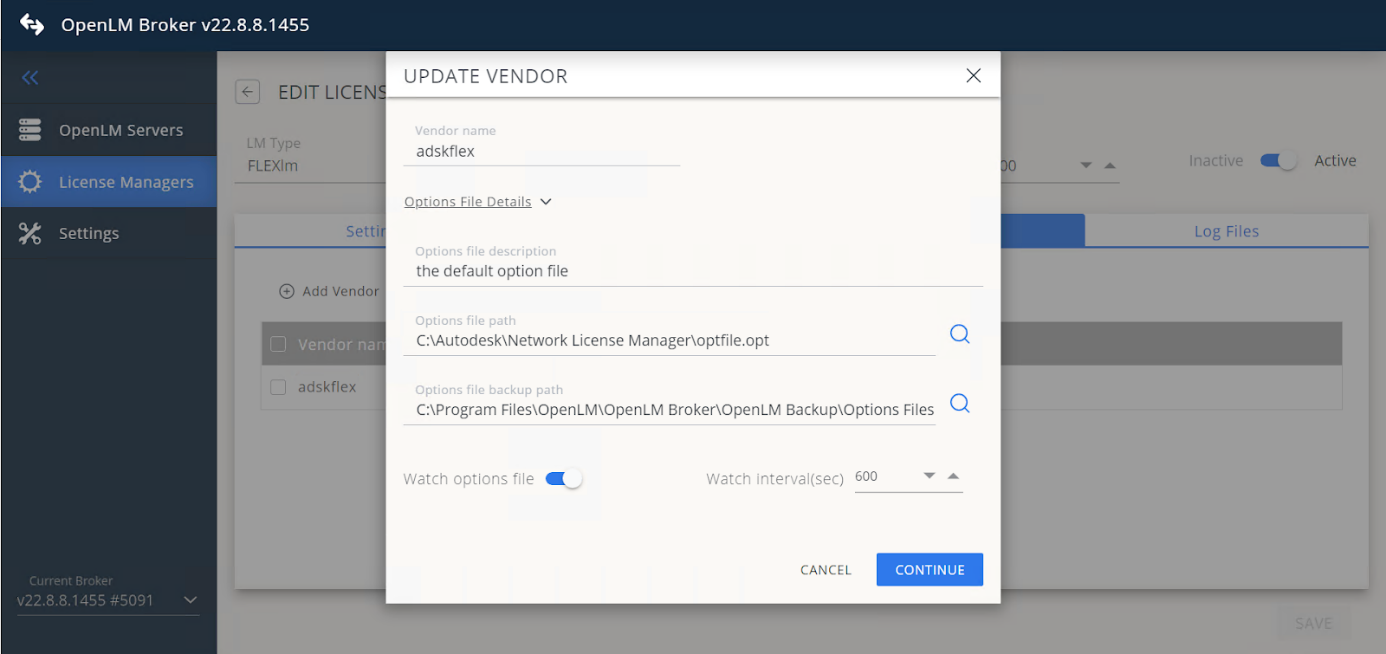
In Vendors, select Add Vendor (for example,
adskflex). -
Expand Options File Details to configure file path and backup.
-
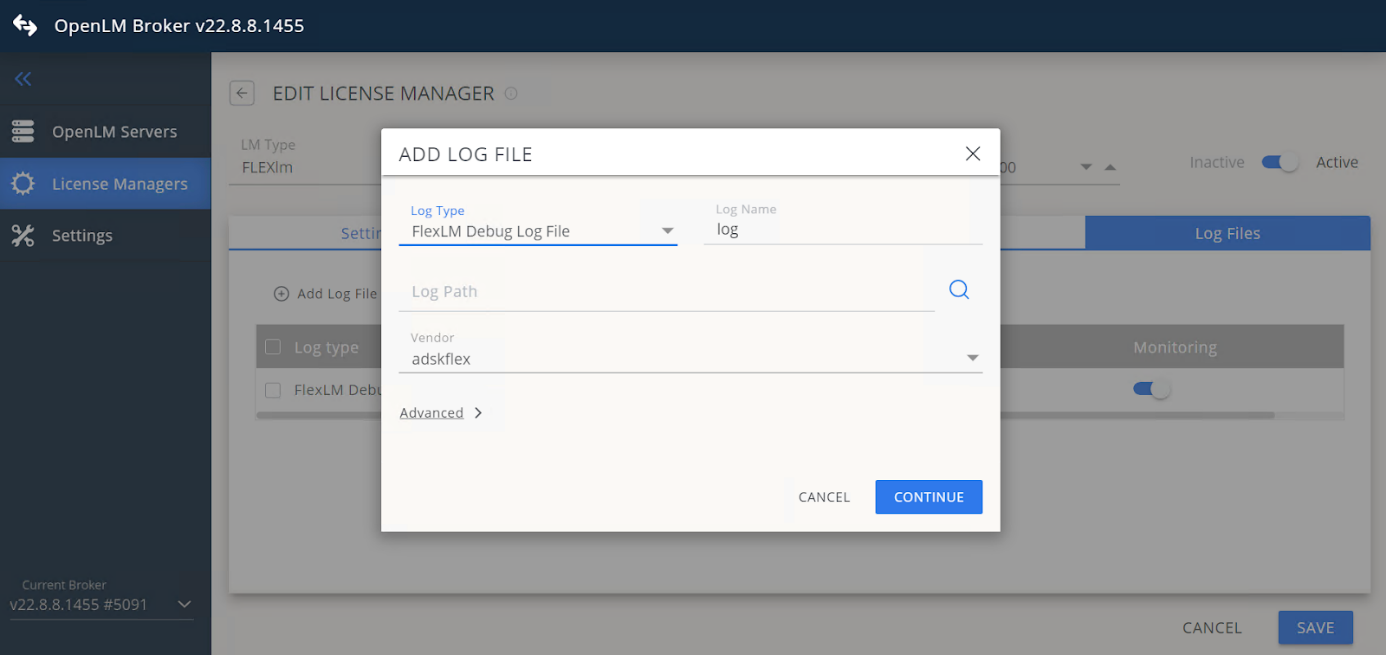
In Log Files, select Add Log File.
-
Select FlexLM Debug Log File and set the path.
-
Save the configuration.
OpenLM Server configuration
Once Broker is configured, it sends data to OpenLM Server.
Automatic configuration
- Open EasyAdmin.
- Go to License Servers.
- Double-click the new FlexLM server entry.
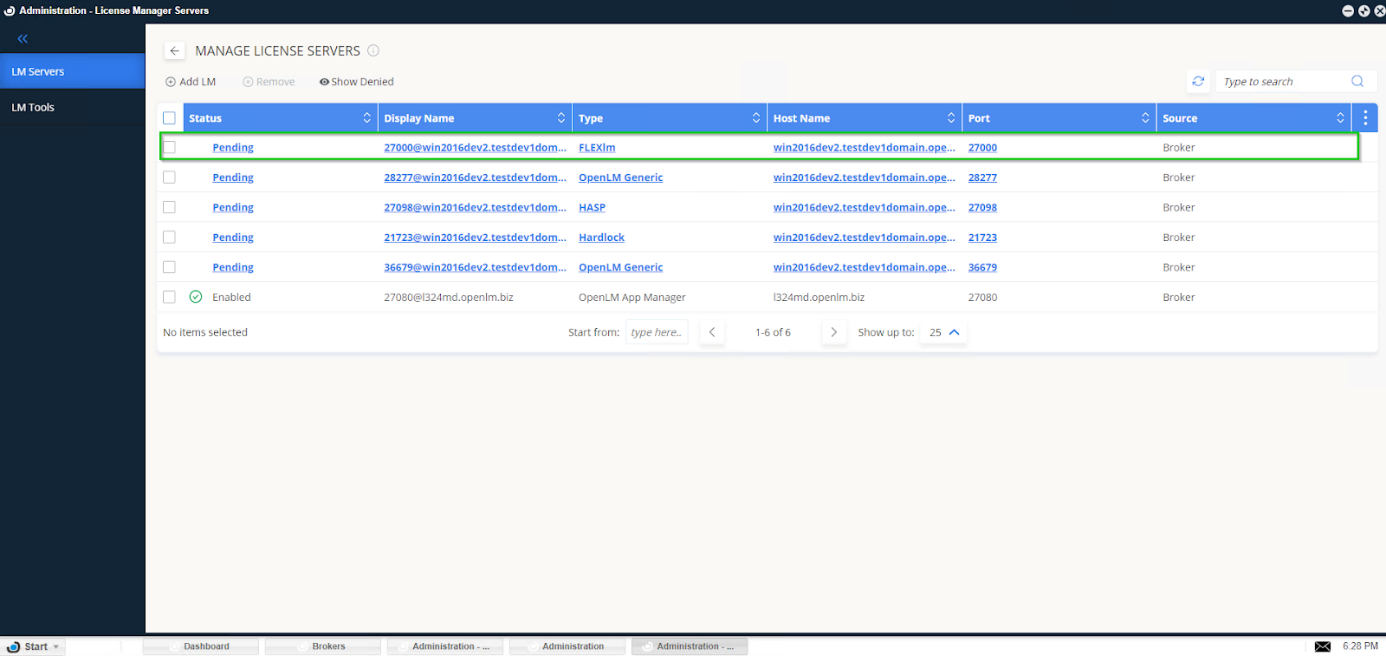
- Select Approve.
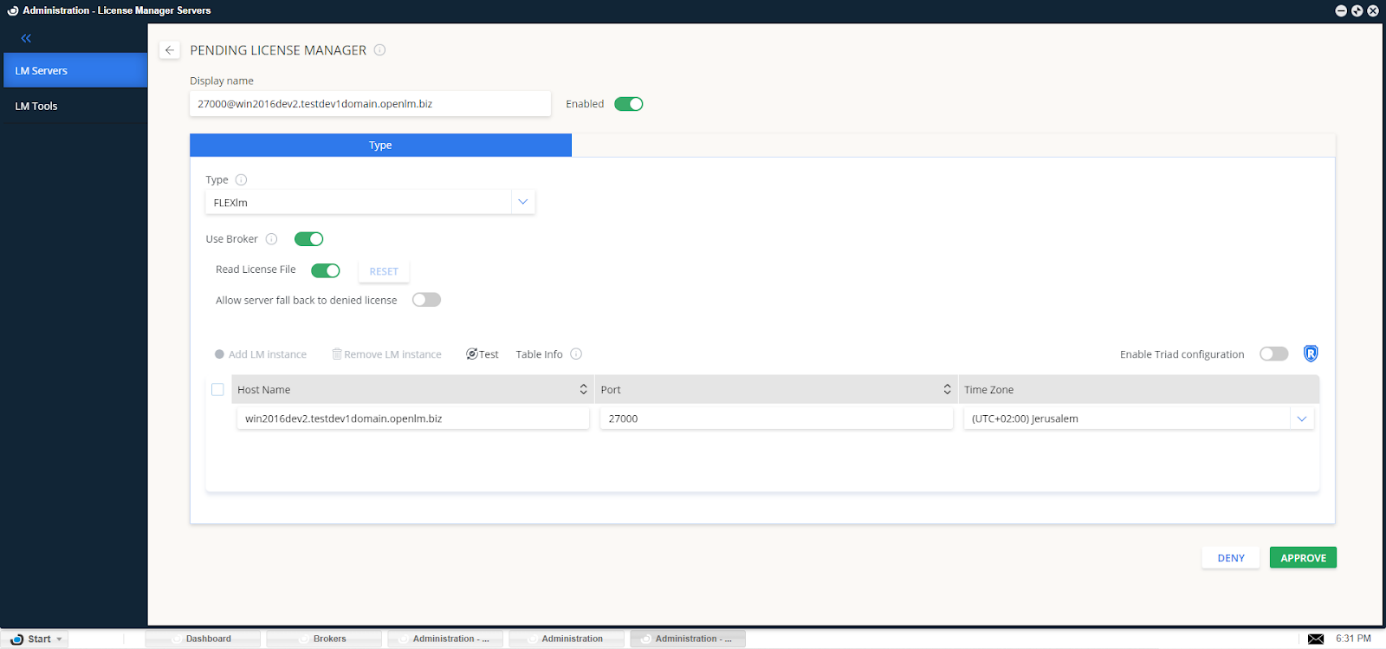
FlexLM configuration approved in EasyAdmin
The FlexLM server is now monitored through Broker and usage data is available in EasyAdmin.
When using FlexNet Publisher
- FlexNet Publisher does not use
lmutil.exeandlmgrd.exe.
Use the defaultlmutilprovided with Broker:
C:\Program Files\OpenLM\OpenLM Broker\tools64\lmutil.exe. - Set the main license manager port (default: 27000) instead of the vendor port.
Multiple-pool license files
OpenLM can distinguish between:
- Floating licenses
- Named licenses
- Node-locked licenses
For details, see Multiple FlexLM license pool monitoring.
Importing and uploading license files
With EasyAdmin you can:
- Import options files, log files, and license files from remote servers
- Edit and upload them back
- Restart or re-read the license server
For details, see Uploading and downloading files from license server.
Options file management
OpenLM provides options file management features:
- Edit and apply license allocations and restrictions through EasyAdmin
- Sync with Active Directory to keep options files updated
- Import users and groups through options files
See:
Monitoring license borrowing
License borrowing ties a license to a workstation for offline use.
OpenLM shows borrowed license data in EasyAdmin → License Servers.
Verifying FlexLM configuration
- Open EasyAdmin.
- Go to Start → Widgets → License Servers.
- A green circle means the server is connected.
- Check Start → Reports → Denials for license denials.
Denials are logged only after Broker is configured with a debug log. They are not available retroactively.