tNavigator
Follow these steps to configure OpenLM to monitor license usage and retrieve statistics from the tNavigator License Manager.
Requirements
Before starting, make sure you have:
- OpenLM SLM v2x installed on a machine in your organization
- OpenLM Broker v23.8 or higher installed on the same machine as the tNavigator License Manager
Monitoring capabilities
| Feature | Resolution | License totals | License usage | Denials | Borrowing | Expiration date | Redundancy |
|---|---|---|---|---|---|---|---|
| Support | By second | ✔ | ✔ | ❌ | ❌ | ✔ | ❌ |
OpenLM Broker configuration
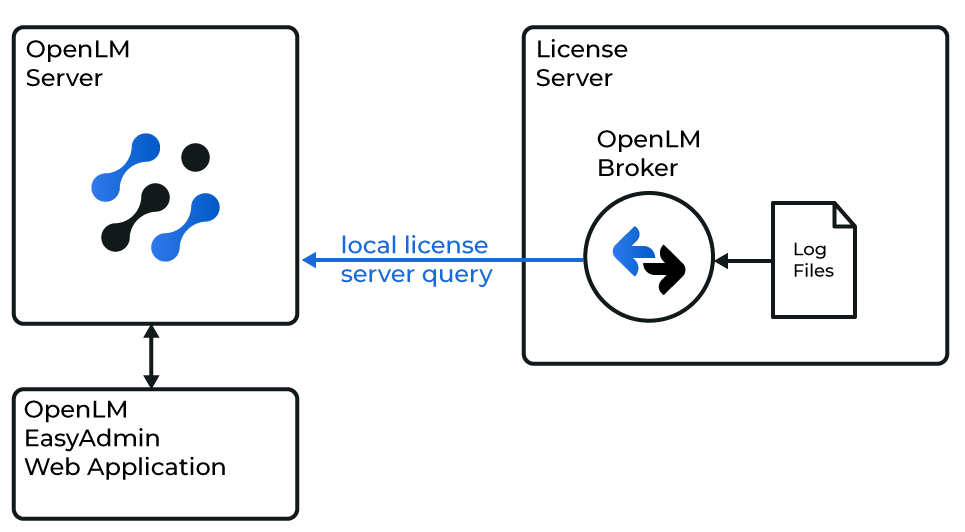
Diagram of how OpenLM interfaces with the tNavigator License Manager
note
OpenLM Broker must already be installed and configured to report to OpenLM before proceeding.
- On the tNavigator license manager machine, open the Broker web UI at
http://localhost:5090/. - Go to License Managers → Add License Manager.

- Select tNavigator from the drop-down list and enter the port number. Select Add.
- In the Commands tab, browse to or type the installation path of the tNavigator License Manager.
- Select Execute to verify there are no errors.
- Go to Vendors → Add Vendor. Enter
tNavigatorand select Continue. - Go to Log Files → Add Log File. Browse to the tNavigator log file location, turn Watch File by Pattern on, and select Continue.
- Select Save.
OpenLM Server configuration
Automatic configuration through EasyAdmin
- Open EasyAdmin at Windows Start → OpenLM → OpenLM EasyAdmin User Interface → Start → Widgets → License Manager Servers.
- Select the Servers pending approval icon.
- Select the tNavigator entry (displayed as OpenLM Generic).
- Optionally, enter a descriptive name (for example,
tNavigator) and ensure Enabled is on. - Select Approve.
The tNavigator License Manager will be added automatically and will begin reporting shortly.
Verify your configuration
- Open EasyAdmin.
- Go to Start → Widgets → License Servers.
- Confirm the tNavigator License Manager appears in the list with a green status circle.
note
It may take up to 3 minutes for a new connection to display as active.